Category Archives: Vegan

How To Make Almond Milk ( Step By Step )

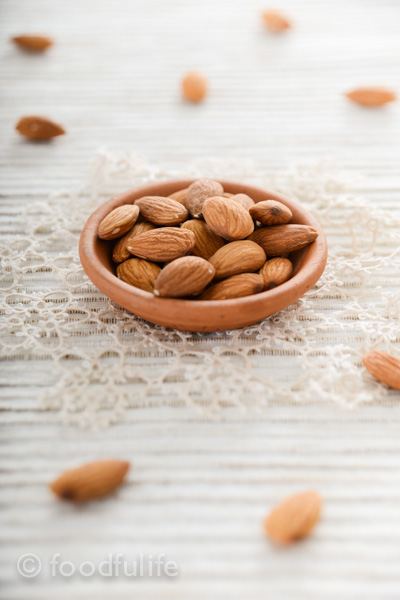
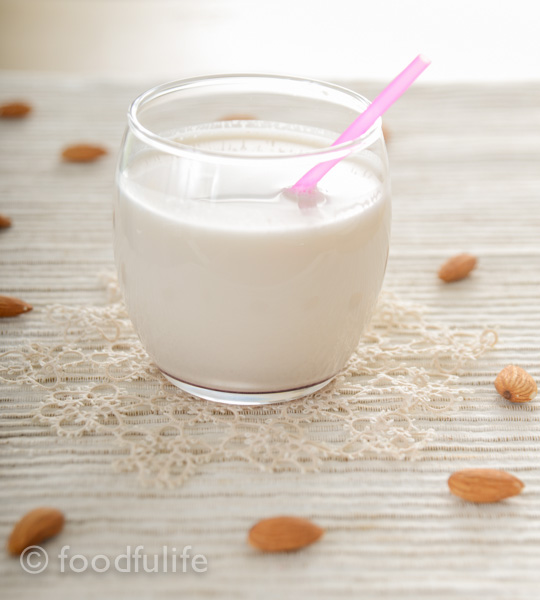
Rich in calcium, antioxidants and vitamin E, almond milk is a wonderful healthy drink, widely used in vegan recipes… And today we are going to make it from scratch!

This recipe is very easy to prepare, it doesn’t require any fancy equipment and is quite quick to make! As you’ll see in the recipe method, we are basically going to separate the almond pulp from the juice, in order to extract the milk.

How to make almond milk, foodfulife.com

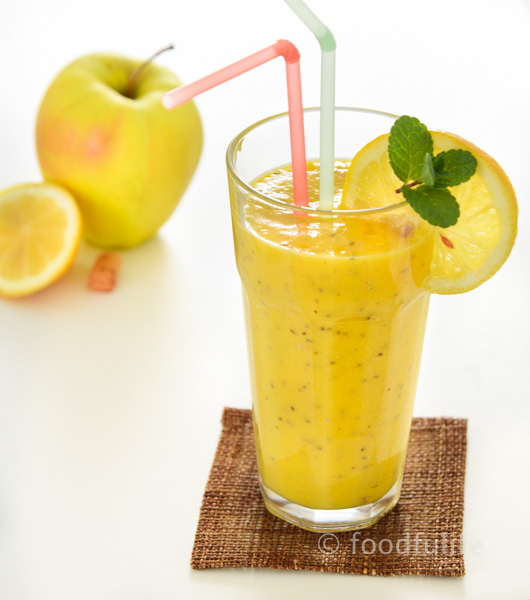
Almond milk is another incredibly versatile ingredient, as it can be used in the preparation of smoothies and can replace dairy products in many recipes, both sweet and savoury; while the almond paste, obtained during the process, can be used in cake and biscuit recipes.

How to make almond milk, foodfulife.com

Almond milk (basic recipe).

Soaking: 30 minutes

Preparation time: 20 minutes

Ingredients

for 1 bottle (1 l.)

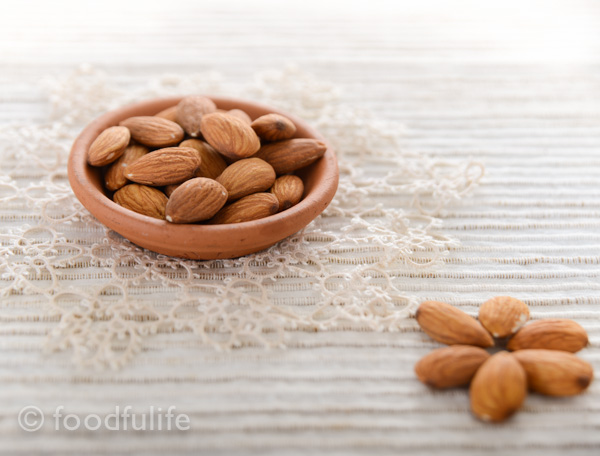
100 g of raw shelled almonds (better unpeeled)

1 l. of water

a few ice cubes

a pinch of salt

You need

1 blender

1 bowl

1 funnel

1 glass bottle

1 strainer

a cloth (like a cotton napkin)

DSC_3633

Note.

To make a slightly sweeter almond milk you can add 3 boneless dry dates and blend them with the almonds, then sift everything, as described in the recipe.

Method.

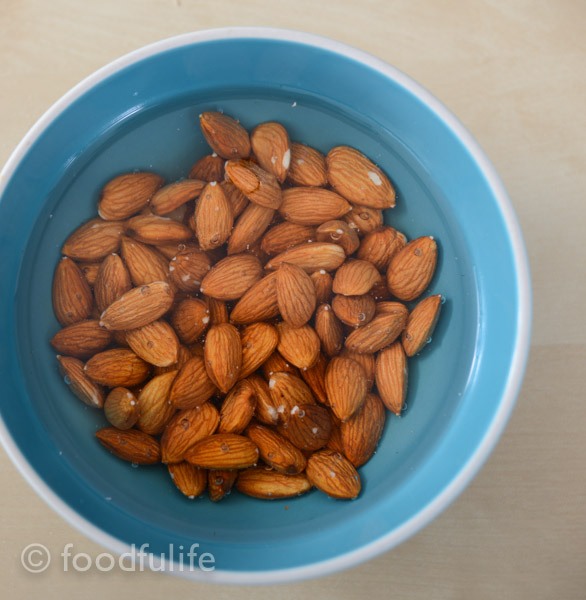
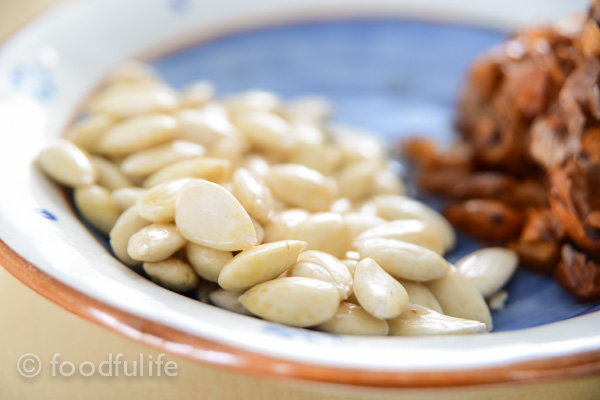
1. Place the almonds in a bowl and fill with 200 ml of hot water. Soak the almonds in the water for 30 minutes, then drain (keep the soaking water, you’ll need it later!) and remove the skin from the almonds.

DSC_3636

How to make almond milk, foodfulife.com

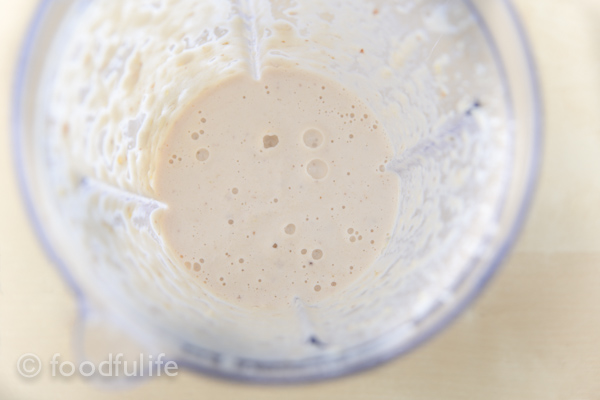
2. In a blender, blend the almonds with a few ice cubes and then gradually add the soaking water (this will preserve part of the substances contained in the almond skin). Blend everything, until you have a creamy mixture.

How to make almond milk, foodfulife.com

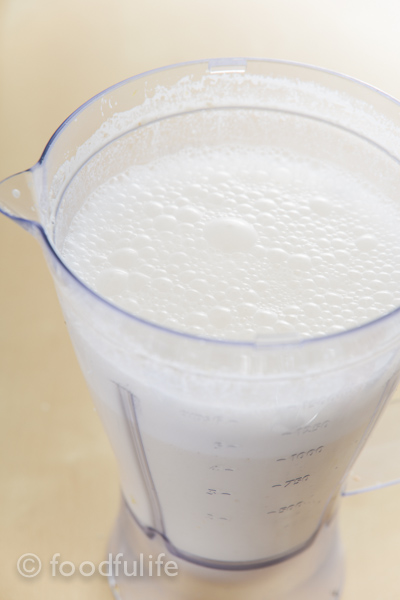
3. Pour in 800 ml of water, add a pinch of salt and blend for a few more minutes.

How to make almond milk, foodfulife.com

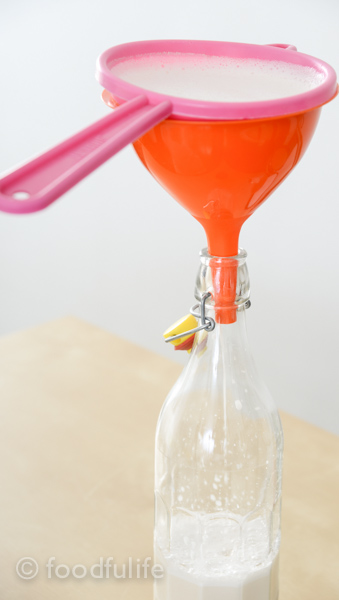
4. Using a funnel and a strainer, sift the mixture and pour the milk into a bottle. Use a cloth (or a cotton napkin) to squeeze all the juice out of the almond paste.

How to make almond milk, foodfulife.com

5. Put the lid on the bottle and place the milk in the fridge. Use within three days.

How to make almond milk, foodfulife.com

Method variation.

In the method described above, we soak the almonds in hot water, in order to soften the pulp and remove the skin (this method is particularly useful if you want to use the pulp in another recipe). However, you can soak the almonds for 30 minutes in cold water, instead, and then blend them with the skin. Then you have to strain the almonds with a strainer through a cloth, pressing the mixture with a spatula. This process might take a little longer, but it’s better if you want to make sure you use raw almonds.

You can flavour your almond milk with honey, maple or agave syrup, vanilla extract, cocoa powder…You choose!

Latte di mandorla (ricetta base)

tempo di riposo: 30 minuti

tempo di preparazione: 20 minuti

Ingredienti

Per una bottiglia (da 1 litro)

100 g di mandorle sgusciate (meglio non pelate)

1 l. d’acqua

qualche cubetto di ghiaccio

un pizzico di sale

cosa serve

1 frullatore

1 ciotola

1 imbuto

1 bottiglia di vetro (da un litro)

1 colino a maglie fitte

un tovagliolo di cotone (oppure un canovaccio)

Nota.

Per rendere più dolce il latte di mandorla potete aggiungere 3-4 datteri (senza seme) e frullarli insieme alle mandorle, poi filtrate tutto, come descritto nella ricetta.

Preparazione.

1. Mettete le mandorle in una ciotola e ricoprite con 200 ml d’acqua bollente. Fate riposare per 30 minuti circa, poi scolate (mettete il liquido d’ammollo da parte) e spellate le mandorle.

2. Mettete le mandorle con qualche cubetto di ghiaccio nel frullatore e incominciate a frullare, versando a filo l’acqua dell’ammollo (questo per dare sapore e conservare parte delle sostanze contenute nella buccia). Continuate a frullare fino ad ottenere una cremina senza grumi.

3. Versate nel composto cremoso 800 ml di acqua con un pizzico di sale e frullate ancora per qualche minuto.

4. Utilizzando un imbuto e un colino, filtrate il composto e versate il liquido in una bottiglia. Dopo aver filtrato tutto il liquido, strizzate bene la polpa di mandorle con un tovagliolo.

5. Mettete la bottiglia con il latte di mandorla in frigorifero e consumate la bevanda entro tre giorni.

Una variante della preparazione.

Nel metodo descritto qui sopra, utilizziamo l’acqua calda per rimuovere con facilità la pellicina e ammorbidire le mandorle (questo metodo è particolarmente indicato se si vuole riutilizzare la polpa ottenuta dalle mandorle in altre ricette). Come variante, potete immergere le mandorle in acqua fredda per 30 minuti e poi frullarle con la loro pellicina. In questo caso, dovrete filtrare bene il composto attraverso un panno e un colino, premendo con una spatola per accelerare il processo. Questo metodo richiederà un po’ più di tempo, ma è meglio, se volete essere sicuri di utilizzare mandorle crude.

How to make almond milk, foodfulife.com

Quick And Easy: Mango And Apple Smoothie

Apples and mango.

Packed with vitamins and minerals (vitamins A, C and calcium, to name a few) and enriched with all the nutrients contained in the chia seeds (rich in vegetable proteins and omega 3), this smoothie is not just sunshine in a glass but a proper energy booster!

…And it tastes better than any dessert that you can ever imagine!

DSC_3411

Mango And Apple Smoothie.

Easy

Preparation time:10 minutes

Serves 4

2 ripe mangoes

2 sweet apples (I used golden delicious apples)

400 ml of almond milk

the juice of a lemon

ground cinnamon to taste

2 tablespoons chia seeds

a handful of ice cubes (optional)

To garnish

4 slices of an organic lemon

grated lemon zest to taste

colourful straws

Method.

1. Peel the apples and skin the mangoes, then remove the stem, seeds and the stone from the fruits. Chop roughly.

2. Add the juice of a lemon and blend the fruit using a food processor, then add the almond milk, the chia seeds, a few ice cubes (optional) and the cinnamon. Blend everything well.

3. Pour in 4 tall glasses, then garnish each glass with a slice of lemon, 2 colourful straws and add some lemon zest on top.

I hope you enjoyed my first smoothie recipe! 🙂

DSC_3439

DSC_3420

Frullato di Mango e Mela.

Facile

Tempo di preparazione: 10 minuti

Serve 4

2 manghi maturi

2 mele golden (oppure le dolci mele che preferite)

400 ml di latte di mandorla

il succo di un limone

cannella in polvere q b

2 cucchiai di semi di chia

una manciata di cubetti di ghiaccio (facoltativo)

per guarnire

4 fette di limone (non trattato)

la scorza grattugiata di un limone (non trattato)

cannucce colorate

Preparazione.

1. Sbucciate, pulite e tagliate le mele e i manghi (rimuovendo i semi e parti indesiderate), poi mettete nel frullatore.

2. Unite ai pezzi di frutta il succo di un limone e frullate bene.  Aggiungete al composto anche il latte di mandorla, i semi di chia, alcuni cubetti di ghiaccio (facoltativo) e la cannella. Frullate bene tutto, per qualche minuto.

3. Versate il composto in 4 bicchieri alti; quindi guarnite ogni bicchiere con una fetta di limone, poi aggiungete le cannucce colorate e un po’ di scorza di limone.

Chickpea Flour Bread With Pumpkin Seeds

DSC_2782

This is a delicious bread, made partially with chickpea flour, which is a rich source of  vegetable protein and has a low carbohydrate content. I’ve developed this recipe in order to create a delicious bread to be served with a light onion soup, a tasty combination for a balanced meal that will warm you up nicely during the festive season.

DSC_2820

As usual, I’ve included you all the directions you need to make the recipe using normal yeast or sourdough. If you use sourdough you can prepare the sourdough starter the night before and let it rise overnight. Then in the morning (or afternoon) you can follow the recipe as written below.

Chickpea flour bread (quickest method with normal yeast)

Cooking time: 25-30 minutes

Preparation time: 20 minutes + the rising time

Ingredients

2 small breads (4 servings)

150 g chickpea flour

150 g whole spelt flour

300 g plain flour

18 g yeast

a little brown sugar

10 g salt

water

For garnish

a handful of shelled pumpkin seeds

Method (with yeast).

1. Make the yeast starter. Mix the yeast with a little bit of warm water, then add two tablespoons of flour and a pinch of brown sugar. Make a small dough, then let double in volume.

2. Separately, mix the rest of the flour with 10 g of salt and enough water to make the bread dough. Add the yeast starter and knead well.

3. Slash an X cut on the surface and then let the dough rise until it has doubled in volume (at least 2 hours).

DSC_2745

4. Divide the dough into two equal parts, then shape two breads. Slash an X cut on both breads and garnish with the pumpkin seeds (possibly, let rise for another 30 minutes).

DSC_2748

5. Line the base of an oven tray with baking paper, then grease with a little extra virgin olive oil and dust with flour. Bake at 200 ° C (392° F) for 25-30 minutes.

DSC_2775

DSC_2783

DSC_2807

Chickpea flour bread with sourdough

Cooking time: 25-30 minutes

Preparation time: 20 minutes + the rising time

2 small breads (4 servings)

150 g chickpea flour

50 g whole spelt flour

270 g plain flour

10 g salt

water

For garnish

a handful of shelled pumpkin seeds

For the starter (to be prepared the night before).

50 g sourdough (I used a semi-solid sourdough made with plain organic flour)

100 g of whole spelt flour

a little of brown sugar

a little bit of water

Make the starter.

Mix 100 g of whole spelt flour with 50 g of sourdough and a little water, then cover with some cling film and let stand overnight.

Method (with sourdough).

1. In a large bowl, mix the rest of the flour with 10 g of salt and enough water to make a soft dough.

2. Combine the dough with the sourdough starter and then add some flour, but only if necessary (the dough shouldn’t be too sticky or dry).

3. Slash a big X on the surface of the dough, cover with a cloth and let stand in a warm place until the dough has doubled in volume (3 to 6 hours, depending on the sourdough strength).

4. Divide the dough into two equal parts and shape the breads, then slash an X on the surface and let rise once more.

5. Garnish the breads with the pumpkin seeds and bake at 200 ° C (392° F) for 25-30 minutes.

DSC_2784

DSC_2810

DSC_2813

See also the Farinata recipe (a delicious focaccia made with chickpea flour)

Pane con farina di ceci (preparazione con lievito di birra)

Tempo di cottura: 25-30 minuti

Tempo di preparazione: 20 minuti + il tempo di lievitazione

Ingredienti

Per 2 panini grossi (per 4 persone)

150 g di farina di ceci

150 g di farina di farro integrale

300 g di farina 00

18 g di lievito di birra

pochissimo zucchero di canna

10 g di sale

acqua q. b.

Per guarnire

una manciata di semi di zucca (senza buccia)

Preparazione dell’impasto con lievito di birra.

1. Sciogliete il lievito di birra in poca acqua tiepida, poi aggiungete due cucchiai di farina e un pizzico di zucchero di canna ; quindi mescolate fino a creare un panetto morbido e lasciate raddoppiare di volume.

2. A parte, mischiate le farine con il sale e aggiungete gradualmente l’acqua, fino ad ottenere un impasto uniforme. Incorporate il panetto di lievito e lavorate bene.

3. Fate un taglio a croce sulla superficie e poi fate lievitare l’impasto per 2 ore.

4. Dividete l’impasto in due parti uguali, date la forma a due panini (vedi le foto) e decorate con i semi di zucca (sarebbe meglio far lievitare per altri 30 minuti).

5. Ricoprite la teglia con carta da forno, ungete con poco olio d’oliva e infornate il pane a 200° C per 25-30 minuti.

Pane con farina di ceci (preparazione con lievito madre)

Tempo di cottura: 25-30 minuti

Tempo di preparazione: 20 minuti + il tempo di lievitazione

Ingredienti

Per due panini grandi ( 4 persone)

150 g di farina di ceci

50 g di farina di farro integrale

275 g di farina 00

10 g di sale

acqua q. b.

Per guarnire

una manciata di semi di zucca (senza buccia)

Per il panetto di lievito (da preparare la sera prima).

50 g di lievito madre (uso un lievito semisolido con base di farina biologica 00)

100 g di farina di farro integrale

pochissimo zucchero di canna

acqua q. b.

Preparazione del panetto di lievito.

Mescolate 100 g di farina di farro con 50 g di lievito madre e  poca acqua; quindi ricoprite con una pellicola e lasciate riposare per tutta la notte.

Preparazione dell’impasto con lievito madre.

1. In una ciotola grande, mischiate le farine con il sale e l’acqua necessaria per ottenere un impasto liscio e morbido.

2. Unite il lievitino al resto dell’impasto, aggiungendo un po’ di farina se necessario (l’impasto non deve risultare troppo umido).

3. Fate un taglio a croce sulla superficie, poi ricoprite  con un panno e lasciate lievitare l’impasto fino a quando sarà raddoppiato di volume (generalmente dalle 3 alle 6 ore, ma dipende dal lievito madre).

4. Dividete l’impasto in due,  date la forma a due panini (vedi le foto) e poi fate lievitare ancora.

5. Guarnite il pane con i semi di zucca e infornate a 200°C per 25-30 minuti.

Vedere anche la ricetta della Farinata

Light And Tasty Onion Soup With Chickpea Bread

DSC_2827

This week we are going to prepare a delicious and easy to make onion soup, served with a wonderful chickpea bread, especially made for this recipe. A meal so light and tasty that it could easily be considered comforting as well as healthy!

This soup is really well complemented by the chickpea bread (see the recipe), which is a good source of proteins and keeps the meal light and nicely balanced! The perfect winter dish to enjoy by the fire!

Enjoy!

DSC_2796

DSC_2724

Light onion soup (zuppa di cipolle)

Preparation time: 10 minutes

Cooking time: 40 minutes

Ingredients

For 4 servings

1 kg of onions of your choice

extra virgin olive oil

salt and pepper (use plenty, because onions are naturally quite sweet)

DSC_2719

Method.

1. Slice the onion and fry them in extra virgin olive oil.

DSC_2738

2. Using a large pan, cover the onions with water and cook until tender.

DSC_2766

3. With an immersion blender, puree the onions until you get a smooth and creamy mixture.

DSC_2768

4. Drizzle with extra virgin olive oil, season with salt and pepper, then serve with the chickpea bread!

DSC_2793

DSC_2802

DSC_2806

See also the pasta e fagioli recipe (another delicious winter dish!).

Zuppa di leggera cipolle

Tempo di preparazione: 10 minuti

Tempo di cottura: 40 minuti

Ingredienti

Per 4 persone

1 kg di cipolle di vostra scelta

olio extra vergine d’oliva q. b.

sale e pepe (abbondate perché le cipolle sono naturalmente dolci)

Preparazione.

1. Sbucciate e affettate le cipolle, poi fatele soffriggere in olio extra vergine d’oliva.

2. Riempite la pentola d’acqua, fino a ricoprire tutte cipolle; quindi fate cuocere, a fuoco moderato e con il coperchio, per 30-35 minuti.

3. Usando un frullatore ad immersione, frullate le cipolle fino ad ottenere un composto cremoso.

4. Condire con olio extra vergine d’oliva e abbondante sale e pepe. Servite la zuppa calda con del pane di farina di ceci.

DSC_2729

Traditional Recipe: La Farinata Genovese (Genoese Socca)

Basically made from 3 ingredients (chickpea flour, olive oil and water), la farinata, or socca (as it is called in Nice), is a kind of chickpea focaccia, which doesn’t contain gluten and is dairy free.  It is quite easy to prepare and it’s perfect for vegan and vegetarian diets, because it is a good source of proteins.

DSC_2043

Before getting the method and recipe right it might take a few tries, especially when it comes to finding the right balance between the ingredients. It might requires a lot of olive oil in order to become crispy on the outside and creamy on the inside, as it should be.
The farinata is traditionally only a few millimetres thin (see the pictures).

A few tips.
The ideal cooking method would also require a high temperature oven, like a wood stove, however, a good oven will do. Remember to use non-stick baking trays or baking paper.
The farinata has to be served quite hot, freshly made, otherwise it will become elastic and not very nice to eat. If you have leftovers, you can reheat the farinata in the oven the day after.

The farinata can also be enriched adding different ingredients; amongst the local most popular variations, you’ll find the onion and the artichoke farinata, also quite easy to make.

DSC_2051

Farinata could be a delicious starter or aperitif, but it is also a wonderful meal when served with a nice big salad on the side.

La farinata di ceci (Genoese socca)

Ingredients

for 3 rounded backing trays (28 cm in diameter)

1,5 litre of water

500 g chickpea flour

200 ml extra virgin olive oil

salt and pepper to taste

Method.

1. In a large bowl, vigorously whisk 1,5 litre of water with 500 g. of chickpea flour, 100 ml olive oil and some salt. Once all the ingredients are mixed well, let sit for at least 5 hours (but 10 hours would be better, so the flour can absorb the water well).

DSC_1994

2. After the resting time, remove the froth formed on the surface of the mixture with a spoon.

DSC_1997

3. Pour some extra virgin oil on a non-stick baking tray, then with a ladle add 1/3 of the mixture and season with salt and pepper.

DSC_2009

DSC_2007

4. Bake the farinata at 220°C / 428°F (or higher) until golden, then turn on the grill and cook for a little longer, in order to get a nice crispy crust on top. Remove from the oven and serve hot.

DSC_2013

DSC_2049

DSC_2056

Also see Chickpea flour bread recipe

La farinata di ceci.

Ingredients

Per 3 teglie rotonde di 28 cm di diametro

1,5 l d’ acqua

500 g di farina di ceci

sale e pepe q.b.

200 ml di olio extra vergine d’oliva

Preparazione.

1. In una ciotola grande, mescolate energicamente con una frusta 1, 5 l di acqua, 500 g. di farina di ceci, 100 ml di olio e un po’ di sale. Una volta amalgamati bene gli ingredienti, lasciate riposare per almeno 5 ore (sarebbe meglio 10 ore, per far assorbire bene l’acqua).

2. Passato il tempo necessario, togliete con un cucchiaio la schiuma formata in superficie.

3. Versate un po’ d’olio su una teglia antiaderente, poi con un mestolo aggiungete il composto liquido (non troppo perché deve restare sottile) e condite con sale e pepe.

4. Infornate a 220° C per una decina di minuti, poi accendete il grill e lasciate che si formi una crosta croccante. Sfornate e servite!

DSC_2047

DSC_2030

Vedi anche la ricetta del Pane con farina di ceci e semi di zucca

Focaccia Rustica Alle Cipolle (Rustic Onion Focaccia)

This is another popular version of the Focaccia Alla Genovese. This onion focaccia comes from a traditional recipe, but here I am making my own adaptation, using different flours and not just plain flour (we use plain flour in the traditional recipe).

In fact, for this recipe I am preparing a dough mixing plain flour, semolina flour and spelt flour in equal parts.  It is quite a rustic focaccia, with the addition of the onions that keep the focaccia nicely moist and sweet. It is definitely something to try…

DSC_1563

Focaccia rustica con le cipolle (onion focaccia).

Ingredients

for a medium sized oven tray

150 g plain unbleached flour

150 g whole spelt flour

150 g semolina (durum wheat) flour

14 g yeast

8 g salt (and a pinch of salt to put on top)

extra virgin olive oil

1/2 a glass of water (a small glass!!)

1 large onion, finely sliced

Method.

1. Mix the yeast with some warm water, than add two tablespoons of spelt flour (take two tablespoons from the 150 g of spelt flour mentioned in the ingredient list). Create a starter and let it rise until it doubles in volume.

Note. You can use yeast or make a starter using 50 g of semisolid sourdough (I used plain flour sourdough), a pinch of barley malt, a little bit of water and 100 g of spelt flour). If you are going to use sourdough, let the starter rise over night and then follow the recipe, starting from step 2.

2. Mix the remaining flour, arrange it on a working board (or a table) and create a well in the centre. Add 8 g of salt with a little bit of warm water and combine the ingredients to create a soft dough. Add the starter and work well.

3. Let rise until the dough has doubled in volume.

4. Roll out the dough on a baking tray,previously greased with plenty of extra virgin olive oil and let rise for an hour. When the dough has risen, pressed with your fingers to create regular indents on the surface.

DSC_1546

5. Top with the onion slices, add a little bit of salt and drizzle with extra virgin olive oil.

DSC_1560

6. Bake at 200° C (392°F) until the focaccia is slightly golden. Remove the focaccia from the oven and pour half a glass of water on the surface. Bake again until golden-brown and crisp.

DSC_1570

DSC_1573

DSC_1577

DSC_1581

also see the focaccia alla genovese recipe.

Focaccia rustica con le cipolle.

Ingredienti

per una teglia da forno di media grandezza

150 g di farina 00

150 g di farina di farro integrale

150g di semola rimacinata di grano duro

14 g di lievito di birra

8 g di sale fino (e un pizzico di sale in più, da aggiungere alla fine)

olio extra vergine di oliva q.b.

Mezzo bicchiere d’acqua (un bicchiere piccolo!)

1 cipolla grande, tagliata a fettine sottili

Preparazione.

1. Sciogliete il lievito di birra in poca acqua (tiepida) e aggiungete due cucchiai di farina di farro (prendete i due cucchiai di farina di farro dai 150 g indicati negli ingredienti). Create un panetto e lasciate raddoppiare di volume.

Nota. In questa ricetta è possibile utilizzare il lievito di birra oppure il lievito madre. Se utilizzate il lievito madre, fate un lievitino con 50 g di pasta madre semisolida (io ho usato lievito madre a base di farina 00), un pizzico di malto d’orzo, un po’ d’acqua e 100 g di farina integrale di farro). Lasciare lievitare tutta la notte e poi seguite la ricetta, a partire dal secondo passaggio.

2. Mischiate bene le farine rimaste e disponetele su una spianatoia (oppure su un tavolo). Aggiungete 8 g di sale con un po’ d’acqua tiepida e lavorate fino a creare un impasto morbido. Aggiungete anche il panetto di lievito e lavorate bene.

3. Lasciate lievitare in un luogo riparato, fino a quando l’impasto sarà raddoppiato di volume.

4. Stendete la pasta su una teglia (precedentemente unta con abbondante olio extra vergine d’oliva) e lasciate lievitare per un’oretta. Quando la pasta sarà nuovamente lievitata, pressate con le dita la superficie per creare delle fossette.

5. Ricoprite la focaccia con le fette di cipolla, aggiungete ancora un po’ di sale e irrorate con abbondante olio extra vergine d’oliva.

6. Infornate a 200°, fino a quando la focaccia sarà leggermente dorata. Togliete la focaccia dal forno e versate mezzo bicchiere d’acqua sulla parte superiore, poi infornate nuovamente, fino ad ottenere una focaccia ben dorata e croccante.

Da vedere anche la ricetta della focaccia alla genovese 

Quick And Easy: Chestnut Salad With Apples And Escarole

This week, as promised, I start a series of recipes dedicated to chestnuts. Chestnuts are a wonderful and versatile ingredient, full of fibre, nutrients and vitamins. Basically, they are carbohydrates, but they also contains some good proteins and are gluten-free. These fruits are usually roasted or boiled, sometimes used to enrich salads, stews or soups. Chestnuts flour is also quite popular, often used to make tasty breads and various desserts. Candied chestnuts are also an amazing ingredient when it comes to making desserts, but they are usually quite expensive.

DSC_9980

Today I am publishing a salad with crunchy roasted chestnuts, escarole, pine nuts and apples, packed with vitamins (B1, B2, C etc…) and minerals, to boost the immune system with plenty of flavour and texture!

DSC_0092

Salad with roasted chestnuts, escarole and apples.

Ingredients 

For 4 people

400 g of roasted chestnuts (or boiled, if you prefer) see How to make amazing roasted chestnuts

160 g of escarole or curly-leaved endive, washed and dried

1/2 red onion (optional)

30 g of raisins

40 g pine nuts

2 gala apples, washed and dried

3 tablespoons extra virgin olive oil

the juice of half a lemon

salt and pepper to taste

DSC_0015

DSC_0023

Method.

1. Cut the apples and the escarole leaves. Peel and slice the onion then put it in a cup and fill the cup with water. Leave the onion in the water for 30 minutes and then drain (this operation will make the onion sweeter).

DSC_0149

2. Arrange the escarole leaves on the plates, then add the chopped apples with the raisins, the onion and the pine nuts (divide into 4 servings).

DSC_0163

DSC_0165

3. Peal the roasted chestnuts then  add them to the salad.

DSC_0218

4. Season with 3 tablespoons of extra virgin olive oil, a few drops of lemon juice, salt and pepper.

DSC_0223

DSC_0190

DSC_0174

Insalata di caldarroste, scarola e mele.

Ingredienti

Per 4 persone

400 g di caldarroste (oppure castagne bollite),

per fare le caldarroste seguite questo link:  Come preparare ottime caldarroste a casa

160 g di indivia scarola (oppure indivia riccia) , lavata e asciugata

1/2 cipolla rossa (facoltativo)

30 g di uvetta

40 g di pinoli

2 mele gala, lavate e asciugate

3 cucchiai di olio extravergine d’oliva

il succo di mezzo limone

sale e pepe q. b.

Preparazione.

1. Tagliate le mele e le foglie di scarola. Sbucciate e affettate le cipolle.  Mettete le cipolle a mollo in acqua per 30 minuti (per renderle più dolci), poi scolate.

2. Dividendo in quattro porzioni, sistemate prima le foglie di scarola e poi aggiungete i pezzetti di mele, l’uvetta, la cipolla e i pinoli.

3. Sbucciate le caldarroste e aggiungetele all’insalata.

4. Condite con olio extra vergine d’oliva, qualche goccia di succo di limone, sale e pepe.

DSC_0215

How To Make Amazing Roasted Chestnuts In Your Own Home!

This is the right season to enjoy some crunchy roasted chestnuts! Golden and crunchy, roasted chestnuts are simply delicious!! When my brother and I were kids, my father used to make some roasted chestnuts before bed time….We loved it!

DSC_0128

In this post I’ll share the method to prepare amazing roasted chestnuts directly on the stove, just like my father used to do, but make sure you follow the instructions and you protect yourself with the proper equipment, in order to avoid disasters! :-). If you carefully follow all the steps this method is fairly easy and safe.

DSC_0132

Tip. During the cooking time keep away from the fire as much as possible and wear oven gloves for extra safety.

How to make roasted chestnuts 

Preparation time: 5 minutes

Cooking time:15-20 minutes

Ingredients

500 g of fresh chestnuts

just a small splash good quality white wine (avoid putting the bottle close to the fire when you cook and use it)

What you need.

a gas stove

a frying pan with holes to cook chestnuts (you can buy it or you can make your own, by piercing an old frying pan with a large nail, using a hammer)

a long stainless steel kitchen utensil (don’t use anything with plastic or wood)

Good oven gloves

Preparation.

1. Check, wash and dry the chestnuts.

DSC_0096

2. Using a sharp knife, cut the chestnuts one by one, making a 2cm long incision on the round side (make an X or 1 long cut horizontally, either way it should be fine!).

DSC_0098

DSC_0106

This operation is necessary to release the steam from the nuts while they are cooking and it will also make them easier to peel (If you skip this step the chestnuts will explode during the cooking process, so make sure you cut them properly).

Cooking Method (on the stove).

1. Put the pierced pan with the chestnuts directly on the gas stove over a moderate-high heat. Stir constantly with a long stainless steel kitchen utensil.

2. Roast the chestnuts for about 10 minutes, then add a small splash of white wine (try to keep yourself and the bottle of wine away from the heat, while you do that) and continue to roast and stir for at least 5 more minutes.

DSC_0136

3. Turn off the eat and put the chestnuts in a brown paper bag for a few minutes (this will keep them hot and moist). Peel the chestnuts while they are still hot, because once they are cool they become much more difficult to peel.

DSC_0139

Tip. You can bake the chestnuts at 220° C (428° F) for about 20 minutes, instead of cooking them on the stove top; it’s probably a safer cooking method…However, I prefer the method above, because the chestnuts are much tastier and crunchier, when cooked directly over the flame!

DSC_0108

Roasted chestnuts with roasting pan.

Come preparare ottime caldarroste a casa.

In questo articolo vedremo insieme come preparare delle ottime caldarroste, cotte direttamente sul fornello, proprio come mio padre era solito fare, quando io e mio fratello eravamo bambini.

Seguite attentamente le istruzioni indicate e vedrete che questo è un metodo abbastanza semplice e sicuro.

Nota. Durante la cottura delle caldarroste, per quanto possibile, cercate di stare lontano dal fuoco e indossate dei guanti da forno per protezione.

Preparazione delle caldarroste.

Tempo di preparazione: 5 minuti

Tempo di cottura: 15-20 minuti

Ingredienti

500 g di castagne fresche

un dito di vino bianco di buona qualità (fate attenzione a non avvicinare troppo la bottiglia di vino al fuoco)

L’attrezzatura

un fornello a gas

una padella forata per caldarroste (potete farne una voi forando più volte una vecchia padella, con un chiodo grosso e un martello).

un cucchiaio grande di acciaio con manico lungo (non utilizzate plastica o legno)

guanti da forno

Preparazione.

1. Controllate, lavate e asciugate le castagne.

2. Utilizzando un coltello molto affilato, tagliate le castagne, una ad una, facendo un’ incisione di circa 2 cm sulla parte bombata. Questa operazione è necessaria per fare evaporare l’acqua dai frutti durante la cottura, se no le castagne col calore possono esplodere.

Metodo di cottura (sul fornello)

1. Mettete la padella forata, con le castagne, direttamente sul fornello a fuoco medio. Mescolate spesso, utilizzando un grosso cucchiaio di acciaio con il manico lungo.

2. Fate arrostire le castagne per circa 10 minuti, quindi insaporite con una piccola spruzzata di vino bianco (cercate di tenere la bottiglia di vino lontana dal fuoco). Continuate a cuocere le castagne per almeno altri 5 minuti.

3. Spegnete il fuoco e mettere le castagne in un sacchetto di carta per alcuni minuti (serve a mantenerle calde e umide). Sbucciate le castagne mentre sono ancora calde perché, una volta raffreddate, sbucciarle diventa molto più difficile.

Nota. È possibile cuocere le castagne nel forno a 220 °  C per circa 20 minuti, invece di utilizzare il fornello. Io preferisco cuocerle direttamente sulla fiamma perché, in questo modo, le castagne risultano molto più croccanti e saporite

Traditional Recipe: Roasted Bell Peppers With Garlic Vinaigrette

Bell peppers are delicious, rich in vitamin C and antioxidants and come in a variety of colours. In Italy we usually cook red and yellow peppers and we don’t use green peppers as much, because they are more acidic and bitter in taste. Bell peppers are usually roasted, fried, grilled or stewed with different ingredients. Today we are going to roast the peppers and season them with a light vinaigrette made with extra virgin olive oil, a splash of balsamic vinegar and enriched with fresh herbs and garlic.

Roasted peppers are a very simple but effective appetiser or side dish, I personally really like them and I could eat lots! If you prefer a more complex dish you can use them to make a sauce to complement or season pasta and meat dishes, or simply used them as a tasty ingredient in salads.

DSC_0574

Roasted bell peppers with garlic vinaigrette.

medium difficulty

Ingredients

for 4 people

3 large bell peppers.

DSC_0545

For the garlic vinaigrette.

4 tablespoons of extra virgin olive oil

1 clove of garlic, crushed

1/2 tablespoon of dried oregano

1/2 tablespoon of finely chopped fresh parsley

1 tablespoon of good balsamic vinegar

salt and pepper to taste

Method.

1. Wash and dry the bell peppers.

DSC_0523

2. Roast the whole peppers in the oven at 200°C (392° F ) on a baking sheet (The cooking time will vary depending on the size and thickness of the peppers. When the skin starts darkening slightly and detaching from the flesh, the peppers are ready).

DSC_0531

3. Once the peppers are slightly soft, turn off the oven. Put the hot peppers in plastic bags (or an airtight container) and seal well (In this way, the steam will make removing the skin from the flesh mush easier).

4. Let cool, then remove the pepper from the bag and throw away the water created from the steam. Remove the skin on each pepper, using a small sharp knife.

DSC_0538

5. Slice the peppers vertically into two, then remove and discard the stem and the seeds. Slice each pepper vertically into 8 pieces and serve cold with the garlic and herb vinaigrette.

DSC_0546

DSC_0579

For the vinaigrette.

Mix 4 tablespoons of extra virgin olive oil with the herbs, the garlic and some salt and pepper. Season and serve.

Tip. For extra flavour you can add half a tablespoon of anchovy paste to the sauce.

DSC_0543

DSC_0571

Peperoni arrosto con vinaigrette all’ aglio.

media difficoltà

Ingredienti

Per 4 persone

3 peperoni abbastanza grossi (rossi e gialli)

Per la vinaigrette all’ aglio

4 cucchiai di olio extra vergine di oliva

1 spicchio d’aglio, sbucciato e ben schiacciato

1/2 cucchiaio di origano essiccato

1/2 cucchiaio di prezzemolo fresco tritato

1 cucchiaio di aceto balsamico

sale e pepe q.b.

Preparazione.

1. Lavate bene i peperoni e asciugateli.

2. Mettete i peperoni interi a cuocere in forno a 200° C ( uso una teglia grande ricoperta da un foglio di carta da forno). Il tempo di cottura varierà a seconda della grandeza e dello spessore dei peperoni; quando la buccia si colorirà e si staccherà dalla polpa, i peperoni sono pronti.

3. Mettete i peperoni ancora caldi in un contenitore con il coperchio, poi chiudete bene e lasciate raffreddare (con questo metodo il vapore farà staccare con più facilità la buccia dalla polpa).

4. Aprite e buttate via l’acqua che si è formata per il vapore. Con un coltello, levate la buccia ai peperoni.

5. Tagliate a metà i peperoni e rimuovete la parte interna con i semi. Tagliate ancora i peperoni in verticale fino ad ottenere 6-8 fette lunghe per peperone.

Per la vinaigrette.

Mescolate l’olio extra vergine di oliva con le erbe, l’aglio, il sale e pepe. Condite i peperoni e servire.

Tip. Per insaporire ulteriormente si può aggiungere mezzo cucchiaio di pasta d’acciughe al condimento.

DSC_0588

Traditional Recipe: La Peperonata

DSC_8575

Peperonata is a delicious traditional Italian dish made with yellow and red bell peppers and a few other ingredients. It’s a dish full of character and flavour! It can be a great side dish and it can be a fantastic appetizer, when served with grilled rustic bread, like a bruschetta. The recipe I am publishing this week is my mother’ s peperonata. My mother made a few adaptations to the traditional recipe to achieve a creamier and very tasty dish. Nothing can beat my mother’ s peperonata! So sweet, flavourful and delicate at the same time; it really melts in the mouth!

DSC_8543

While cooking, the onions will melt creating a lovely creamy sauce which works perfectly with the rest of the ingredients. Give it a try, you’ll love it!

Tips. For extra flavour you can use Ketchup instead of tomato paste. The cooking time might vary for the thickness of the peppers.

DSC_8547

La Peperonata.

Ingredients

For 4-6 servings

Easy

Preparation and cooking time: 50 minutes

3 tablespoons extra virgin olive oil

2 large onions, chopped

4 bell peppers (2 yellow and 2 red)

1 tablespoon of capers (possibly in vinegar)

6 good quality pitted green olives

6 good quality pitted black olives

1/2 a tablespoon tomato paste (or tomato ketchup)

white wine (only if necessary)

a handful of pine nuts (optional)

salt and pepper to taste

Method.

1. Cut each pepper into 4 pieces and then slice them horizontally into slices (2 cm thick). Cut also the onions into thick slices.

DSC_8522

2. In a large frying pan, sauté the onion and the peppers with a clove of garlic in 3 tablespoons of extra virgin olive oil.

DSC_8524

DSC_8526

3. Add the capers, the olives​​ and the pine nuts.

DSC_8530

4. Add some tomato paste (or tomato ketchup), then cover and cook for 40 minutes over a low heat (add a little of white wine if it’s too dry). Let simmer until the peppers get really tender.

DSC_8535

5. Remove the lid and let most of the juices evaporate. Season with salt and pepper, then serve (you can serve the peperonata hot or cold).

DSC_8563

La Peperonata.

Ingredienti

Per 4-6 persone

Facile

Tempo di preparazione e cottura: 50 minuti

3 cucchiai d’olio extra vergine d’oliva

2 cipolle tagliate grosse

4 peperoni, due gialli e due rossi

1 cucchiaio di capperi sott’aceto

6 olive verdi

6 olive nere

1/2 cucchiaio di passata di pomodoro (oppure ketchup, per una peperonata più saporita)

vino bianco q. b. (facoltativo)

una manciata di pinoli (facoltativo)

sale e pepe q. b.

Preparazione.

1. Tagliate i peperoni in 4 pezzi e poi a strisce orizzontali. Affettate le cipolle grossolanamente.

2. In una padella grande, fate soffriggere la cipolla, i peperoni e uno spicchio d’aglio tagliato a metà.

3. Aggiungete ai peperoni un cucchiaio abbondante di capperi, 6 olive verdi, 6 olive nere e alcuni pinoli.

4. Aggiungete il concentrato di pomodoro, poi coprite e fate cuocere a fuoco lento per 40 minuti (se occorre aggiungete un po’ di vino bianco).

5. Quasi a fine cottura, levate il coperchio e fate ritirare un po’ il liquido. Aggiungete il pepe, il sale e servite.  La peperonata è ottima anche servita fredda.

DSC_8580