Tag Archives: High in fibre

Caprese Flatbread Wraps (piadine alla caprese)

Today we are going to prepare a delicious Caprese salad in “pockets”, a fresh and light meal for a healthy lunch on the go, that can also be served as a tasty appetiser. These Caprese Piadinas are perfect for this season and they are so quick and easy to make!

Italian flatbread with Caprese salad on a wooden board. Piadina con mozzarella e pomodorini.

See also the Whole spelt Piadina (Italian flatbread) recipe

Caprese flatbread wraps

Ingredients

Serves 4

4 spelt Piadinas ( Whole grain Italian flatbreads)

2 fresh mozzarella cheeses

12 ripe Piccadilly or cherry tomatoes

a handful of fresh basil leaves

extra virgin olive oil to taste

salt and pepper to taste

Mozzarella cheese, cherry tomatoes and basil leaves on wooden board.

Method.

1. Drain and squeeze the mozzarellas well.

2. Wash and dry the tomatoes and the basil leaves, then cut the tomatoes into halves.

basil leaves, mozzarella and cherry tomatoes on a wooden board.

3. Fold and then fill each Piadina with 6 pieces of tomatoes, some slices of the mozzarella and some basil leaves.

Italian flatbread with Caprese salad on a wooden board. Piadina con mozzarella e pomodorini.

4. Season with plenty of extra virgin olive oil, salt, pepper and serve.

Italian flatbread with Caprese salad on a wooden board. Piadina con mozzarella e pomodorini.

Italian flatbread with Caprese salad on a wooden board. Piadina con mozzarella e pomodorini.

Tip. You can add some crushed garlic, a few drops of balsamic vinegar and/ or a pinch of dried oregano for more flavour.

Piadina alla caprese.

Ingredienti

Per 4 persone

4 piadine sfogliate grandi (andate alla ricetta della piadine di farro)

2 mozzarelle freschissime

12 pomodori maturi (piccadilly o ciliegino)

una manciata di foglie di basilico fresco

olio extra vergine di oliva q.b.

sale e pepe q.b.

Preparazione.

1. Scolate e strizzate bene le mozzarelle.

2. Lavate e asciugate i pomodori, poi tagliarli a metà. Mondate e lavate anche le foglie di basilico.

3. Piegate e riempire ogni Piadina con 6 pezzi di pomodori, qualche fetta di mozzarella e qualche foglia di basilico.

4. Condire con abbondante olio extra vergine di oliva, sale, pepe e servite.

Nota.

Potete aggiungere agli ingredienti anche un po’ d’ aglio crudo (tritato molto finemente), qualche goccia di aceto balsamico e / o un pizzico di origano per dare sapore.

Buckwheat Crepes (Gluten-free, High in fibre)

Rich in flavour and fibre, buckwheat crepes are incredibly delicious, healthy and can make a simple meal look quite impressive! You can be a little intimidated when you first make crepes….Well, I was when I made crepes for the first time! It is not so difficult to make nice crepes, as long as you remember to occasionally grease the frying pan during the preparation method, you move quickly when you shape the crepes and you cook the crepes over a low heat.

Crepe on round wooden cutting board on a table mat

Tips.
It might take a little bit of practice at first, however the best way to shape the crepes is to quickly move the pan around, in order to spread and flatten the batter evenly. During this process the frying pan shouldn’t be too hot, otherwise the batter will cook too quickly, leaving you with thick and uneven crepes.
During the cooking time, the crepes will start curling around the edges and lifting up from the pan; at this point the crepes are ready to be flipped around, to cook both sides.

You can be very creative with this dish and serve your crepes with lots of savoury or sweet fillings, experimenting with a great variety of ingredients, textures and flavour combinations.
Enjoy the recipe and have fun with it!

crepes on rectangular cutting board on a beige cutting mat, with white background

Buckwheat crepes

Ingredients

For 10 crepes

2 eggs

300 g of buckwheat flour

400 ml of milk

100 ml of water

extra virgin olive oil

salt or sugar (depending if you are making a sweet or savoury recipe)

extra virgin olive oil

Method.

1. In a bowl, gradually mix the flour with milk, water and salt (or sugar). Separately, beat the eggs and then make the batter incorporating the eggs and 1 tablespoon of extra virgin olive oil into the flour mixture. Place the batter to cool for two hours in the refrigerator.

crepes batter with whisk in white plastic bowl

2. Heat a large frying pan over a low heat, then grease the base with a tablespoon of extra virgin olive oil.

3. Using a ladle, pour the batter in centre of the pan, then spread evenly and let cook for a few minutes.

raw crepe in a stone pan with olive oil on blue painted table

4. When the crepe starts curling around the edges, turn it around and cook the other side.

Repeat the process until you have made all the crepes, occasionally greasing the pan with a little extra virgin olive oil.

pile of crepes on round wooden cutting table on beige table mat

Also see the Gluten-free Béchamel sauce recipe and the Crepes with swiss chard and borage filling recipe.

SER_0750

SER_0753

SER_0780

Crepes di grano saraceno

Ingredienti

Per 10 crepes

2 uova

300 g di farina di grano saraceno

400 ml di latte

100 ml di acqua

olio extra vergine d’oliva

zucchero o sale (dipende se la ricetta è dolce o salata)

Preparazione.

1. Amalgamate la farina e il sale (o zucchero) con il latte mischiato all’acqua. A parte, sbattete le uova e incorporatele al composto con un cucchiaio d’olio extra vergine d’oliva. Lasciate riposare la pastella nel frigorifero per almeno due ore.

2. Fate scaldare, a fuoco moderato, una padella con un cucchiaio d’olio extra vergine d’oliva.

3. Usando un mestolo, versate il composto al centro della padella, poi muovete energicamente la pentola per stendere uniformemente la pastella.

4. Lasciate cuocere per qualche minuto. Quando la crepe incomincia ad arricciarsi sui bordi potete girarla per cuocerla su entrambi i lati.

Preparate tutte le crepes, ricordandovi di ungere ogni tanto la padella con un filo d’olio.

Guardate anche la ricetta della Besciamella con amido di mais e la ricetta delle Crepes con ripieno di bietole e borragine.

Whole Spelt And Rolled Oat Crackers

Mixed salad with shrimps-10

Whole spelt and rolled oat crackers.

makes 2 baking sheets (24 cm x 33 cm) of crackers

Difficulty: easy

Ingredients

100 g whole spelt flour

50 g rolled oats

40 g flax seeds

3 tablespoons extra virgin olive oil

130 ml water

salt to taste

Method.

1. In a large bowl, mix all the ingredients and knead well, until you get a nice and compact dough.

Whole spelt and oat crackers

2. Cut the dough into three pieces. Dust with some flour, then roll out each piece of dough between two sheets of baking paper (make the dough as thin as possible).

Whole spelt and oat crackers-5

3. Remove the sheet of paper on top and then, using a cutting wheel, roughly cut out and shape the dough into small squares.

Whole spelt and oat crackers-3

Whole spelt and oat crackers-4

4. Line two baking sheets with baking paper and bake the crackers at 180°C /356° F (with the fan on) for 15 minutes.

Whole spelt and oat crackers-6

Whole spelt and oat crackers-8

5. Serve with the fresh vegetable and shrimp salad (see the recipe).

Mixed salad with shrimps-14

Crackers integrali di farro e fiocchi d’avena.

Per 2 teglie da forno (24 cm x 33 cm) di crackers

Difficoltà: facile

Ingredienti

100 g farina di farro integrale

50 g di fiocchi integrali d’avena

40 g di semi di lino

3 cucchiai di olio extra vergine d’ oliva

130 ml d’acqua

sale q. b.

Preparazione.

1. In una terrina grande, mescolate tutti gli ingredienti e impastate fino ad ottenere un impasto omogeneo.

2. Tagliate l’impasto in tre pezzi. Spolverate con un po’ di farina, poi stendete con un matterello un pezzo di pasta tra due fogli di carta da forno (cercate di renderlo il più sottile possibile).

3. Togliete il foglio di carta da forno sulla parte superiore dell’impasto e poi, con una ruota tagliapasta, tagliate dei piccoli quadrati. Ripetete l’operazione con il resto dell’impasto.

4. Ricoprite due teglie con carta da forno e infornate i crackers a 180 ° C (con la ventola) per 15 minuti.

5. Servite con lInsalata con gamberi e avocado.

Quick And Easy: Mango And Apple Smoothie

Apples and mango.

Packed with vitamins and minerals (vitamins A, C and calcium, to name a few) and enriched with all the nutrients contained in the chia seeds (rich in vegetable proteins and omega 3), this smoothie is not just sunshine in a glass but a proper energy booster!

…And it tastes better than any dessert that you can ever imagine!

DSC_3411

Mango And Apple Smoothie.

Easy

Preparation time:10 minutes

Serves 4

2 ripe mangoes

2 sweet apples (I used golden delicious apples)

400 ml of almond milk

the juice of a lemon

ground cinnamon to taste

2 tablespoons chia seeds

a handful of ice cubes (optional)

To garnish

4 slices of an organic lemon

grated lemon zest to taste

colourful straws

Method.

1. Peel the apples and skin the mangoes, then remove the stem, seeds and the stone from the fruits. Chop roughly.

2. Add the juice of a lemon and blend the fruit using a food processor, then add the almond milk, the chia seeds, a few ice cubes (optional) and the cinnamon. Blend everything well.

3. Pour in 4 tall glasses, then garnish each glass with a slice of lemon, 2 colourful straws and add some lemon zest on top.

I hope you enjoyed my first smoothie recipe! 🙂

DSC_3439

DSC_3420

Frullato di Mango e Mela.

Facile

Tempo di preparazione: 10 minuti

Serve 4

2 manghi maturi

2 mele golden (oppure le dolci mele che preferite)

400 ml di latte di mandorla

il succo di un limone

cannella in polvere q b

2 cucchiai di semi di chia

una manciata di cubetti di ghiaccio (facoltativo)

per guarnire

4 fette di limone (non trattato)

la scorza grattugiata di un limone (non trattato)

cannucce colorate

Preparazione.

1. Sbucciate, pulite e tagliate le mele e i manghi (rimuovendo i semi e parti indesiderate), poi mettete nel frullatore.

2. Unite ai pezzi di frutta il succo di un limone e frullate bene.  Aggiungete al composto anche il latte di mandorla, i semi di chia, alcuni cubetti di ghiaccio (facoltativo) e la cannella. Frullate bene tutto, per qualche minuto.

3. Versate il composto in 4 bicchieri alti; quindi guarnite ogni bicchiere con una fetta di limone, poi aggiungete le cannucce colorate e un po’ di scorza di limone.

Cranberry And White Chocolate Pandolce

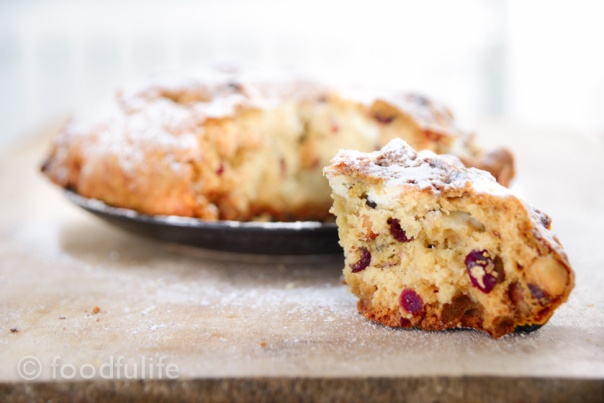
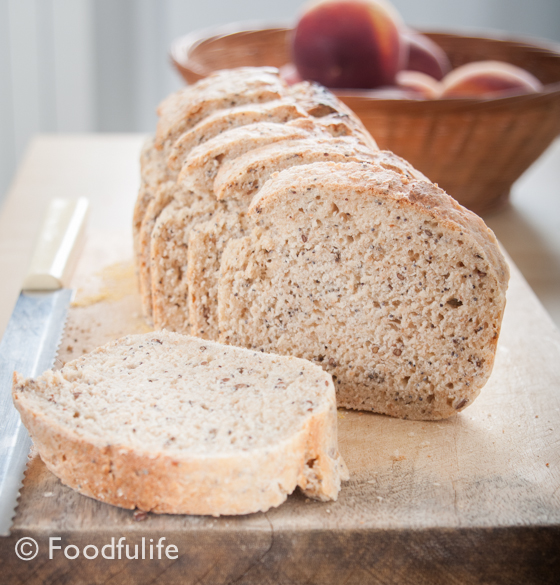
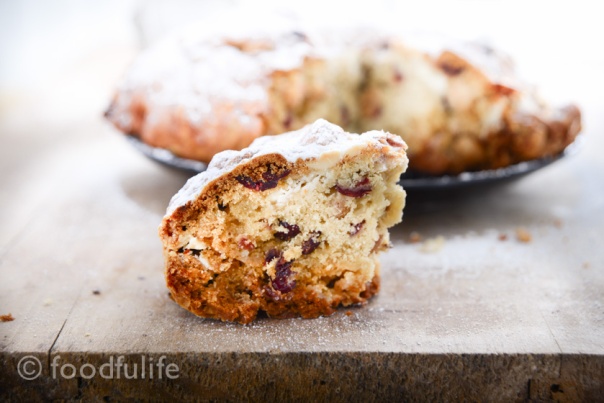
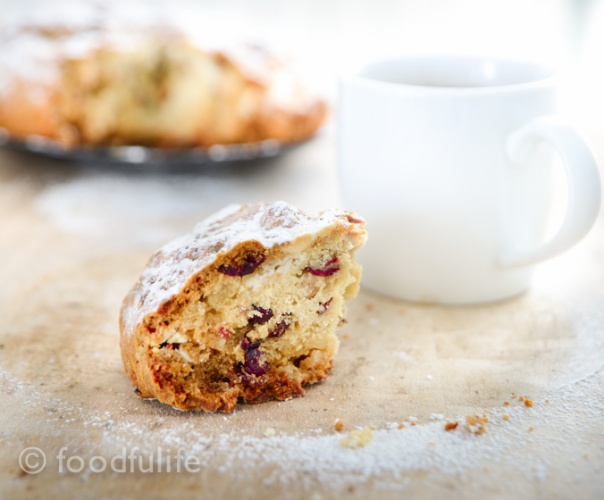
Pandolce is a wonderful Genoese Christmas cake, traditionally made with raisins, candied fruits and pine nuts; so simple but rich in flavours, because we use only the best quality ingredients.

Cranberry, white chocolate and hazelnut Pandolce

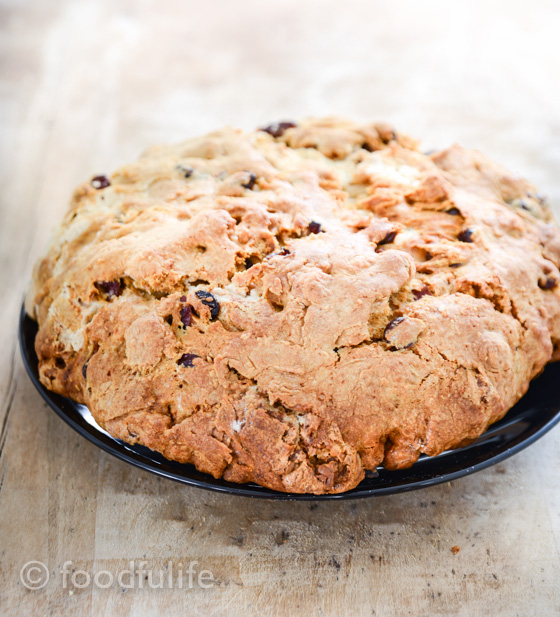
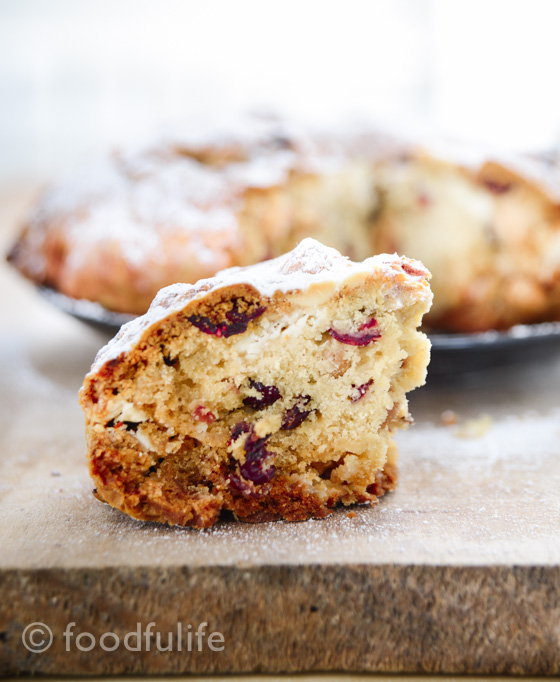
For this Christmas I prepared (as usual) my own version, giving a foodfulife twist to the traditional recipe! I made a Pandolce packed with delicious cranberries, white chocolate and hazelnuts. This dessert is sweet bread (actually more like a cookie dough), perfect if you want to surprise your guests with something truly special for Christmas!

Believe me, it doesn’t get any better than this!

Cranberry, white chocolate and hazelnut Pandolce

If you prefer something a little less rich but still delicious, you can try my Chocolate and hazelnut Pandolce, made with dark chocolate and with less sugar and a little less butter.

Cranberry, white chocolate and hazelnut Pandolce

Cranberry and white chocolate Pandolce.

Preparation time: 15 minutes + the resting time

Cooking time: 50 minutes

Ingredients

For 8-10 servings

220 g Manitoba flour (that you can replace with whole spelt flour, or any strong flour)

100 g unbleached all purpose flour

80 g soft butter

60 g milk

1 egg

1 and a half tablespoons of honey

70 g brown sugar

grated zest of 1 organic lemon

2 tablespoons rum

1 teaspoon baking powder

1 teaspoon baking soda

a few drops of vanilla essence

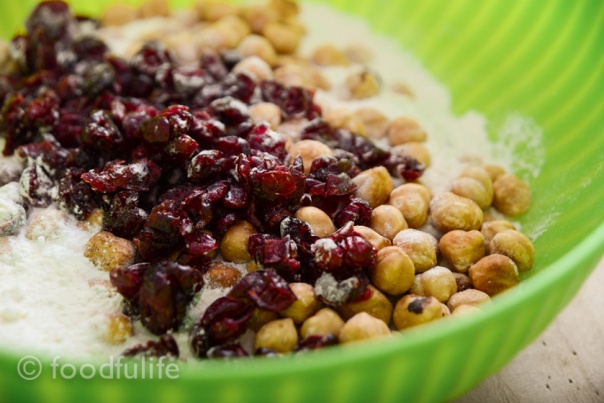
150 g shelled and roasted hazelnuts (whole)

100 g white chocolate, cut into pieces and frozen (that you can replace with dark chocolate)

100 g dried cranberries

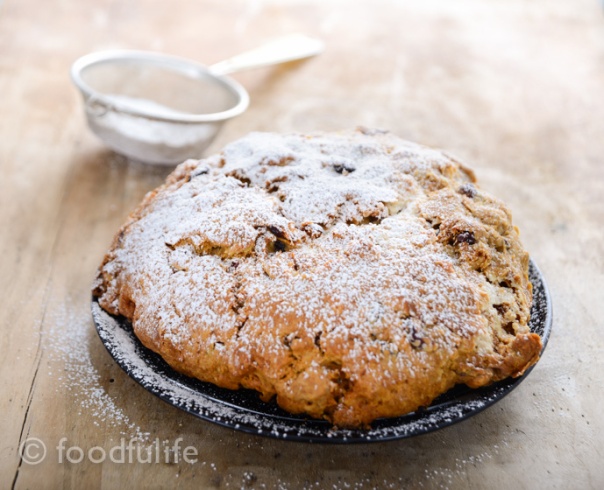
icing sugar to taste

tip. Freeze the white chocolate before making the cake, otherwise it will melt too much during the cooking time.

Cranberry, white chocolate and hazelnut Pandolce

Method.

1. Mix the softened butter with the brown sugar and the egg, then add the honey and 60 g of milk. Add two tablespoons of rum, two drops of vanilla essence, then stir until the mixture is soft and creamy.

2. Separately, mix the two flours with the baking soda and the baking powder; then add the hazelnuts, the zest of a lemon, the white chocolate and the cranberries. Combine these ingredients with the creamy mixture.

Cranberry, white chocolate and hazelnut Pandolce

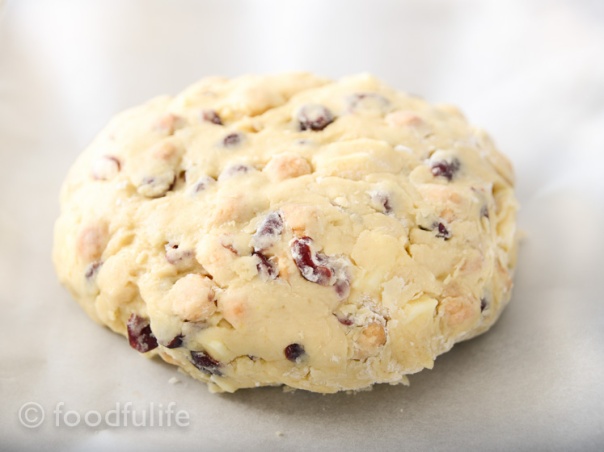
3. Knead well, adding a little bit of flour to prevent the dough from sticking to your hands and place in the refrigerator for 15 minutes.

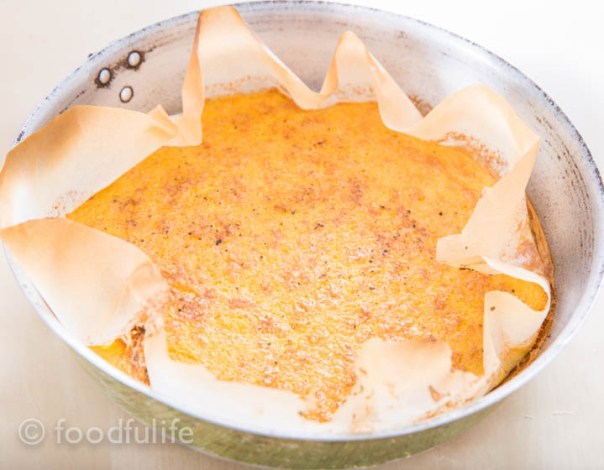
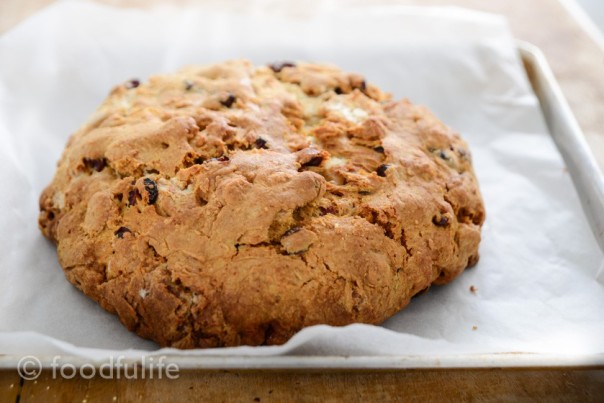
4. Line the base of an oven tray with baking paper, then place and shape the Pandolce on the tray.

Cranberry, white chocolate and hazelnut Pandolce

5. Bake in a preheated oven at 170 ° C/388°F  (with the fan running) for 50 minutes.

 Note. The oven door must remain slightly open during the entire cooking time to release the steam (you can do that by placing a metal object, like a padlock, between the door and the oven, in order to live a 1-2 cm gap).

Cranberry, white chocolate and hazelnut Pandolce

Cranberry, white chocolate and hazelnut Pandolce

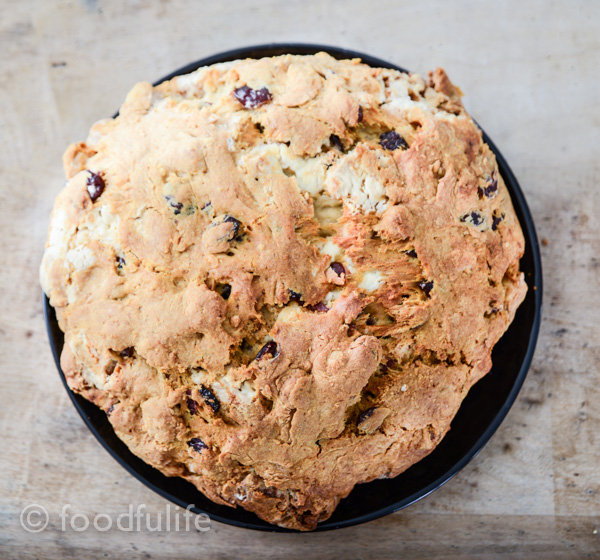
6. Let the Pandolce cool completely, then dust with plenty of icing sugar.

Cranberry, white chocolate and hazelnut Pandolce

Cranberry, white chocolate and hazelnut Pandolce

Cranberry, white chocolate and hazelnut Pandolce

Cranberry, white chocolate and hazelnut Pandolce

Pandolce con mirtilli rossi e cioccolato bianco.

Preparazione: 15 minuti + il riposo

Cottura: 50 minuti

Ingredienti

Per 8-10 servings

220 g di manitoba (che potete sostituire con farina integrale di farro)

100 g di farina 00

80 g di burro morbido

60 g di latte

1 uovo

1 cucchiaio e mezzo di miele

70 g di zucchero di canna

la scorza grattugiata di un limone, non trattato

2 cucchiai di rum

1 cucchiaino di lievito per dolci

1 cucchiaino di bicarbonato

qualche goccia di essenza di vaniglia

150 g di nocciole tostate intere, senza buccia

100 g di cioccolato bianco, rotto in pezzi e surgelato (che potete sostituire con il cioccolato fondente)

100 g di mirtilli rossi essiccati (cranberries)

zucchero a velo q. b.

Nota.

Congelate il cioccolato bianco per evitare che si sciolga troppo durante la cottura.

Preparazione.

1. Amalgamate bene il burro con lo zucchero e l’uovo. Aggiungete 60 g di latte, il rum, l’essenza di vaniglia e un cucchiaio e mezzo di miele, poi mescolate fino ad ottenere un impasto cremoso.

2. Separatamente, mischiate le farine e poi aggiungete le nocciole, i mirtilli rossi, il cioccolato bianco (surgelato), la scorza di un limone, il bicarbonato e il lievito. Mescolate tutti gli ingredienti insieme, unendo l’impasto asciutto a quello cremoso.

3. Amalgamate bene, aggiungendo un po’ di farina per evitare che l’impasto si appiccichi alle mani, poi lasciate riposare nel frigorifero per 15 minuti.

4. Ricoprite la teglia con la carta da forno, poi mettete l’impasto sulla teglia e date la forma al Pandolce.

5. Infornate quindi a 170°C per 50 minuti (con la ventola in funzione).

Nota. La porta del forno deve restare socchiusa (con una fessura di 1 o 2 cm), in modo da far uscire il vapore (potete posizionare un oggetto di metallo, ad esempio un lucchetto, tra la porta e il forno).

6. Fate raffreddare completamente, poi decorate il Pandolce con abbondante zucchero a velo.

Cranberry, white chocolate and hazelnut Pandolce

Some Of My Favourite Recipes…

A few months ago I published the viewers’ favourite recipes, this week I am publishing a selection of my favourite recipes, perfect for this season!

Follow the links, give them a try and let me know! 🙂

 Mixed Seed Wholemeal Bread (high in fibre, very crunchy and delicious!)

DSC_0281

Pizza Bianca Con Mozzarella E Stracchino see Make The Best Pizza Dough (Part 2)

DSC_7555

Pasta E Fagioli (creamy borlotti bean pasta)

Pasta e fagioli (Pasta with borlotti beans)

Wholemeal Chestnut Bread With Rosemary And Pine Nuts (try it warm, with a little piece of butter on top!)

DSC_2959

Gluten-free Buckwheat Gnocchi (already a viewer’s favourite, these gnocchi are incredibly soft and delicious!!!really something to try!)

DSC_4984

  Special Stuffed Calamari (quite a popular quinoa recipe!)

Special stuffed Calamari (front view 2)

 Deliciously Intense chocolate and chestnut biscuits (dark, not very sweet,  delicious served with a glass of milk)

DSC_2823

Double Chocolate Panna Cotta (best dessert ever! This is a single serving recipe, but you can make as many as you like!)

DSC_4151

Traditional Recipe: La Farinata Genovese (Genoese Socca)

Basically made from 3 ingredients (chickpea flour, olive oil and water), la farinata, or socca (as it is called in Nice), is a kind of chickpea focaccia, which doesn’t contain gluten and is dairy free.  It is quite easy to prepare and it’s perfect for vegan and vegetarian diets, because it is a good source of proteins.

DSC_2043

Before getting the method and recipe right it might take a few tries, especially when it comes to finding the right balance between the ingredients. It might requires a lot of olive oil in order to become crispy on the outside and creamy on the inside, as it should be.
The farinata is traditionally only a few millimetres thin (see the pictures).

A few tips.
The ideal cooking method would also require a high temperature oven, like a wood stove, however, a good oven will do. Remember to use non-stick baking trays or baking paper.
The farinata has to be served quite hot, freshly made, otherwise it will become elastic and not very nice to eat. If you have leftovers, you can reheat the farinata in the oven the day after.

The farinata can also be enriched adding different ingredients; amongst the local most popular variations, you’ll find the onion and the artichoke farinata, also quite easy to make.

DSC_2051

Farinata could be a delicious starter or aperitif, but it is also a wonderful meal when served with a nice big salad on the side.

La farinata di ceci (Genoese socca)

Ingredients

for 3 rounded backing trays (28 cm in diameter)

1,5 litre of water

500 g chickpea flour

200 ml extra virgin olive oil

salt and pepper to taste

Method.

1. In a large bowl, vigorously whisk 1,5 litre of water with 500 g. of chickpea flour, 100 ml olive oil and some salt. Once all the ingredients are mixed well, let sit for at least 5 hours (but 10 hours would be better, so the flour can absorb the water well).

DSC_1994

2. After the resting time, remove the froth formed on the surface of the mixture with a spoon.

DSC_1997

3. Pour some extra virgin oil on a non-stick baking tray, then with a ladle add 1/3 of the mixture and season with salt and pepper.

DSC_2009

DSC_2007

4. Bake the farinata at 220°C / 428°F (or higher) until golden, then turn on the grill and cook for a little longer, in order to get a nice crispy crust on top. Remove from the oven and serve hot.

DSC_2013

DSC_2049

DSC_2056

Also see Chickpea flour bread recipe

La farinata di ceci.

Ingredients

Per 3 teglie rotonde di 28 cm di diametro

1,5 l d’ acqua

500 g di farina di ceci

sale e pepe q.b.

200 ml di olio extra vergine d’oliva

Preparazione.

1. In una ciotola grande, mescolate energicamente con una frusta 1, 5 l di acqua, 500 g. di farina di ceci, 100 ml di olio e un po’ di sale. Una volta amalgamati bene gli ingredienti, lasciate riposare per almeno 5 ore (sarebbe meglio 10 ore, per far assorbire bene l’acqua).

2. Passato il tempo necessario, togliete con un cucchiaio la schiuma formata in superficie.

3. Versate un po’ d’olio su una teglia antiaderente, poi con un mestolo aggiungete il composto liquido (non troppo perché deve restare sottile) e condite con sale e pepe.

4. Infornate a 220° C per una decina di minuti, poi accendete il grill e lasciate che si formi una crosta croccante. Sfornate e servite!

DSC_2047

DSC_2030

Vedi anche la ricetta del Pane con farina di ceci e semi di zucca

Traditional Recipe: Sicilian Almond Biscuits With Candied Cherries (Pasticcini Alle Mandorle)

These Sicilian biscuits (or small pastries) are gluten-free, dairy-free, delicious and very easy to prepare! It is better to use a piping bag to shape the biscuits, but if you don’t have one, you can roll out the dough with your hands to make small balls and then press them with your fingers, to obtain a cookie-like shape.

DSC_1945

The dough needs, at least, 30 minutes of resting time, however they will taste even better if you leave them to rest in the fridge overnight. Traditionally, we garnish these biscuits with candied cherries or almonds, so if you want you can use both. Here I prepared some of these delicious pastries with my mother, I hope you enjoy the recipe!

DSC_1930

Biscuits with almonds and candied cherries.

Preparation and cooking time: 25 minutes + resting time

Difficulty: Easy

Ingredients

For two oven trays

3 egg whites

80 g sugar

200 g almonds, shelled and finely chopped

candied cherries

a few drops of almond flavouring, or some orange zest (optional)

DSC_1904

Method.

1. Grind the almonds with the sugar, using a food processor.

DSC_1900

2. Combine the egg whites with the almond mixture and the flavourings, then put the dough in the refrigerator for at least 30 minutes.

DSC_1902

DSC_1905

3. Using a piping bag, shape the biscuits and then garnish with candied cherries.

DSC_1907

DSC_1912

DSC_1921

DSC_1924

4. Bake at 180 ° C (356° F) until golden.

DSC_1937

DSC_1942

DSC_1947

DSC_1982

Dolcetti alle mandorle con ciliegie candite.

Preparazione e cottura: 25 minutes + il riposo

Difficoltà : Facile

Ingredienti

Per 2 teglie rettangolari di media grandezza.

3 chiari d’uova

80 g di zucchero

200 g di mandorle sgusciate e tritate finemente

ciliegie candite q. b.

1 qualche goccia di aroma di mandorle, oppure una scorretta di arancia tritata (facoltativo)

Preparazione.

1. Tritate finemente le mandorle con lo zucchero.

2. Mescolate i chiari d’uova con le mandorle tritate, lo zucchero e gli aromi. Mettete il composto a riposare in frigorifero per almeno 30 minuti.

3. Usando il sac à poche, date la forma ai pasticcini (oppure formate delle palline e schiacciatele leggermente con le dita).

4. Guarnite i pasticcini con le ciliegie candite, poi infornate a 180° C fino ad ottenere dei dolcetti dorati.

DSC_1972

DSC_1985

Quick And Easy Recipe: Sautéed Carrots

This is an easy and extremely delicious carrot recipe! You can add the quantity of extra virgin olive oil and butter you desire, or you can have a healthy dish with just a little extra virgin olive oil in it. You can adapt this recipe according to your taste.

Sautéed Carrots

Preparation time: 5 minutes

Cooking time: 15-20 minutes

Ingredients

For 6 servings

1 kg carrots, washed and peeled

2 garlic cloves, chopped

4-5 tablespoons extra virgin olive oil

2 tablespoons finely chopped parsley

salt to taste

a little bit of butter (optional)

Method.

1. Steam the carrots until a little bit tender.

2. Slice the carrots and then sauté (for 5-10 minutes) with the extra virgin olive oil, a little bit of butter (optional), the chopped garlic and parsley.

3. Add some salt and serve.

sautéed carrots

Carote saltate in padella.

Temo di preparazione: 5 minuti

Tempo di cottura: 15-20 minuti

Ingredienti

Per 6 porzioni

1 kg di carote, già pulite

2 spicchi d’aglio (tritati)

4-5 cucchiai di olio extra vergine di oliva

2 cucchiai di prezzemolo tritato

sale q. b.

un po’ di burro (facoltativo)

Preparazione.

1. Cuocete a vapore le carote, fino a renderle più tenere.

2. Tagliare le carote e poi fatele rosolare (per 5-10 minuti) con l’olio extra vergine di oliva, un po’ di burro (facoltativo), l’aglio e il prezzemolo.

3. Aggiungete un po’ di sale e servite.