Category Archives: Traditional Recipes

How To Poach An Egg

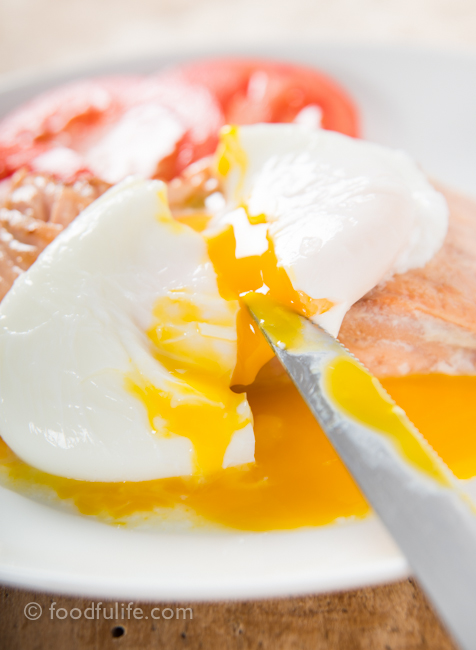
Poached eggs are truly a special dish with their lovely creamy texture and wonderful delicate flavour. The low-fat cooking method used to prepare these eggs can be a little difficult to get right at first, but after a few tries your poached eggs will be cooked to perfection!

how to poach an egg

A few things to keep in mind.
1. It is very important to use really fresh eggs.
2. You have to check the consistency of the egg after 3-5 minutes of cooking time in order to get a soft but cooked egg. Remember to keep an eye on the clock because it is quite easy to overcook the egg.
3. If you cook more than one egg at a time use a large pan filled with plenty of water and just drop 4-5 eggs in it (quite quickly) without stirring the water. Just remember to remove each egg with the slotted spoon in the same sequence in which you added them into the water, so that they cook evenly.
4. You can add a few drops of white wine vinegar to the simmering water before cooking the egg…. The vinegar will make the egg white a little firmer and this will help the cooking process, however this step is totally optional. I like the natural softness and flavour of the egg, therefore I tend not to use vinegar.

DSC_1342

Poached eggs are great served with salmon, steamed vegetables, beans and toast. You can be really creative with this preparation and add a poached egg to a pizza, a baked potatoes, a creamy soup or a bruschetta!

I hope you enjoy this how-to recipe and have some fun with it! X

How to poach an egg.

Preparation time: 10 minutes
Cooking time 3-5 minutes

What you need.
1 egg
1 medium pan, filled with water
a slotted spoon
kitchen paper
a tablespoon
a ramekin
a pinch of sea salt
Method.
1. Simmer the water gently over a medium heat and add some sea salt crystals.
2. Carefully crack the egg into a ramekin.

DSC_1353

3. Using a tablespoon, make a whirlpool in the water by stirring quite quickly for a few seconds.

4. Drop (with one quick movement) the egg into the center of the whirlpool. Now let the egg poach without stirring.

DSC_1356

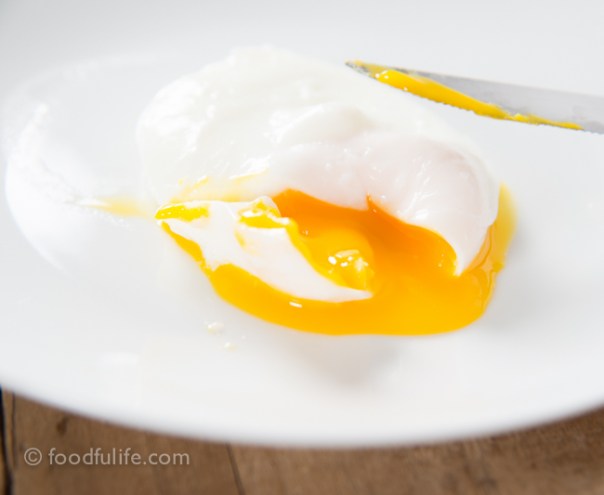
5. After a few minutes, check the consistency of the egg (it should be soft and with the egg white slightly firmer around the edges). When the egg is ready drain it with a slotted spoon. I usually place the egg and the slotted spoon on a strainer for a minute, in order to allow the excess water to drain completely.

DSC_1359

6. Serve your poached eggs straight away.

DSC_1362

DSC_1364

DSC_1365

DSC_1374

How To Make Gnocchi (The Easy Way)

In this recipe it’s really really important to use the right kind of potatoes…The best potatoes to use are old floury potatoes, as they contain less water compared to new potatoes and therefore mix well with flour without making a mess. You can also add an egg when you prepare the dough, because the egg helps keep the ingredients together when you cook the gnocchi….Keep in mind that the dough shouldn’t stick to your hands, so if you think the dough is too wet and the potatoes are not floury enough you can add an egg and a little more flour in order to get the right consistency.

DSC_1188

I strongly recommend you use a good stainless steel potato masher, like the one with two handles that you can hold and press with both hands. We normally use this kind of potato masher because it makes a really fluffy mashed potato with no effort and you can also use it to make various fruit juices…Therefore, it not only works really well, but is also a versatile gadget to keep in the kitchen.

DSC_1172

Potato gnocchi.

4 Servings

Ingredients

1,200 kg potatoes

300 g plain flour

sea salt

DSC_1119

Method.

1. Wash and then steam (or boil) the potatoes until tender.

DSC_1122

2. Mash the potatoes with a potato masher.

3. Dust a working board, make a well with 300 g of flour and place the mashed potatoes in the centre with a pinch of salt. Mix everything and work the mixture until you get a smooth dough.

DSC_1130

4. Dust the working board again and cut the dough into 8 small pieces. Roll out each piece to make 8 ropes (approximately 1,5 cm thick), then cut each rope into small equal pieces.

DSC_1139

DSC_1164

5. Fill a large pan with water and bring to the boil, then add the gnocchi with a tablespoon of sea salt. Cook the gnocchi until they all rise from the bottom of the pan, then drain and serve with the sauce of your choice.

DSC_1187

DSC_1170

See also the rocket (arugula) pesto and the traditional pesto recipe.

DSC_1190

Gnocchi di patate

4 persone

Ingredienti

1.200 kg di patate farinose

300 g di farina 00

sale marino

Preparazione.

1. Lavate bene le patate e fatele cuocere a vapore (oppure fatele bollire) finché saranno tenere (ma non sfatte).

2. Schiacciate tutte le patate con lo schiacciapatate.

3. Infarinate bene il piano di lavoro e impastate delicatamente la farina con le patate, aggiungendo un pizzico di sale fino.

4. Infarinate nuovamente il piano di lavoro e tagliate la pasta in 8 pezzi. Fate rotolare la pasta con il palmo delle mani per create 8 cilindri lunghi e sottili (circa 1,5 cm di spessore). Tagliate ogni cilindro in piccoli pezzi uguali.

5. Cuocete gli gnocchi in acqua bollente con un cucchiaio di sale grosso. Scolare gli gnocchi non appena salgono in superficie e servite.

DSC_1184

Vedi anche pesto di rucola e pesto alla genovese.

Genoese Sage Focaccia! (more a tutorial than a recipe)

This focaccia alla salvia, a typical Genoese focaccia, is very aromatic, wonderful served with cheese, soups and cold cuts. To make this focaccia you follow the focaccia recipe method and then you add the fresh sage at the end. You have to chop the sage really finely, in order to blend it nicely with the dough. The focaccia dough also needs to rise for several hours, so we are going to make a starter that you can make in advance, in order to make the preparation method a little more manageable.

The longer the dough rises, the better the focaccia will become, so don’t rush it! This is why in the traditional method we repeat the leavening process a few times…However you can shorten the process by skipping the second leavening (step 3) and mixing all the flour together straight away, if you don’t have much time.

DSC_0062

I suggest you make the focaccia during the weekends (or in your spare time), as it needs to be looked after during the preparation method…It is a long process but it’s worth it!!!

Note. To make the starter there are two options: you can use normal yeast or you can use sourdough.

All you need (for the entire method).
250-300 g plain flour (depending if you use sourdough or yeast)
250 g durum wheat semolina flour
12 g yeast (or 50 g of sourdough)
a big bunch of fresh sage, very finally chopped
fine sea salt
lots of extra virgin olive oil
water
a little sugar
baking sheet
a baking tray (24 cm x 28 cm)
a bowl
cling film

Note. I am going to divide the ingredients and the preparation method into 4 main steps.

DSC_0004

HOW TO MAKE SAGE FOCACCIA.

Step 1. Make the starter

For the starter with yeast

Ingredients

100 g plain flour

12 g yeast

water

a little sugar

Method with yeast.

Mix the yeast with a few spoons of warm water, a little flour and a little sugar. When it forms some bubbles add the rest of the flour, more water and work it until you get a small dough (keep it quite moist). Put the dough into a small bowl, then cover it with cling film and let rise overnight at room temperature.

For the starter with sourdough (natural yeast).

Ingredients

50 g plain flour

50 g sourdough

water

a little sugar

Method with sourdough.

Mix the flour, a pinch of sugar and the sourdough with some water, until you get a soft and moist dough. Place in a small bowl, then cover it with cling film and let rise overnight.

DSC_9944

DSC_9948

Step 2. The first leavening.

Ingredients

the starter we prepared earlier (with yeast or sourdough)

100 g of plain flour

100 g of durum wheat semolina flour

water

a little sugar (to help the leavening process)

Method.

In the morning, mix the starter with 100 g of plain flour, 100 g of durum wheat semolina flour and a little sugar, then add enough water to make a soft dough. Work well, then place the dough in a bowl, cover it with a cling film and let rise until it doubles in volume.

DSC_9950

DSC_9985

Step 3. The second leavening.

Ingredients

the dough we prepared earlier

100 g plain flour

100 g durum wheat semolina four

water

a little sugar

Method.

Take the dough and add the flour with a little sugar, then mix with enough water and work well. Cover with cling film and let rise until it doubles in volume.

DSC_9991

Step 4. Adding all the ingredients and baking.

Ingredients

the dough we prepared earlier

50 g of durum wheat semolina flour

a big bunch of fresh sage, very finely chopped

fine sea salt

50 ml extra virgin olive oil (and you’ll need some more to drizzle before baking)

100 ml of water

DSC_9994

DSC_0005

Method.

1. This is the final step! Take the dough and mix it with 50 g durum wheat semolina flour, finally chopped fresh sage leaves, some fine sea salt (but we are going to add more later) and mix just enough to blend the ingredients. Add 50 ml of extra virgin olive oil, previously mixed with 100 ml of water. Mix everything (just enough, don’t overwork it or you’ll lose the leavening strength of the dough).

DSC_0009

2. Take a baking tray, line with baking paper, drizzle with olive oil and place the dough so that it covers the tray. Let rise for about an hour.

DSC_0011

3. Once it has risen, press the dough with the tip of your fingers in order to create wells. Drizzle with more olive oil mixed with water, season with plenty of salt and bake at 200° C (392 °F) for 30-35 minutes.

DSC_0023

DSC_0030

DSC_0060

DSC_0073

Spaghetti With Raw Tomato ‘Sauce’ (Vegan/Dairy-free)

SER_9324

This wonderful ‘sauce’ is so easy to make, can be prepared in advance and is a delicious refreshing summer recipe! My mum makes this sauce using a smaller quantity of tomatoes (without draining the juice from the tomatoes) and lots of Parmesan cheese, but I personally prefer a healthier version of the recipe with lots of tomatoes and no cheese.

This raw tomato sauce contains anti-oxidants, lots of fibre and is low-fat….you’ll love it!!
You could also have this sauce on a bruschetta or serve it with meat, if you prefer.

SER_9314

Spaghetti with raw tomato sauce.

Serves 4

Ingredients

320 g spaghetti

350 g tomatoes

2 garlic gloves

a big bunch of fresh basil

2 tablespoons balsamic vinegar (optional)

salt and pepper to taste

4 tablespoons of extra virgin olive oil

Method.

1. Wash the tomatoes and basil, then dry them using a kitchen towel.

SER_9239

2. Crush two garlic cloves (use a knife or a garlic press).

3. Chop the tomatoes into small pieces and let them drain for about 10-15 minutes.

SER_9219

4. Then mix the tomatoes with extra virgin olive oil, balsamic vinegar, salt and pepper. Place the sauce in the fridge for at least half an hour.

SER_9240

SER_9266

5. Cook the pasta al dente, following the instructions on the packaging, then drain.

6. Mix the pasta with the sauce and serve chilled.

SER_9317

SER_9315

SER_9285

Spaghetti con “salsa” di pomodoro crudo.

Ingredienti

Per 4 persone

320 g di spaghetti

350 g di pomodori

2 spicchi d’aglio

un mazzetto grosso di basilico

2 cucchiai di aceto balsamico

olio extravergine d’oliva

sale e pepe

Preparazione.

1. Lavate e asciugate i pomodori e il basilico.

2. Utilizzando un coltello, pressate e molto tagliate finemente due spicchi d’aglio.

3. Prendete i pomodori e tagliateli in pezzetti piccoli con il coltello, poi lasciate scolare per 10-15 minuti.

4. Mescolate i pomodori con 4 cucchiai d’ olio d’oliva, 2 cucchiai di aceto balsamico, il sale e il pepe. Mescolate ancora e mettete nel frigorifero almeno per 30 minuti.

5. Cuocete la pasta al dente e scolate.

6. Condite la pasta con il sugo e servite come piatto freddo.


Pasta With Easy Fresh Tomato Sauce

SER_6228

Pasta al pomodoro is cheap, easy to make and absolutely delicious! There are several variations of this dish, made using different ingredients to personalise and flavour the sauce, but I personally prefer one of the simplest version made with fresh tomatoes.

Today I am going to show you the recipe I usually prepare at home. Basically, to make this delicious tomato sauce you’ll need just four ingredients: cherry tomatoes, garlic, fresh parsley and, of course, extra virgin olive oil. Try to use only the best quality ingredients in this recipe, it will be a little more expensive but I can assure you that it will make a huge difference in the end.

SER_6239

Tip. You can replace the garlic with a small chopped onion and the parsley with a handful of fresh basil leaves, for a more delicate flavour.

SER_6192

Pasta al pomodoro fresco.

Ingredients

For 4 servings

Easy 

350 g thick spaghetti (but you can use any pasta you like)

500 g fresh and ripe cherry tomatoes

3 cloves of garlic, chopped

a bunch of fresh parsley

5 tablespoons of extra virgin olive oil

grated Parmesan cheese to taste (optional)

salt and pepper to taste

SER_6179

Method.

1. Wash and dry the tomatoes, then cut them into small pieces. Leave in a strainer to drain.

SER_6177

2. Wash the parsley, remove the stem, then finely chop the leaves.

3. Cook the pasta al dente, following the instructions on the packaging, then drain and set aside.

4. Sauté the garlic with 5 tablespoons of extra virgin olive oil for a minute or two. At soon at the garlic softens add the chopped tomatoes. Let shimmer for about 10 minutes, then add the chopped parsley with some salt and pepper.

SER_6201

SER_6212

5. Add the pasta to the sauce, sauté for only a couple of minutes and serve with plenty of grated parmesan (but it’s optional) on top.

SER_6225

SER_6258

SER_6247

Pasta al pomodoro fresco.

Ingredienti

Per 4 persone

Facile

350 g di spaghetti grossi

500 g di pomodorini ciliegia maturi

3 spicchi d’aglio tritati grossolanamente

un mazzetto di prezzemolo fresco

5 cucchiai di olio extravergine d’oliva

parmigiano grattugiato q. b. (facoltativo)

sale e pepe

Preparazione.

1. Lavate e asciugate i pomodori, poi tagliateli a pezzetti. Lasciate i pezzetti di pomodoro in un colino per far scolare l’acqua in eccesso.

2. Lavate il prezzemolo, tagliate i gambi e tritate finemente le foglie.

3. Preparate gli spaghetti molto al dente, poi scolate e mettete da parte.

4. Fate rosolare l’aglio in una padella grande, con 5 cucchiai di olio extra vergine di oliva, per un minuto o due. Quando l’aglio sarà ammorbidito, aggiungere i pomodori tritati. Fate cuocere per circa 10 minuti, quindi aggiungete il prezzemolo tritato con il sale e il pepe.

5. Mescolate la pasta al condimento, poi fate rosolare per un paio di minuti e servire con abbondante parmigiano grattugiato.

SER_6224

SER_6274

Traditional Recipe : Vegetarian Bolognese Sauce (Sugo Finto)

DSC_7079

I have to admit that since I stopped eating meat there are some traditional dishes that I really miss…Bolognese sauce is one of them! There is a very tasty vegetarian alternative though,  which is as good as the original Bolognese sauce with all the flavour of an old fashioned classic! This amazing sauce is called sugo finto ( fake sauce), an old traditional recipe made using minced vegetables instead of meat.  This sauce can easily replace the Bolognese sauce in many recipes such as cannelloni, lasagne or any other dish which requires a similar sauce.

The sugo finto is delicious and it has been on my family menu for generations! In fact, my mother remembers my grandfather’s aunty preparing the sauce for meatless family meals on Fridays.

The sugo finto is a must for vegetarians who love tasty traditional recipes!!!!

Try it and let me know what you think…

DSC_7088

Vegetarian Bolognese sauce (sugo finto)

Ingredients

1 can of tomato passata (best quality)

1/2 an onion (medium size)

1 clove of garlic

1 carrot

2 stalks of celery

1 big bunch of fresh aromatic herbs (marjoram, thyme, rosemary, 2 bay leaves, oregano)

4 tablespoons of extra virgin olive oil

4 tablespoons of tomato paste

1/2 a organic stock cube

a large glass of water

DSC_7017

Method.

1. Finely chop the rosemary.

DSC_7026

2. Cut the celery, carrot and garlic in small pieces, then place the vegetables with the herbs (without the bay leaves) in the mixer and blend for a few minutes. Now add the onion and blend once more.

DSC_7032

DSC_7033

3. Fry the vegetables with 4 tablespoons of olive oil. Add two bay leaves.

DSC_7036

4. Add 4 tablespoons of tomato paste, then add the passata and stir.

5. During the cooking time add a large glass of water and mix well.

6. Cook and stir until you get a Bolognese sauce consistency.

DSC_7046

DSC_7042

DSC_7052

DSC_7071

DSC_7108

Tip. The cooking time may vary between 30 or 50 minutes, depending on whether you want a slightly milder sauce or dense sauce with a stronger flavour.

Ragù vegetariano (sugo finto)

Ingredienti

400 g di passata di pomodoro (di ottima qualità)

1/2 cipolla di media grandezza

1 spicchio d’aglio

1 carota

2 gambi di sedano

1 mazzetto bello grosso di erbe aromatiche fresche (maggiorana, timo, rosmarino, 2 foglie di alloro, origano)

4 cucchiai di olio extravergine d’oliva

4 cucchiai di concentrato di pomodoro

1/2 dado biologico di buona qualità

un bicchiere d’acqua

Preparazione.

1. Tritate finemente il rosmarino.

2. Tagliare il sedano, la carota e l’aglio a pezzetti. Mettete quindi le verdure con le erbe (senza l’alloro) nel mixer e sminuzzate per qualche minuto. Aggiungete anche la cipolla e continuate a sminuzzare fino ad ottenere un tritato abbastanza fine.

3. Fate soffriggere le verdure sminuzzate con 4 cucchiai d’olio, per una decina di minuti. Aggiungete  anche due foglie intere di alloro.

4. Aggiungete 4 cucchiai di concentrato di pomodoro, poi unite la passata al concentrato e mescolate bene.

5. Durante la cottura annaffiate con un bicchiere d’acqua e mescolate di tanto in tanto.

6. Fate ritirare il liquido in eccesso e lasciate cuocere fino ad ottenere un sugo con la consistenza del ragù.

Nota. Il tempo di cottura può variare da 30 a 50 minuti, a seconda se desiderate un sugo più delicato oppure più denso e dal sapore un po’ più deciso.

DSC_7061

Whole Spelt Piadina (Italian flatbread)

The Piadina Romagnola is a flatbread traditionally made in Emilia-Romagna, an Italian region well known for its delicious food and wonderful recipes. Usually, this bread is made with simple ingredients like: white 00 flour (Italian plain flour), lard, water, milk and fine sea salt… However there are some variations in ingredients, thickness and consistency. This week we are going to prepare a whole grain piadina made with yogurt and extra virgin olive oil, instead of using lard and plain flour, for a lighter high-in-fibre version of the Piadina.

SER_1359

You can be very creative and fill this bread with lots of fresh seasonal ingredients.

SER_1384

Tips.

1. For the cooking method I suggest you use a heavy-based large and flat pan; a cast iron or a stone-derived pan is possibly the best thing you can use for this preparation.

2. Dust the pastry with some flour before placing it on the hot pan to cook. Then, when the piadina is cooked, wipe the surface of the pan with some paper. Repeat this operation before cooking each bread, otherwise the flour left on the pan will burn and change the flavour of the piadina.

3. I added a little bit of yogurt to replace the milk and lard, however you can replace the yogurt with more oil and water, if you want a dairy-free recipe.

Whole spelt Piadina (Italian flatbread)

for 5 large flatbreads

Ingredients

400 g wholemeal spelled flour

50 ml extra virgin olive oil

1/2 teaspoon fine sea salt

1/2 teaspoon baking soda

3 tablespoons of yogurt (I used full-fat, but you can use low-fat yogurt if you prefer)
200 ml of water

Method.

1. Mix all the ingredients in a bowl, then cover with cling film and let sit for 30 minutes.

2. Heat a large non-stick frying pan (use a pan with 24 cm in diameter).

3. Cut the dough into five pieces. Using a rolling pin, roll out the dough until you get a round thin sheet of pastry, with a diameter a little ‘smaller than the diameter of the pan.

4. Dust the Piadina and place it on the hot pan, over a medium-high heat. Cook the flatbread on each side for a few minutes until crispy and golden.

5. Cook all the Piadinas, then fill them with all the fresh ingredients that you like.

See also Caprese flatbread wraps (piadine alla caprese)

SER_1368

SER_1373

SER_1450

The preparation of this recipe is so quick and easy that you won’t be buying flat bread anymore!!

Piadine di farro (senza strutto)

Per 5 piadine 

Ingredienti

400 g di farina integrale di farro

50 ml di olio extra vergine d’oliva

1/2 cucchiaino di sale

1/2 cucchiaino di bicarbonato

3 cucchiai di yogurt intero

200 ml d’acqua

Preparazione.

1. Impastate tutti gli ingredienti in una terrina, poi ricoprite con la pellicola e lasciate riposare per 30 minuti.

2. Scaldate una padella antiaderente abbastanza grande (uso una padella con 24 cm di diametro).

3. Tagliate la pasta in cinque pezzi. Stendete la pasta con un matterello fino ad ottenere una sfoglia rotonda e sottile (del diametro un po’ più piccolo della padella).

4. Infarinate la sfoglia e mettetela sulla padella. Fate cuocere per qualche minuto e poi girate la piadina per cuocerla uniformemente. Quando la piadina è dorata su entrambi i lati è pronta.

5. Preparate tutte le piadine, poi farcitele con con il ripieno che desiderate.

Guardate anche la ricetta per la piadina alla caprese

SER_1347

Traditional Recipe: Easy Spinach Flan

DSC_4335

This week we are going to prepare a light spinach flan, made with lots of spinach, fresh ricotta, eggs and parmesan cheese. It is an incredibly easy dish to make and so tasty, it can be served as a main vegetarian meal with some fresh salad on the side, but it is also a wonderful side dish.
My mother prepares this flan very often and we love it! I hope you enjoy the recipe!

Easy spinach flan

Ingredients

Serves 4-6

500 g of fresh spinach, washed and ready to cook

80 g of Parmigiano Reggiano

2 large eggs

250 g ricotta

3 tablespoons of polenta (or breadcrumbs)

4 tablespoons extra virgin olive oil

a pinch of nutmeg

salt and pepper to taste

Method.

1. Soften the spinach in a large pan with two tablespoons of water, over a low heat for a few minutes.

2. Drain the spinach and let cool (as the spinach will release some water when they cook). Then vigorously squeeze the vegetables for a few minutes.

3. Coarsely chop the spinach using a knife.

DSC_4293

4. In a large bowl, mix 250g ricotta with two large eggs, 80 g Parmesan cheese, then season with salt, pepper, a pinch of nutmeg and two tablespoons of extra virgin olive oil. Mix well.

DSC_4298

5. Line a small baking pan with a sheet of baking paper (I used a 22 cm x 6 cm round pan), then grease the base with 2 tablespoons of extra virgin olive oil.

6. Pour the spinach mixture into the pan, sprinkle with lots of polenta (or breadcrumbs) and bake at 180 ° C (356 °F) until the flan is golden brown around the edges. Serve warm or cold, as you prefer.

DSC_4310

DSC_4312

DSC_4315

Follow foodfulife on Facebook for more mouth-watering recipes!

DSC_4346

Sformato di spinaci (facile)

Ingredienti

per 4-6 persone

500 g di spinaci freschi in busta

80 g di Parmigiano Reggiano

2 uova medio-grandi

250 g di ricotta

polenta (o pangrattato)

4 cucchiai di olio extra vergine d’oliva

Noce moscata

sale e pepe q. b.

Preparazione.

1. Fate ammorbidire gli spinaci in una pentola con due cucchiai d’acqua, a fuoco molto basso per qualche minuto.

2. Scolate e lasciate raffreddare gli spinaci, poi strizzateli energicamente.

3. Tritate grossolanamente gli spinaci usando un coltello.

4. Unite 250 g di ricotta a due uova con 80 g di Parmigiano Reggiano grattugiato, poi condite con sale, pepe, un pizzico di noce moscata e due cucchiai d’olio extra vergine d’oliva. Mescolate bene.

5. Ricoprite una teglia con carta da forno (uso una casseruola di 22 cm x 6 cm) e ungete la base con due cucchiai di olio extra vergine d’oliva.

6. Versate il contenuto nella teglia, cospargete la superficie con abbondante polenta e infornate a 180° C, fino a quando lo sformato sarà dorato sulla parte superiore.

Pear And Gorgonzola Risotto (no oil, no butter)

DSC_4422

This pear and gorgonzola risotto is definitely another highly addictive dish!….One of those dishes that you just can’t stop eating, even when you have picked up the last grain of rice and swept up the all the traces of what was left on the plate with a spoon!

A truly delicious risotto, where the flavours blends perfectly together and the consistency is perfectly creamy and yet quite “light”. In fact, there is no need to add any oil or butter, because the cheese already does the job!

DSC_4405

Cooking tips.

1. For the preparation of this dish you’ll need quite a good quantity of pepper and salt to balance out the flavours and sweetness of the pears.

2. It is important to keep the vegetable broth quite warm during the whole cooking process, in this way the rice won’t stop cooking when you add the broth to the risotto.

3. Always get the best quality ingredients when making a risotto! For this dish I used the best quality of fresh Gorgonzola, sweet, tangy and so creamy that it literally melts in the mouth.

Pear and gorgonzola risotto.

Preparation and cooking time: 25 minutes

Easy

Ingredients

Serves 4

320 g risotto rice (Carnaroli or Arborio)

3 kaiser pears (or any pear suitable for cooking)

200 g good quality Gorgonzola cheese, cut into small pieces

80 g of Grana Padano cheese

salt to taste

plenty of ground black pepper

2 tablespoons of fresh parsley, finely chopped (optional)

1 litre of hot vegetable stock (I used an organic cube stock, without glutamate)

Method

1. Peel and clean the pears, then cut the fruit into little pieces.

2. Toast the rice grains in a pan (without any oil or butter) for a few minutes.

DSC_4393

3. Add the pieces of fruit with two ladles of broth and let shimmer over a low heat.

DSC_4394

4. Once the liquid has almost completely evaporated, add more broth and let evaporate again, then continue this process until the rice is cooked (the rice will take about 18-20 minutes to cook).

DSC_4396

5. When the rice is properly cooked, add 200 g of Gorgonzola cheese, 80 g of Grana Padano, salt and pepper. Mix well.

DSC_4398

6. Mix well, then cover the pan with a lid and let sit for a few minutes. Sprinkle with fresh parsley and serve.

DSC_4406

DSC_4423

Note.

At the end of the cooking process the risotto should be very creamy, however it might thicken a little when you add the cheeses (see step 5). It’s ok, you can solve this problem by adding one or two ladles of warm vegetable broth to the risotto, which will make it creamier.

Risotto alle pere e gorgonzola

Tempo di preparazione e cottura: 25 minuti

Facile

Ingredienti

Per 4 persone

320 g di riso da risotto (Carnaroli o Arborio)

3 pere kaiser (o altre pere adatte alla cottura)

200 g di gorgonzola di buona qualità, tagliato a cubetti piccoli

1 litro di brodo vegetale caldo (uso del dado biologico senza glutammato)

80 g di Grana Padano

prezzemolo fresco tritato molto finemente (facoltativo)

sale q. b.

pepe a volontà

Preparazione.

1. Pelate e pulite le pere, poi tagliate la polpa a pezzi piccoli.

2. Fate tostare i chicchi di riso in una pentola (senza olio o burro) per qualche minuto.

3. Unite la polpa delle pere con due mestoli di brodo al riso. Mescolate e lasciate evaporare il liquido a fuoco molto basso.

4. Aggiungete gradualmente altro brodo e fate evaporare, continuando così per tutto il tempo di cottura (il risotto cuoce in 18-20 minuti).

5. A cottura terminata, aggiungete 200 g di Gorgonzola, 80 g di Grana grattugiato, sale e tanto pepe.

6. Mescolate bene, coprite la pentola con un coperchio e lasciate mantecare per qualche minuto. Aggiungete del prezzemolo tritato finemente e servite.

Nota.

Se a fine cottura il risotto dovesse risultare poco cremoso, aggiungete un po’ di brodo caldo, quindi mescolate e fate mantecare.

DSC_4427

DSC_4435

Cranberry And White Chocolate Pandolce

Pandolce is a wonderful Genoese Christmas cake, traditionally made with raisins, candied fruits and pine nuts; so simple but rich in flavours, because we use only the best quality ingredients.

Cranberry, white chocolate and hazelnut Pandolce

For this Christmas I prepared (as usual) my own version, giving a foodfulife twist to the traditional recipe! I made a Pandolce packed with delicious cranberries, white chocolate and hazelnuts. This dessert is sweet bread (actually more like a cookie dough), perfect if you want to surprise your guests with something truly special for Christmas!

Believe me, it doesn’t get any better than this!

Cranberry, white chocolate and hazelnut Pandolce

If you prefer something a little less rich but still delicious, you can try my Chocolate and hazelnut Pandolce, made with dark chocolate and with less sugar and a little less butter.

Cranberry, white chocolate and hazelnut Pandolce

Cranberry and white chocolate Pandolce.

Preparation time: 15 minutes + the resting time

Cooking time: 50 minutes

Ingredients

For 8-10 servings

220 g Manitoba flour (that you can replace with whole spelt flour, or any strong flour)

100 g unbleached all purpose flour

80 g soft butter

60 g milk

1 egg

1 and a half tablespoons of honey

70 g brown sugar

grated zest of 1 organic lemon

2 tablespoons rum

1 teaspoon baking powder

1 teaspoon baking soda

a few drops of vanilla essence

150 g shelled and roasted hazelnuts (whole)

100 g white chocolate, cut into pieces and frozen (that you can replace with dark chocolate)

100 g dried cranberries

icing sugar to taste

tip. Freeze the white chocolate before making the cake, otherwise it will melt too much during the cooking time.

Cranberry, white chocolate and hazelnut Pandolce

Method.

1. Mix the softened butter with the brown sugar and the egg, then add the honey and 60 g of milk. Add two tablespoons of rum, two drops of vanilla essence, then stir until the mixture is soft and creamy.

2. Separately, mix the two flours with the baking soda and the baking powder; then add the hazelnuts, the zest of a lemon, the white chocolate and the cranberries. Combine these ingredients with the creamy mixture.

Cranberry, white chocolate and hazelnut Pandolce

3. Knead well, adding a little bit of flour to prevent the dough from sticking to your hands and place in the refrigerator for 15 minutes.

4. Line the base of an oven tray with baking paper, then place and shape the Pandolce on the tray.

Cranberry, white chocolate and hazelnut Pandolce

5. Bake in a preheated oven at 170 ° C/388°F  (with the fan running) for 50 minutes.

 Note. The oven door must remain slightly open during the entire cooking time to release the steam (you can do that by placing a metal object, like a padlock, between the door and the oven, in order to live a 1-2 cm gap).

Cranberry, white chocolate and hazelnut Pandolce

Cranberry, white chocolate and hazelnut Pandolce

6. Let the Pandolce cool completely, then dust with plenty of icing sugar.

Cranberry, white chocolate and hazelnut Pandolce

Cranberry, white chocolate and hazelnut Pandolce

Cranberry, white chocolate and hazelnut Pandolce

Cranberry, white chocolate and hazelnut Pandolce

Pandolce con mirtilli rossi e cioccolato bianco.

Preparazione: 15 minuti + il riposo

Cottura: 50 minuti

Ingredienti

Per 8-10 servings

220 g di manitoba (che potete sostituire con farina integrale di farro)

100 g di farina 00

80 g di burro morbido

60 g di latte

1 uovo

1 cucchiaio e mezzo di miele

70 g di zucchero di canna

la scorza grattugiata di un limone, non trattato

2 cucchiai di rum

1 cucchiaino di lievito per dolci

1 cucchiaino di bicarbonato

qualche goccia di essenza di vaniglia

150 g di nocciole tostate intere, senza buccia

100 g di cioccolato bianco, rotto in pezzi e surgelato (che potete sostituire con il cioccolato fondente)

100 g di mirtilli rossi essiccati (cranberries)

zucchero a velo q. b.

Nota.

Congelate il cioccolato bianco per evitare che si sciolga troppo durante la cottura.

Preparazione.

1. Amalgamate bene il burro con lo zucchero e l’uovo. Aggiungete 60 g di latte, il rum, l’essenza di vaniglia e un cucchiaio e mezzo di miele, poi mescolate fino ad ottenere un impasto cremoso.

2. Separatamente, mischiate le farine e poi aggiungete le nocciole, i mirtilli rossi, il cioccolato bianco (surgelato), la scorza di un limone, il bicarbonato e il lievito. Mescolate tutti gli ingredienti insieme, unendo l’impasto asciutto a quello cremoso.

3. Amalgamate bene, aggiungendo un po’ di farina per evitare che l’impasto si appiccichi alle mani, poi lasciate riposare nel frigorifero per 15 minuti.

4. Ricoprite la teglia con la carta da forno, poi mettete l’impasto sulla teglia e date la forma al Pandolce.

5. Infornate quindi a 170°C per 50 minuti (con la ventola in funzione).

Nota. La porta del forno deve restare socchiusa (con una fessura di 1 o 2 cm), in modo da far uscire il vapore (potete posizionare un oggetto di metallo, ad esempio un lucchetto, tra la porta e il forno).

6. Fate raffreddare completamente, poi decorate il Pandolce con abbondante zucchero a velo.

Cranberry, white chocolate and hazelnut Pandolce