Tag Archives: Gluten-free

Cooked Apple “Pudding” With Chocolate Sauce (Gluten-free, Low-fat)

Today we are going to make an easy cooked apple and walnut “pudding ” served with an aromatic cocoa sauce to celebrate the apple season.  This is a refreshing low-fat dessert, easy to make and can be prepared in advance with no problem. In the recipe method I considered an individual portion, but you can make as many as you like, simply doubling the amount of ingredients.

SER_1699

This recipe is gluten-free and relatively low-fat, however you can make it even lighter by cooking the apple in a little bit of water instead of using butter…But with a small amount of butter it will definitely taste better! 🙂

SER_1723

I hope you enjoy it! ❤

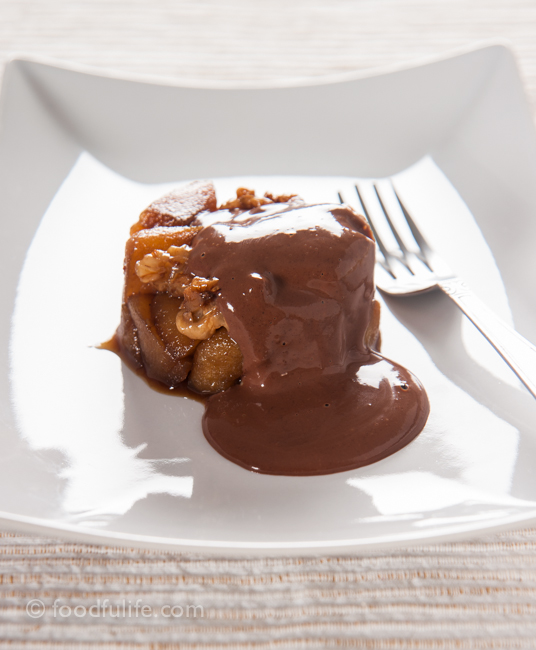
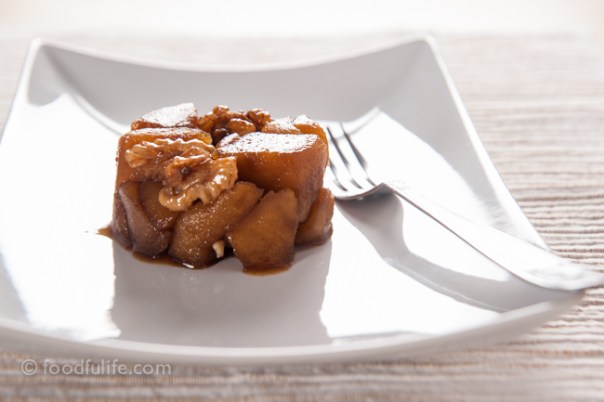
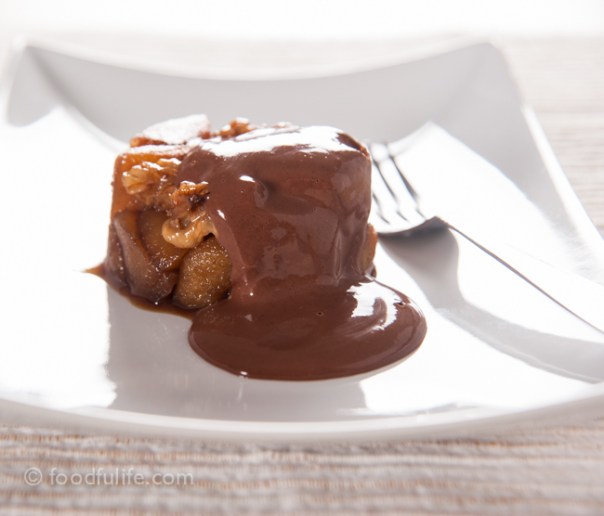
Cooked apple “pudding” with cocoa sauce.
Ingredients
For 1 serving
1 apple (I used a fuji apple)
1 tablespoon of naturally dark brown sugar
a pinch of cinnamon
two pieces of lemon zest
3 walnuts
a small knob of butter (optional)
water

For the sauce.
a spoonful of naturally brown sugar
half a tablespoon of cocoa powder (actually a little bit more)
1 egg yolk
100 ml of milk

Method.
1. Wash and peel the apple. Cut the apple into chunks, then sauté the fruit with the walnuts, the lemon zest and a pinch of cinnamon in a little bit of butter (only for a few minutes).

2. Add a tablespoon of sugar with one tablespoon of water and cook over a medium heat until the apple is tender.

3. When the apple is ready remove the lemon zests, increase the heat to evaporate the juice and then let cool.

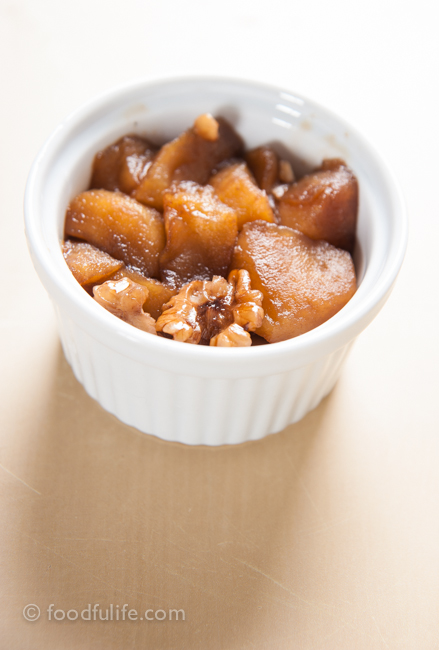
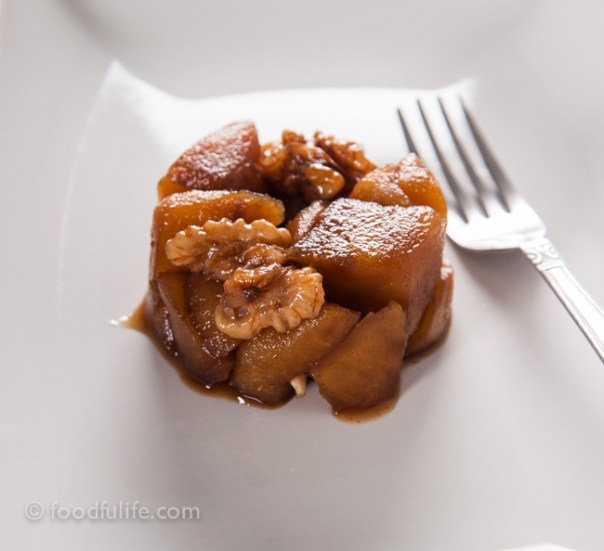
4. Put the cooked apple and walnuts into a mould and store in the refrigerator for about 30 minutes.

SER_1683

SER_1704

SER_1701

For the cocoa sauce.
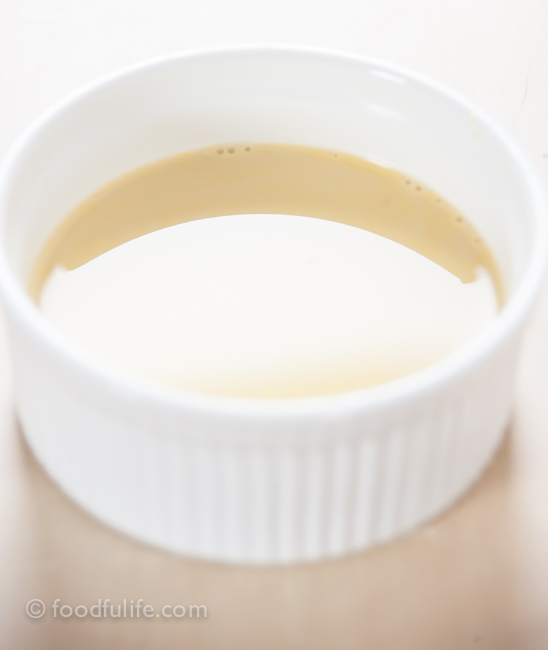
1. In a saucepan, whisk half a tablespoon of cocoa powder with an egg yolk and a tablespoon of sugar.

2. Pour the milk gradually and stir. Simmer (stirring slowly and continuously), until you get a thick sauce.

SER_1679

3. Let cool and serve with the apple “pudding”.

SER_1723

See also spelt flour apple cake (with no refined sugar and dairy-free) and spelt cake with blackberries and apples

SER_1721

“Tortino” di mela cotta e noci con salsa al cacao

Ingredienti

Per 1 porzione

1 mela (ho usato una mela fuji)

1 cucchiaio abbondante di zucchero integrale di canna

un pizzico di cannella

due pezzetti di scorza di limone

4 gherigli di noce

una noce di burro (facoltativo)

acqua q. b.

Per la salsa

1 cucchiaio abbondante di zucchero integrale di canna

mezzo cucchiaio di cacao (abbondante)

1 tuorlo d’uovo

100 ml di latte

Preparazione.

1. Lavate e pelate la mela. Tagliate la polpa a dadini e fate rosolare per qualche minuto con i gherigli di noce, le bucce di limone, la cannella e una piccola noce di burro.

2. Aggiungete un cucchiaio abbondante di zucchero integrale di canna con un po’ d’acqua. Lasciate cuocere a fuoco medio-basso fino a quando le mele saranno tenere.

3. Quando le mele saranno pronte, levate le bucce di limone e alzate il fuoco per far ritirare il liquido delle mele. Fate raffreddare.

4. Mettete la polpa della mela con le noci in uno stampino e riponete nel frigorifero per 30 minuti.

Preparazione della salsa al cacao.

1. In un pentolino, mescolate con una frusta mezzo cucchiaio di cacao con un tuorlo d’uovo e un cucchiaio di zucchero integrale di canna.

2. Aggiungete gradualmente il latte e mescolate. Quindi cuocete a fuoco lento per qualche minuto (mescolando lentamente e continuativamente), fino ad ottenere una crema densa.

3. Fate raffreddare la crema e servite con il “tortino” di mela e noci.

SER_1733

Vedere anche Torta di mele con farina di farro (senza latticini e con il miele) Torta di farro con more e mele

Tangerine Custard Pots

SER_1584

SER_1597

A delicately flavoured tangerine custard cream, baked in small pots. This dessert is super easy to make and is a great alternative to plain custard. I added some cardamom seeds in the recipe, however it ‘s totally up to you if you want to add them or not. Cardamom seeds can give a nice spicy kick to the dessert, however you have to add just a hint of really finely ground seeds (not like in the pictures) or you might get a strong bitter flavour.

You can use this tangerine custard as a cake filling if you cook it in a pan on a moderate heat instead of baking it. Have fun with this recipe and be creative with it! 🙂

SER_1505

Tangerine custard pots.

Ingredients

For 2 small terracotta pots

300 ml of milk

4-5 seedless tangerines (organic)

a piece of lemon zest

2 egg yolks

1 spoonful of cornstarch

3 finely ground cardamom seed (just the seeds, not the pods)

2 tablespoons of sugar for the custard and 2 more tablespoons for the syrup

Method.

1. Wash the tangerine really well, then peel the skin off and place the slices on the side.

2. Place the tangerine and the lemon skin in a small pan, add 300 ml of milk, then bring to the boil. Boil for a few minutes, until the tangerine skins release their flavour.

3. In a small bowl, whisk 1 spoonful of cornstarch with two tablespoons of sugar and two egg yolks, until you get a creamy mixture. Gradually pour the boiling milk into the egg mixture (but remove the skins with a strainer) and whisk well.

SER_1520

4. Pour the mixture into two pots and place on a thick oven tray filled with water. Bake at 160° C (320 ° F) until the custard has thickened.

SER_1529

SER_1571

SER_1583

For the decoration.

In a small pan put 2 tablespoons of sugar and then cover with water, then add the tangerine slices and bring to the boil. Continue to cook at a moderate heat until you have a syrup. Decorate the custard pots with the tangerine slices, a hint of finely ground cardamom seeds and then pour some syrup on top.

Terrine di crema cotta al mandarino.

Ingredienti

2 stampini piccoli di terracotta

300 ml di latte

4-5 mandarini non trattati (senza semi e a buccia sottile)

un pezzo di scorza di limone

2 tuorli d’uovo

1 cucchiaio di amido di mais

3 semi di cardamomo, finemente macinati (non il baccello, ma i semi)

2 cucchiai di zucchero, per fare la crema pasticciera

2 cucchiai di zucchero, per fare lo sciroppo.

Preparazione.

1. Lavate bene i mandarini, quindi levate le bucce e mettete gli spicchi da parte.

2. Mettete le scorze dei mandarini e del limone con 300 ml di latte in un pentolino e portate ad ebollizione. Fate bollire per alcuni minuti.

3. Mescolate 1 cucchiaio abbondante di amido di mais con due cucchiai di zucchero e due tuorli d’uovo, fino ad ottenere un composto cremoso. Versate gradualmente il latte bollente nel composto e, contemporaneamente, levate le bucce dei mandarini filtrando con un colino. Mescolate bene.

4. Riempite due stampini piccoli di terracotta con il composto e metteteli in una teglia riempita d’acqua (x cuocere nel forno la crema a bagnomaria). Infornate a 160 ° C e fate cuocere fino a quando la crema si sarà rassodata. Lasciare raffreddare.

Per la decorazione.

Mettete 2 cucchiai di zucchero e ricoprire con un po’ d’acqua, poi aggiungete le fette di mandarino e portate ad ebollizione. Continuate la cottura a fuoco moderato fino a quando si dispone di uno sciroppo. Decorate le crema pasticciera con le fette di mandarino, un pizzico di semi di cardamomo finemente macinate e lo sciroppo.

SER_1596

Rice Salad With Buffalo Mozzarella and Olives

A delicious variation of the classic recipe Insalata di riso, enriched with colourful seasonal ingredients. Quick and easy to prepare, this wonderful dish could be a great starter for a dinner party or a light summer meal.
In the recipe method I used a round pastry cutter to shape the rice with the ingredients, but you can mix all the ingredients if you prefer.

DSC_9673

DSC_9653

Rice salad with buffalo mozzarella and olives.

4 servings

Ingredients

200g arborio rice (you can use a parboiled rice)

4 ripe plum tomatoes

4 buffalo mozzarella

120 g of pitted black and green olives

a bunch of fresh basil

extra virgin olive to taste

salt and pepper

DSC_9631

DSC_9615

Method.

1. Cook the rice following the preparation method illustrated on the packaging. Then drain the rice and season with a little bit of extra virgin olive oil.

DSC_9624

DSC_9637

2. Wash the basil and remove the stems. Roughly chop the basil leaves and slice the olives.

3. Drain the buffalo mozzarella well and then cut it into small pieces.

4. Place the rice on the dish and then cover it with the olives, the mozzarella and the basil. Season with extra virgin olive oil, salt, pepper and serve.

DSC_9639

DSC_9682

DSC_9672

Insalata di riso con mozzarella di bufala e olive.

Per 4 persone

Ingredienti

200 g di riso arborio

4 pomodori perini maturi

4 mozzarelle di bufala

120 g di olive nere e verdi snocciolate

un mazzetto di basilico fresco

olio extra vergine di oliva q. b.

sale e pepe

Preparazione.

1. Cuocete il riso seguendo il metodo di preparazione e il tempo di cottura indicato sulla confezione. A cottura terminata, scolate il riso e conditelo con un po’ d’olio extra vergine d’oliva.

2. Lavate il basilico e rimuovete i gambi. Tagliate le foglie di basilico e le olive.

3. Scolate bene le mozzarelle di bufala e poi tagliatele a cubetti.

4. Sistemate il riso nel piatto e ricopritelo con le olive, i cubetti di mozzarella e il basilico.

Condite ancora con olio extra vergine d’oliva, sale, pepe e servite.

DSC_9662

DSC_9689

Buckwheat Crepes (Gluten-free, High in fibre)

Rich in flavour and fibre, buckwheat crepes are incredibly delicious, healthy and can make a simple meal look quite impressive! You can be a little intimidated when you first make crepes….Well, I was when I made crepes for the first time! It is not so difficult to make nice crepes, as long as you remember to occasionally grease the frying pan during the preparation method, you move quickly when you shape the crepes and you cook the crepes over a low heat.

Crepe on round wooden cutting board on a table mat

Tips.
It might take a little bit of practice at first, however the best way to shape the crepes is to quickly move the pan around, in order to spread and flatten the batter evenly. During this process the frying pan shouldn’t be too hot, otherwise the batter will cook too quickly, leaving you with thick and uneven crepes.
During the cooking time, the crepes will start curling around the edges and lifting up from the pan; at this point the crepes are ready to be flipped around, to cook both sides.

You can be very creative with this dish and serve your crepes with lots of savoury or sweet fillings, experimenting with a great variety of ingredients, textures and flavour combinations.
Enjoy the recipe and have fun with it!

crepes on rectangular cutting board on a beige cutting mat, with white background

Buckwheat crepes

Ingredients

For 10 crepes

2 eggs

300 g of buckwheat flour

400 ml of milk

100 ml of water

extra virgin olive oil

salt or sugar (depending if you are making a sweet or savoury recipe)

extra virgin olive oil

Method.

1. In a bowl, gradually mix the flour with milk, water and salt (or sugar). Separately, beat the eggs and then make the batter incorporating the eggs and 1 tablespoon of extra virgin olive oil into the flour mixture. Place the batter to cool for two hours in the refrigerator.

crepes batter with whisk in white plastic bowl

2. Heat a large frying pan over a low heat, then grease the base with a tablespoon of extra virgin olive oil.

3. Using a ladle, pour the batter in centre of the pan, then spread evenly and let cook for a few minutes.

raw crepe in a stone pan with olive oil on blue painted table

4. When the crepe starts curling around the edges, turn it around and cook the other side.

Repeat the process until you have made all the crepes, occasionally greasing the pan with a little extra virgin olive oil.

pile of crepes on round wooden cutting table on beige table mat

Also see the Gluten-free Béchamel sauce recipe and the Crepes with swiss chard and borage filling recipe.

SER_0750

SER_0753

SER_0780

Crepes di grano saraceno

Ingredienti

Per 10 crepes

2 uova

300 g di farina di grano saraceno

400 ml di latte

100 ml di acqua

olio extra vergine d’oliva

zucchero o sale (dipende se la ricetta è dolce o salata)

Preparazione.

1. Amalgamate la farina e il sale (o zucchero) con il latte mischiato all’acqua. A parte, sbattete le uova e incorporatele al composto con un cucchiaio d’olio extra vergine d’oliva. Lasciate riposare la pastella nel frigorifero per almeno due ore.

2. Fate scaldare, a fuoco moderato, una padella con un cucchiaio d’olio extra vergine d’oliva.

3. Usando un mestolo, versate il composto al centro della padella, poi muovete energicamente la pentola per stendere uniformemente la pastella.

4. Lasciate cuocere per qualche minuto. Quando la crepe incomincia ad arricciarsi sui bordi potete girarla per cuocerla su entrambi i lati.

Preparate tutte le crepes, ricordandovi di ungere ogni tanto la padella con un filo d’olio.

Guardate anche la ricetta della Besciamella con amido di mais e la ricetta delle Crepes con ripieno di bietole e borragine.

Light Béchamel Sauce (Gluten-free White Sauce)

Béchamel sauce is a delicious white sauce, traditionally used to enrich various recipes like lasagna, cannelloni, crepes and other oven-baked pasta dishes.  Usually made with butter and flour, today we are going to make a lighter gluten-free and Parmesan-flavoured version of this wonderful sauce.
It is a fairly easy and quick recipe to make, just mix the cornstarch with the milk and cook the sauce really gradually and slowly….Take your time with it, heat it gently and stir it constantly during the entire preparation method and you’ll be all right!

Tip. The béchamel sauce might thicken a little too much when it cools down. You can solve this problem by heating the sauce up with some hot milk over a low heat and then blending everything using a mixer. With this method you should get a smooth sauce with the desired consistency.

DSC_4484

Gluten-free Béchamel sauce (white sauce with cornstarch)

Ingredients

600 ml of milk

80 g of cornstarch

4 tablespoons of Parmesan cheese

a pinch of grated nutmeg (optional)

salt and pepper to taste

Method.

1. In a pan, mix the milk with 80 g of cornstarch (add the milk very gradually).

2. Warm the milk up over a low heat, then bring slowly to a boil, stirring constantly and vigorously. When the sauce has thickened, add the grated Parmesan cheese and stir for a few more minutes. Remove from the heat.

DSC_4468

3. Season with one tablespoon of extra virgin olive oil, a pinch of grated nutmeg (optional), salt, pepper and serve.

DSC_4486

DSC_4510

Also see the Crepes with swiss chard and borage filling recipe and the Buckwheat Crepes recipe

Besciamella con amido di mais (senza glutine)

Ingredienti

600 ml di latte

80 g di amido di mais

4 cucchiai di Parmigiano Reggiano

sale e pepe q. b.

un pizzico di noce moscata

un cucchiaio d’olio extra vergine d’oliva

Preparazione.

1. Mescolate il latte freddo con 80 g di amido di mais (aggiungete il latte molto gradualmente).

2. Mettete il latte sul fuoco e portate ad ebollizione, mescolando energicamente. Quando la crema si sarà addensata, aggiungete il parmigiano grattugiato e mescolate per qualche minuto.

3. Spegnete il fuoco, condite con un cucchiaio di olio extra vergine d’oliva, un pizzico di noce moscata, sale, pepe e servite.

DSC_4515

Guardate anche la ricetta delle Crepes di grano saraceno e la ricetta delle Crepes con ripieno di bietole e borragine.

Traditional Recipe: Easy Spinach Flan

DSC_4335

This week we are going to prepare a light spinach flan, made with lots of spinach, fresh ricotta, eggs and parmesan cheese. It is an incredibly easy dish to make and so tasty, it can be served as a main vegetarian meal with some fresh salad on the side, but it is also a wonderful side dish.
My mother prepares this flan very often and we love it! I hope you enjoy the recipe!

Easy spinach flan

Ingredients

Serves 4-6

500 g of fresh spinach, washed and ready to cook

80 g of Parmigiano Reggiano

2 large eggs

250 g ricotta

3 tablespoons of polenta (or breadcrumbs)

4 tablespoons extra virgin olive oil

a pinch of nutmeg

salt and pepper to taste

Method.

1. Soften the spinach in a large pan with two tablespoons of water, over a low heat for a few minutes.

2. Drain the spinach and let cool (as the spinach will release some water when they cook). Then vigorously squeeze the vegetables for a few minutes.

3. Coarsely chop the spinach using a knife.

DSC_4293

4. In a large bowl, mix 250g ricotta with two large eggs, 80 g Parmesan cheese, then season with salt, pepper, a pinch of nutmeg and two tablespoons of extra virgin olive oil. Mix well.

DSC_4298

5. Line a small baking pan with a sheet of baking paper (I used a 22 cm x 6 cm round pan), then grease the base with 2 tablespoons of extra virgin olive oil.

6. Pour the spinach mixture into the pan, sprinkle with lots of polenta (or breadcrumbs) and bake at 180 ° C (356 °F) until the flan is golden brown around the edges. Serve warm or cold, as you prefer.

DSC_4310

DSC_4312

DSC_4315

Follow foodfulife on Facebook for more mouth-watering recipes!

DSC_4346

Sformato di spinaci (facile)

Ingredienti

per 4-6 persone

500 g di spinaci freschi in busta

80 g di Parmigiano Reggiano

2 uova medio-grandi

250 g di ricotta

polenta (o pangrattato)

4 cucchiai di olio extra vergine d’oliva

Noce moscata

sale e pepe q. b.

Preparazione.

1. Fate ammorbidire gli spinaci in una pentola con due cucchiai d’acqua, a fuoco molto basso per qualche minuto.

2. Scolate e lasciate raffreddare gli spinaci, poi strizzateli energicamente.

3. Tritate grossolanamente gli spinaci usando un coltello.

4. Unite 250 g di ricotta a due uova con 80 g di Parmigiano Reggiano grattugiato, poi condite con sale, pepe, un pizzico di noce moscata e due cucchiai d’olio extra vergine d’oliva. Mescolate bene.

5. Ricoprite una teglia con carta da forno (uso una casseruola di 22 cm x 6 cm) e ungete la base con due cucchiai di olio extra vergine d’oliva.

6. Versate il contenuto nella teglia, cospargete la superficie con abbondante polenta e infornate a 180° C, fino a quando lo sformato sarà dorato sulla parte superiore.

Pear And Gorgonzola Risotto (no oil, no butter)

DSC_4422

This pear and gorgonzola risotto is definitely another highly addictive dish!….One of those dishes that you just can’t stop eating, even when you have picked up the last grain of rice and swept up the all the traces of what was left on the plate with a spoon!

A truly delicious risotto, where the flavours blends perfectly together and the consistency is perfectly creamy and yet quite “light”. In fact, there is no need to add any oil or butter, because the cheese already does the job!

DSC_4405

Cooking tips.

1. For the preparation of this dish you’ll need quite a good quantity of pepper and salt to balance out the flavours and sweetness of the pears.

2. It is important to keep the vegetable broth quite warm during the whole cooking process, in this way the rice won’t stop cooking when you add the broth to the risotto.

3. Always get the best quality ingredients when making a risotto! For this dish I used the best quality of fresh Gorgonzola, sweet, tangy and so creamy that it literally melts in the mouth.

Pear and gorgonzola risotto.

Preparation and cooking time: 25 minutes

Easy

Ingredients

Serves 4

320 g risotto rice (Carnaroli or Arborio)

3 kaiser pears (or any pear suitable for cooking)

200 g good quality Gorgonzola cheese, cut into small pieces

80 g of Grana Padano cheese

salt to taste

plenty of ground black pepper

2 tablespoons of fresh parsley, finely chopped (optional)

1 litre of hot vegetable stock (I used an organic cube stock, without glutamate)

Method

1. Peel and clean the pears, then cut the fruit into little pieces.

2. Toast the rice grains in a pan (without any oil or butter) for a few minutes.

DSC_4393

3. Add the pieces of fruit with two ladles of broth and let shimmer over a low heat.

DSC_4394

4. Once the liquid has almost completely evaporated, add more broth and let evaporate again, then continue this process until the rice is cooked (the rice will take about 18-20 minutes to cook).

DSC_4396

5. When the rice is properly cooked, add 200 g of Gorgonzola cheese, 80 g of Grana Padano, salt and pepper. Mix well.

DSC_4398

6. Mix well, then cover the pan with a lid and let sit for a few minutes. Sprinkle with fresh parsley and serve.

DSC_4406

DSC_4423

Note.

At the end of the cooking process the risotto should be very creamy, however it might thicken a little when you add the cheeses (see step 5). It’s ok, you can solve this problem by adding one or two ladles of warm vegetable broth to the risotto, which will make it creamier.

Risotto alle pere e gorgonzola

Tempo di preparazione e cottura: 25 minuti

Facile

Ingredienti

Per 4 persone

320 g di riso da risotto (Carnaroli o Arborio)

3 pere kaiser (o altre pere adatte alla cottura)

200 g di gorgonzola di buona qualità, tagliato a cubetti piccoli

1 litro di brodo vegetale caldo (uso del dado biologico senza glutammato)

80 g di Grana Padano

prezzemolo fresco tritato molto finemente (facoltativo)

sale q. b.

pepe a volontà

Preparazione.

1. Pelate e pulite le pere, poi tagliate la polpa a pezzi piccoli.

2. Fate tostare i chicchi di riso in una pentola (senza olio o burro) per qualche minuto.

3. Unite la polpa delle pere con due mestoli di brodo al riso. Mescolate e lasciate evaporare il liquido a fuoco molto basso.

4. Aggiungete gradualmente altro brodo e fate evaporare, continuando così per tutto il tempo di cottura (il risotto cuoce in 18-20 minuti).

5. A cottura terminata, aggiungete 200 g di Gorgonzola, 80 g di Grana grattugiato, sale e tanto pepe.

6. Mescolate bene, coprite la pentola con un coperchio e lasciate mantecare per qualche minuto. Aggiungete del prezzemolo tritato finemente e servite.

Nota.

Se a fine cottura il risotto dovesse risultare poco cremoso, aggiungete un po’ di brodo caldo, quindi mescolate e fate mantecare.

DSC_4427

DSC_4435

Pear And Passion Fruit Smoothie

A delicious and delicate smoothie, high in fibre, vitamins A, C and also contains a good quantity of iron, calcium, manganese and potassium. I added some chia seeds for extra fibre, omega 3 fatty acid and vegetable proteins.
If I was to describe it in a few words, I’d say that this smoothie tastes like spring! So take a sip of this wonderful drink, relax and enjoy the flavours!

DSC_4349

Pear and passion fruit smoothie.

for 2 smoothies

Ingredients

2 Williams pears (Bartlett pears)

2 passion fruit (maracujà)

200 ml almond milk (or the vegetable milk of your choice)

2 tablespoons of chia seeds (optional)

4 ice cubes

Method

1. Wash peel and clean the pears then, using a teaspoon, scoop out all the pulp form the passion fruit.

2. Using a blender, blend the fruit with 200 ml of almond milk, two tablespoons of chia seeds and 4 ice cubes.

3. Garnish with fresh mint leaves and serve.

DSC_4363

DSC_4373

DSC_4379

Frullato di pere e frutto della passione.

per 2 frullati

Ingredienti

2 pere Williams

2 frutti della passione (maracujà)

200 ml di latte di mandorle (o il latte vegetale di vostra scelta)

2 cucchiai di semi di chia (facoltativo)

4 cubetti di ghiaccio

Preparazione.

1. Sbucciate e pulite le pere poi, utilizzando un cucchiaino, estraete tutta la polpa dai frutti della passione.

2. Frullate la frutta con 200 ml di latte di mandorla, due cucchiai di semi di chia e 4 cubetti di ghiaccio.

3. Guarnite con qualche foglia di menta fresca e servite.

DSC_4366