Tag Archives: Baking and Confections

Delicious Chocolate and Pistachio Flan.

This week I’m publishing another recipe from my friend, Anahita Tcheraghali.
With the Christmas holidays just around the corner, we decided to prepare a light and tasty dessert for you to enjoy with the whole family during this festive season!
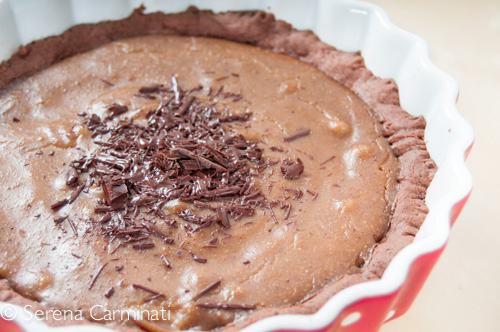
This delightful flan is made with a nice chocolate shortcrust pastry and an exquisite pistachio filling, with an intense caramel-like flavour. It is light and perfect for vegan diets because it doesn’t contain eggs and it’s dairy-free.
You will love it!
DSC_3399
Ingredients
for the filling
300 ml (10 fl oz)  rice milk
25 g (0.88 oz) muscovado brown sugar
40 g (1.4 oz) of shelled pistachios 
2 tablespoons cornstarch
a vanilla bean (or a few drops of vanilla extract)
For the pastry
200 g (7 oz) flour 00
60 g (2 oz) of sunflower oil
60 g (2 oz) dark chocolate (with 70% cocoa solids)
80 g (3 oz) muscovado brown sugar
a pinch of baking soda
some grated lemon zest
a pinch of salt
a pinch of cinnamon (optional)
Preparation of the filling.
1. Finely grind the pistachios.
DSC_3332
2. Mix the ground pistachios with 2 tablespoons of cornstarch and 25 g (0.88 oz)  of sugar.
DSC_3341
3. Add the rice milk with a few seeds of the vanilla bean.
4. Thicken the filling on a low heat, stirring continuously for about 10 minutes.
DSC_3355
Preparation of the pastry.
1. Separately, combine the flour with the baking soda, then melt the chocolate in a bain-marie.
DSC_3371
2. Mix the flour with the melted chocolate, 300 ml (10 fl oz) of oil, a little bit of lemon zest, cinnamon, salt and 80 g of sugar.
DSC_3379
3. Once you have a smooth dough, put it in the fridge for 30 minutes.
DSC_3383
4. Roll out the pastry on a greased baking tray and pierce the surface with a fork.
DSC_3390
5. Bake the base of the tart at 170 ° C (338 °F)  for 10 minutes.
6. Spoon the filling into the the pastry base and bake for another 15 minutes.
DSC_3395
DSC_3417
DSC_3443
Crostata di cioccolato con crema di pistacchi.
Ingredienti
Per la pasta brisé al cioccolato
200 g di farina 00
60 g di olio di semi di girasole
60 g di cioccolato fondente al 70 % (possibilmente bio)
80 g di zucchero di canna muscovado
un pizzico di bicarbonato
1 po’ di scorza di limone non trattato
un pizzico di cannella (facoltativo)
un pizzico di sale
Per la crema
2 cucchiai di amido di mais
300 ml di latte di riso
40 g di pistacchi sgusciati
una stecca di vaniglia (o qualche goccia di estratto di vaniglia)
25 g di zucchero di canna muscovado
Preparazione della crema.
1. Tritate i pistacchi finemente.
2. Unite i pistacchi tritati all’amido di mais e allo zucchero. Aggiungete il latte di riso e qualche seme del baccello di vaniglia.
3. Fate addensare la crema sul fornello a fuoco basso, mescolando continuativamente.
Preparazione della pasta.
1. A parte, unite la farina al bicarbonato e poi fate sciogliere il cioccolato a bagnomaria.
2. Impastate la farina con l’olio, la scorza di limone, la cannella, il cioccolato fuso, il sale e lo zucchero.
3. Una volta ottenuto un impasto omogeneo, mettetelo a riposare nel frigo per 30 minuti.
4. Stendete la pasta su una teglia leggermente unta e bucherellate la superficie con una forchetta.
5. Infornate la base della crostata a 170 °C per 10 minuti.
6. Riempite la base della torta con la crema e poi fate cuocere per altri 15 minuti.

Delicious Plum Ice Cream With A Hint Of Cinnamon

In my parents’ garden there is a beautiful wild plum tree that every year gives us lots of fruit. These plums, however, are small, mushy and not very sweet. They not very good to eat but great for preparing jams, sauces and desserts. This week I’m going to prepare a really nice and delicate plum ice cream, enriched with a hint of cinnamon, a real treat!

DSC_9196

Yellow plum ice cream with a hint of cinnamon.

Ingredients

Serves 4

500 g yellow plums, halved, pitted

1 tablespoon of cornstarch

the juice of 1/2 a lemon

150 g brown sugar

200 ml water

1 greek yogurt (170 g)

1 tablespoon honey

cinnamon to taste (optional)

Method.

1. Peel the plums carefully (the plums I’m using have a very thin skin, therefore I’m not going to peel them for this recipe).

DSC_9176

2. Meanwhile, boil the water with sugar and let cool.

DSC_9179

3. Puree the fruit in a food processor until smooth, then add the lemon juice, honey, corn starch, and finally the yogurt with cinnamon to the mixture.

DSC_9181

4. Add the sugar syrup to the rest of the ingredients and mix well.

DSC_9192

5. Place the mixture in the ice cream maker and follow the manufacturer’s instructions.

DSC_9195

6. Store in freezer. Top with some fresh mint and serve.

DSC_9214
Gelato di prugne gialle alla cannella.
Ingredienti
Per 4 persone
500 g di prugne gialle
1 cucchiaio abbondante di amido di mais
il succo di 1/2 limone
150 g di zucchero di canna
200 ml di acqua
1 yogurt greco (175 g)
1 cucchiaio di miele
cannella q b (facoltativo)
Preparazione.

1. Lavate e asciugate le prugne, quindi togliete la buccia e il nocciolo (qui io uso delle prugne con la buccia sottilissima e non la tolgo).

2. A parte, fate bollire l’acqua con lo zucchero e lasciate raffreddare.

3. Frullate la frutta fino ad ottenere una crema, poi aggiungete il limone, il miele, l’amido di mais e lo yogurt con le cannella.

4. Aggiungete anche lo sciroppo e mescolate bene.

5. Mettete il composto nella gelatiera e seguite le istruzioni.

6. Una volta fatto, potete conservare il gelato nel congelatore o servirlo direttamente nelle coppette con due foglie di menta.

Cake Design Tutorial: Silk Clutch Bag (advanced).

Some time ago I helped a friend make a cake design tutorial. Although it’s definitely not a simple one, actually quite complicated, we decided to put it online anyway. Laura made a very sleek silk clutch bag cake design and it took several pictures and steps to be able to partially explain the process. We did our best, we hope you enjoy it. Feel free to comment on this post.

If you wish to see more of Laura Barcellonio’s cake design visit her facebook page : https://www.facebook.com/pages/Cake-Deluxe/265825503502411?fref=ts

Follow us on facebook : https://www.facebook.com/Foodfulife

Silk Clutch Bag Cake

Designed by Laura Barcellonio

dsc_5137

The material used:
A chopping board and a wide, pointed knife (small size)
A pizza or pastry cutting wheel (with a straight blade)
A metal working board to use as a cut mat and a cutting knife (a scalpel)
paper, pencil and scissors
Basic kitchen tools, a silicone spatula and a food brush
Few toothpick and straws
A base for cakes (a thick cardboard coated ) and a white ribbon

For the cake:

1 kg white sugar paste for the cake, plus 500 g for the base

ivory and black food colouring, (and edible pearl food dust optional)

vanilla buttercream

A sponge or a madeira cake ( quite thick)

A few raw pieces of spaghetti

Coloring the sugar paste:

Take 1 kg of white sugar paste. Using a toothpick, start mixing some ivory food colouring with a small amount of white sugar paste. Increase the amount of white sugar paste until you get the desired colour. Take a small piece of ivory paste and add the black color (just a little) , to create a uniform grey paste.

DSC_5145

Preparation of the pieces to dry:

With the ivory paste shape and cut the handle of the bag. Make 6 grey pearls (1 cm in diameter each) and insert them, three at a time, into two small pieces of spaghetti.

 Untitled-2.4

Then shape two grey drops, just a little bit bigger than the pearls. Let all the pieces dry for about an hour.

 DSC_5172

Cake shaping technique.

Using tracing paper, draw and cut the outlines of your clutch bag. Draw the base of the bag (22 x 12 cm, considering the widest points) , and the side ( 22 x 18 cm, considering the maximum width and height),then cut out your sketches. Take the sponge cake, mark the base and cut out two equal pieces in order to overlap them.

Untitled 1

You can use part of the buttercream to make the filling. Following the outline of your drawings, cut the cake until you obtain the desired shape.

Coat crumb with plenty of butter cream and put the cake to cool in the refrigerator for 15 minutes.

Roll out some ivory paste with a rolling pin, until you have a thin sheet, then cut out a rectangular shape and place it gently over the cake.

Untitled 2.1

Cut a trapeze out of the sugar paste sheet and use the straws to calculate 9 folds. Now shape the folds with your fingers and cut out any excess paste. Brush one side of the cake with water and cover it with the sugar paste layer. Repeat this procedure to cover both sides.

Untitled-2.2

DSC_5251

Cut another two smaller trapezoids and calculate 6 folds for each piece. Shape the folds, brush the surface, and apply the trapezoids to the small sides.

Untitled-3

For the handle:

Roll out the grey sugar paste, shape a small thick sheet and cut out two narrow strips, equal in size. Moisten the part on top of the cake with water, then place and mould the strips.

Take the two pieces of spaghetti with the pearls, pierce the grey stripes and place the handle on top of the cake. Using two pieces of spaghetti place the two drops in the center (see the final picture).

Untitled-4

For roses:

Roll out a thin sheet of ivory sugar paste ( 25 cm x 10 cm). Fold the sheet in half and roll it up to shape a rose. Remove any excess paste. Pierce the back of the rose with a small piece of spaghetti and place the rose on the cake.

Untitled-5

For the base:

Roll out a large chunk of ivory paste and cover the entire base of the cake. Roll out some thin stripes of white sugar paste, then fold them to create a fabric-like effect on the base of the cake.

Use a white ribbon to cover the edges. Place the cake on top of the base and brush the surface of the clutch bag with a pearl food colour powder,  diluted in a little bit of alcohol (this step is optional).

Untitled-2.3