Tag Archives: Articles

Cake Design Tutorial: Silk Clutch Bag (advanced).

Some time ago I helped a friend make a cake design tutorial. Although it’s definitely not a simple one, actually quite complicated, we decided to put it online anyway. Laura made a very sleek silk clutch bag cake design and it took several pictures and steps to be able to partially explain the process. We did our best, we hope you enjoy it. Feel free to comment on this post.

If you wish to see more of Laura Barcellonio’s cake design visit her facebook page : https://www.facebook.com/pages/Cake-Deluxe/265825503502411?fref=ts

Follow us on facebook : https://www.facebook.com/Foodfulife

Silk Clutch Bag Cake

Designed by Laura Barcellonio

dsc_5137

The material used:
A chopping board and a wide, pointed knife (small size)
A pizza or pastry cutting wheel (with a straight blade)
A metal working board to use as a cut mat and a cutting knife (a scalpel)
paper, pencil and scissors
Basic kitchen tools, a silicone spatula and a food brush
Few toothpick and straws
A base for cakes (a thick cardboard coated ) and a white ribbon

For the cake:

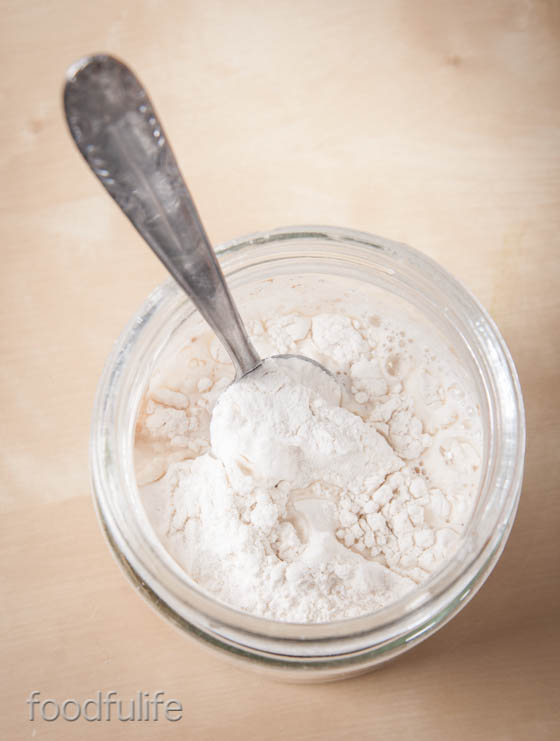
1 kg white sugar paste for the cake, plus 500 g for the base

ivory and black food colouring, (and edible pearl food dust optional)

vanilla buttercream

A sponge or a madeira cake ( quite thick)

A few raw pieces of spaghetti

Coloring the sugar paste:

Take 1 kg of white sugar paste. Using a toothpick, start mixing some ivory food colouring with a small amount of white sugar paste. Increase the amount of white sugar paste until you get the desired colour. Take a small piece of ivory paste and add the black color (just a little) , to create a uniform grey paste.

DSC_5145

Preparation of the pieces to dry:

With the ivory paste shape and cut the handle of the bag. Make 6 grey pearls (1 cm in diameter each) and insert them, three at a time, into two small pieces of spaghetti.

 Untitled-2.4

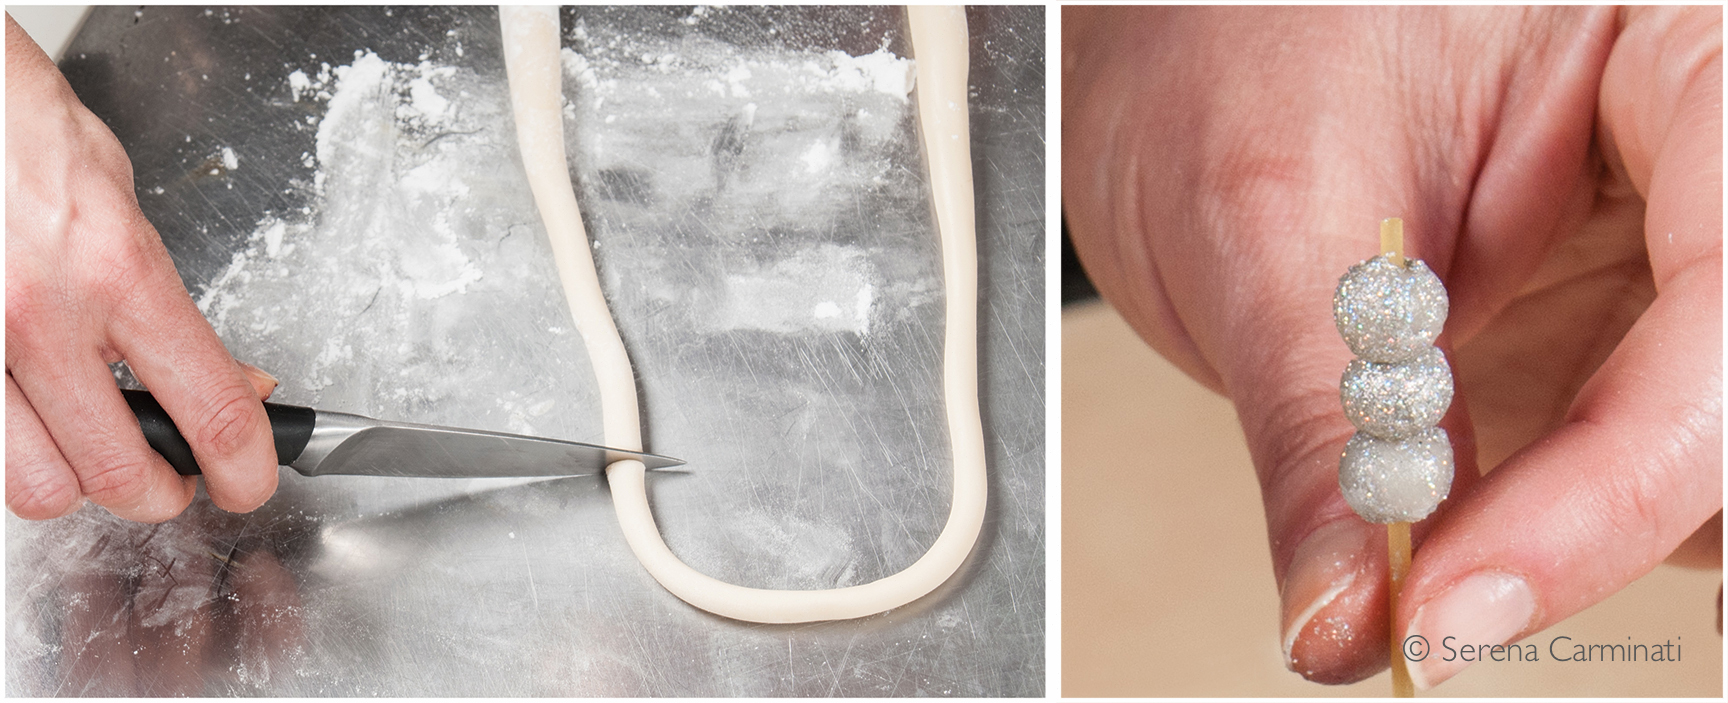
Then shape two grey drops, just a little bit bigger than the pearls. Let all the pieces dry for about an hour.

 DSC_5172

Cake shaping technique.

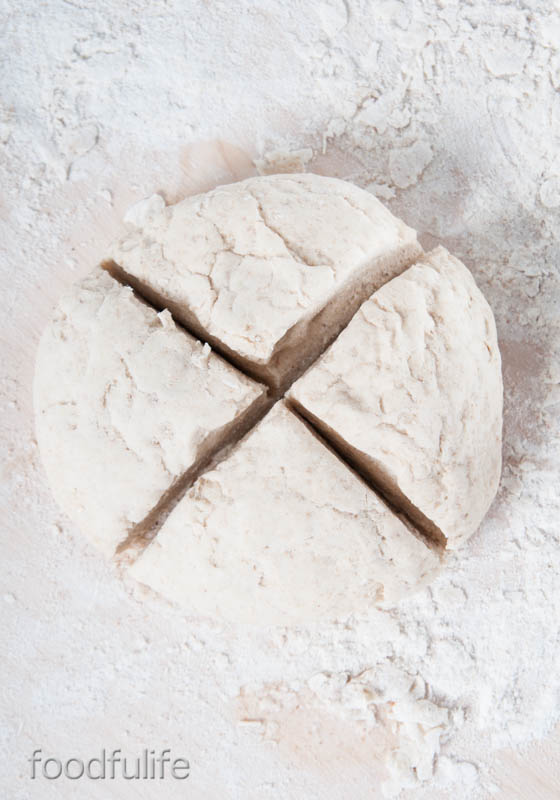
Using tracing paper, draw and cut the outlines of your clutch bag. Draw the base of the bag (22 x 12 cm, considering the widest points) , and the side ( 22 x 18 cm, considering the maximum width and height),then cut out your sketches. Take the sponge cake, mark the base and cut out two equal pieces in order to overlap them.

Untitled 1

You can use part of the buttercream to make the filling. Following the outline of your drawings, cut the cake until you obtain the desired shape.

Coat crumb with plenty of butter cream and put the cake to cool in the refrigerator for 15 minutes.

Roll out some ivory paste with a rolling pin, until you have a thin sheet, then cut out a rectangular shape and place it gently over the cake.

Untitled 2.1

Cut a trapeze out of the sugar paste sheet and use the straws to calculate 9 folds. Now shape the folds with your fingers and cut out any excess paste. Brush one side of the cake with water and cover it with the sugar paste layer. Repeat this procedure to cover both sides.

Untitled-2.2

DSC_5251

Cut another two smaller trapezoids and calculate 6 folds for each piece. Shape the folds, brush the surface, and apply the trapezoids to the small sides.

Untitled-3

For the handle:

Roll out the grey sugar paste, shape a small thick sheet and cut out two narrow strips, equal in size. Moisten the part on top of the cake with water, then place and mould the strips.

Take the two pieces of spaghetti with the pearls, pierce the grey stripes and place the handle on top of the cake. Using two pieces of spaghetti place the two drops in the center (see the final picture).

Untitled-4

For roses:

Roll out a thin sheet of ivory sugar paste ( 25 cm x 10 cm). Fold the sheet in half and roll it up to shape a rose. Remove any excess paste. Pierce the back of the rose with a small piece of spaghetti and place the rose on the cake.

Untitled-5

For the base:

Roll out a large chunk of ivory paste and cover the entire base of the cake. Roll out some thin stripes of white sugar paste, then fold them to create a fabric-like effect on the base of the cake.

Use a white ribbon to cover the edges. Place the cake on top of the base and brush the surface of the clutch bag with a pearl food colour powder,  diluted in a little bit of alcohol (this step is optional).

Untitled-2.3

Cake Design Tutorial: Pochette di seta

Qualche tempo fa ho aiutato un’ amica a fare un tutorial di cake design. Laura ha fatto una meravigliosa torta a forma di una pochette di seta, un elegantissimo esempio di cake design che richiede un po’ di impegno nella preparazione. Speriamo che vi piaccia.

Se volete vedere di più di cake design di Laura Barcellonio visitare la sua pagina facebook: https://www.facebook.com/pages/Cake-Deluxe/265825503502411?fref=ts

Seguiteci su Facebook:https://www.facebook.com/Foodfulife

Designed by Laura Barcellonio

dsc_5137

Il materiale:
Un tagliere grande e un piccolo coltello largo e stretto
Una rotella taglia pasta
Un piano di lavoro su cui tagliare e un cutter
delle cannucce e qualche stecchino
carta, matita e forbici
Attrezzi base da cucina, una spatola in silicone e un pennello per alimenti
una base per torte spessa di cartone rivestito e un nastro bianco
Per la torta:
1 kg di pasta di zucchero bianca per la torta, più altri 500 g per la base
2 coloranti alimentari concentrati tinta avorio e nero  (il perlato in polvere é facoltativo)
Crema al burro 
Torta di pan di spagna o plumcake allo yogurt
Zucchero a velo q b
alcuni spaghetti (pasta) per le applicazioni


Preparazione della pasta di zucchero:

Prendete 1 kg di pasta di zucchero bianca. Infilate la punta di uno stuzzicadenti nel colore alimentare avorio (ivory) e colorate una piccola quantità di pasta di zucchero. Aggiungete della pasta di zucchero bianca fino ad ottenere il colore desiderato. Fate lo stesso procedimento usando la pasta avorio e pochissimo colorante alimentare nero per creare una pasta grigia.

DSC_5145

Preparazione dei pezzi da far asciugare:

Con la pasta avorio modellate il manico (1 cm di diametro) e tagliate le estremità. Preparate 6 palline grigie uguali (1 cm circa di diametro) e infilzatele, tre a tre, con due pezzi di spaghetti.

Untitled-2.4

Preparate anche due gocce poco più grosse delle palline.

 DSC_5172

Fate asciugare per un’oretta.

Tagliamo la torta.

Disegnate e tagliate le sagome della pochette. La sagoma dell’ellisse della base ha come massime dimensioni 22 x 12 cm, mentre quella della proiezione del lato misura 22 x 18 cm. Segnate la base della torta con la sagoma di carta e tagliate con il coltello due pezzi uguali da sovrapporre.

Untitled 1

Tagliate e farcite la torta a piacere (con una crema bianca o crema al burro) .  Scolpite la torta seguendo la forma delle sagome. 

Procedete ricoprendo abbondantemente la superficie con crema al burro (crumb coating). Mettete la torta a raffreddare in frigorifero per 15 minuti. 

Stendete con il matterello un pezzo di pasta di zucchero (avorio) , tagliate un rettangolo sottile e stendetelo delicatamente sopra la torta.

Untitled 2.1

Tagliate un rettangolo di sfoglia e calcolate 9 pieghe usando le cannucce. Tagliate e modellate la pasta con le dita. Inumidite la parte su cui applicherete la sfoglia usando un pennello per alimenti. Stendete la pasta delicatamente sulla torta, infilando il materiale in eccesso sotto la base. Ripetete l’operazione fino a coprire entrambi i lati. 

Untitled-2.2

DSC_5251

Tagliate altri due trapezi piccoli dalla sfoglia e procedete misurando 6 pieghe a trapezio con le cannucce. Modellate, tagliate la pasta e infine applicate ai due lati scoperti della torta.

Untitled-3

Per il manico:

Stendete la pasta grigia fino ad ottenere una sfoglia spessa e tagliate due strisce strette, di uguali dimensioni. Inumidite la parte in cima alla torta e appoggiate le strisce sopra la parte inumidita, modellandole con le mani. 

Prendete le palline, infilzate le strisce grigie con gli spaghetti e posizionatevi sopra il manico. Aggiungete le due gocce nel centro usando due pezzi di spaghetti (vedi foto finale).

Untitled-4

Per le rose:

Stendete con il matterello una sfoglia di pasta di zucchero molto sottile. Formate una striscia (25 cm x 10 cm circa), piegatela in due e arrotolatela delicatamente, per formare una rosa.  Strozzate alla base il fiore con le dita e togliete la pasta in eccesso. Infilzate la rosa con uno spaghetto e applicate il fiore sulla torta.

Untitled-5

Per la base:

Stendete una grossa quantità di pasta di zucchero (color avorio), e usatela per coprire interamente la base di cartone della torta. Stendete qualche piccolo rettangolo di pasta di zucchero bianca e riponete le sfoglie sulla base, arricciandole per creare l’effetto della stoffa.

Applicate un nastrino intorno alla base e appoggiate la torta al centro della composizione. Per finire, spennellate la vostra pochette con un colorante alimentare perlato in polvere diluito in alcool (passaggio facoltativo).

Untitled-2.3

Some tips to keep your sourdough in good shape!

My sourdough is one year old! I keep it strong and healthy in a nice big jar in the fridge. I usually feed it once a week (or refresh it, as we say) , but the refreshment time varies depending on my needs. I’ve never had any problems with my natural yeast, however, at times, it’s possible that the yeast becomes sourer, or less responsive to leavening, therefore less active. These elements depend on many factors. There are some steps you can take to keep your sourdough in the best shape and correct any of problems. Of course, if you want a sour product, in order to let the bacteria produce acidity you have to do the opposite of what is indicated below.

To increase the leavening strength:

⁃ increase the temperature during leavening

⁃ decrease the ratio refreshments / flour

⁃ increase the ratio water / flour

⁃ increase humidity

In case of over-acidity:

⁃ change the type of flour (change microflora)

⁃ decrease the rising time

⁃ decrease ratio refreshments / flour

⁃ decrease the amount of water with the flour (to make a harder dough)

⁃ lower the temperature of the dough

DSC_7787

Some of this information belongs to the teaching material of the Cereal Technology Course at Parma University (Italy), courtesy of Prof. Franco Antoniazzi.

Come mantenere il lievito madre al meglio.

Il mio lievito madre ha un anno di vita! Lo tengo in un vasetto di vetro nel frigorifero e lo rinfresco generalmente una volta a settimana, ma a volte anche più spesso se ne uso in grandi quantità. Non ho mai avuto grossi problemi, ma è possibile che il lievito naturale a volte diventi più acido, oppure sia meno reattivo alla lievitazione, questo dipende da molti fattori. Ci sono comunque degli accorgimenti che si possono adottare per mantenere il lievito madre al meglio e correggere eventuali anomalie.

Interventi sui rinfreschi del lievito naturale.

Per aumentare la forza lievitante:

  • aumentare la temperatura di lievitazione
  • diminuire il rapporto rinfreschi/farina
  • aumentare il rapporto acqua/farina
  • aumentare l’umidità

Interventi in caso di acidità eccessiva:

  • cambiare tipo di farina (microflora diversa)
  • diminuire i tempi di lievitazione
  • diminuire i rapporti rinfreschi/farina
  • diminuire la quantità di acqua rispetto alla farina (impasto più duro)
  • abbassare le temperature degli impasti

Alcune delle informazioni riportate in questo articolo, fanno parte del materiale didattico del corso di Tecnologia dei Cereali dell’Univeristà di Parma, per gentile concessione del Prof. Franco Antoniazzi.

Bread making: choosing the right flour.

DSC_6642
  1. A good dough depends on the quality of the flour used. A good stone ground flour preserves most of the original nutritional values of the cereals.
  2. A few important factors determine the quality of a particular flour: tolerance to fermentation, good ability to absorb water, good consistency, extensibility and resistance.
  3. There are weak (soft) and strong (hard) flours. It’s important to understand the difference between these types of flour in order to use them in the best possible way.
  4. The strength of a flour is determined by the amount of protein (gluten) contained in the product. The higher the amount of protein (gluten), the stronger the flour.
  5. Weak flours have low protein (gluten) content and poor water absorption ability, consequently they are less active when leavening. For these reasons weak flours are mainly used for simple and dry preparations (e.g.to make cookies or bread sticks), while strong flours (e.g. manitoba) are used in more elaborate leavening processes.
  6. A plain strong flour dough is harder to work, therefore less extensible than a weaker one.

DSC_6554

Understanding flour strength.

In Italy, flour strength is indicated by a number followed by W. The W number is usually not indicated on the packaging of the product you buy at the supermarket. it’s possible to understand the strength of a flour by looking at the protein content indicated on the packaging.

DSC_6597

Below you will find some reference data that might help you to understand the relationship between protein, flour strengths (W) and their uses.


  • W
  • Protein
  • Use
  • 90/130
  • 9/10,5
  • Cookies (dough with baking powder)
  • 130/200
  • 10/11
  • Breadsticks, Crackers
  • 170/200
  • 10,5/11,5
  • Ciabatta, sandwich, focaccia bread, pizza, plain bread dough (with yeast or baking powder)
  • 220/240
  • 12/12,5
  • Baguettes, ciabatta bread, bread dough ( with yeast or baking powder) and biga (or sourdough) 5/6 h rising time
  • 300/310
  • 13
  • Worked bread, pastry dough with biga (or sourdough) up to 15 h rising time
  • 340/400
  • 13,5/15
  • Puffed bread, Pandoro, Panettone, dough leavened with long fermentation, pastry dough with biga (or sourdough) over 15 h rising time

The data shown here was taken from the teaching material of the Cereal Technology Course at Parma University (Italy), courtesy of Prof. Franco Antoniazzi.

DSC_6644

Guida alle farine.

  1. Un buon impasto dipende dalla qualità della farina utilizzata. Una buona farina ottenuta dalla macinazione in pietra (il metodo tradizionale) preserva al meglio le proprietà e i valori nutrizionali dei cereali macinati.
  2. Le caratteristiche da ricercare in una buona farina per fare il pane sono: tollerabilità alla fermentazione, buon assorbimento dell’acqua, buona consistenza, estensibilità dell’impasto e resistenza alla lavorazione.
  3. Esistono farine deboli e forti. E’ importante capire la differenza tra queste farine per utilizzarne al meglio le caratteristiche.
  4. Il fattore di panificabilità, o forza di panificazione, dipende dal contenuto di proteine (glutine) nella farina. Più alta è la percentuale di proteine contenuta nella farina e maggiore è la forza di panificazione.
  5. Le farine deboli hanno un basso contenuto di glutine, scarsa capacità di assorbimento dell’acqua e di conseguenza reagiscono meno attivamente alla lievitazione. Le farine deboli vengono quindi utilizzate nelle lavorazioni più fini e secche (per fare i biscotti o grissini), mante le farine forti (ad esempio la manitoba) si utilizzano per le lievitazioni più lunghe ed elaborate.
  6. Un impasto semplice, fatto con la farina forte, è più tenace e meno estensibile di un impasto fatto con la farina debole.

DSC_6595
Capire la forza delle farine.

In Italia, la forza della farina si indica con un numero seguito da W. Nella confezione al supermercato non troverete questi parametri riportati sulla confezione. E’ possibile però farsi un’idea sulla forza di panificazione della farina leggendo le percentuali di proteine riportate sulla confezione del prodotto.

In questa tabella troverete alcuni dati di riferimento per capire meglio il rapporto tra le proteine,la  forza di panificazione (W) delle farine e i loro utilizzi.

  • W
  • Proteine
  • Utilizzo
  • 90/130
  • 9/10,5
  • Biscotti ad impasto diretto (con lievito chimico)
  • 130/200
  • 10/11
  • Grissini, Crackers
  • 170/200
  • 10,5/11,5
  • Pane comune, impasto diretto (cioè con lievito chimico o lievito di birra), ciabatte, pancarré, pizze, focacce, fette biscottate
  • 220/240
  • 12/12,5
  • Baguettes, pane comune a impasto diretto (cioè con lievito chimico o lievito di birra), maggiolini, ciabatte a impasto diretto e biga di 5/6 h
  • 300/310
  • 13
  • Pane lavorato, pasticceria lievitata con biga di 15 h e impasto diretto
  • 340/400
  • 13,5/15
  • Pane soffiato, pandoro, panettone, lievitati a lunga fermentazione, pasticceria lievitata con biga oltre le 15 h

I dati riportati nella tabella sono stati presi dal materiale didattico del corso di Tecnologia dei Cereali dell’Univeristà di Parma, per gentile concessione del Prof. Franco Antoniazzi.

DSC_6608

Home-made butter: easy to prepare and healthier to eat.

Home-made butter.

DSC_2174

Butter is made by churning cream until the solid fat (butter) is separated from the liquid (buttermilk). Commercial butter is produced using industrial churning techniques and is a byproduct of cheese, rich in saturated fats, harmful to health. Home-made butter, which is obtained by whipping cream with a mixer, contains a much higher percentage of unsaturated fats, vitamins and water, therefore it’s a healthier and lighter product, but it doesn’t last for long.

In this article I will explain, step by step, how to make fresh butter using an electric mixer with a simple method.

Conservation.

Fresh butter will last in the refrigerator for a few days and in the freezer up to a week or more. Salted butter will last for longer ( 2-3 weeks in the fridge) because salt acts as a preservative but salted butter can have a limited use. Keep your butter sealed in a light-proof container, to avoid exposure to direct sunlight or unwanted odours that can ruin this fresh and delicate product.

Doses.

With 500 ml of cream you can obtain 200 g of butter (I use whipping cream but you can also use double cream, which is richer, therefore you might end up with slightly different results).

DSC_2091

The process.

Place a whisk and a bowl or a large glass jar  (all previously sterilized with boiling water or ethanol, at 95 °) to cool in the freezer for 30 minutes. Cool the cream, but careful not to freeze it. When everything is very cold, pour the cream in the bowl (or in the jar) and whip it until the color and texture changes, and the solid fat separates completely from the liquid.

DSC_2101

DSC_2103

Now separate the buttermilk (the liquid) from the butter (the fat mass) using a strainer.

DSC_2111

Rinse with cold water and squeeze the butter with a spotless cloth to drain. Whip the butter in the sterilized bowl (or in a sterilized jar) for another 30 seconds, to expel the remaining buttermilk (whipping twice is not necessary if the butter is firm). Rinse the butter again and squeeze well with a cloth. Repeat this process until the water in the bowl is completely clear. Remember to handle the butter as little as possible to avoid melting.

DSC_2117

Place the fresh butter in a sealed sterilized container and store in the refrigerator or in the freezer. This product can be easily mixed with different ingredients, like salmon and herbs,  while buttermilk is used to prepare breads, cakes and drinks.

DSC_2134


Fare il burro in casa.

Il burro si ricava, molto semplicemente, montando la panna fino a far separare i grassi solidi da quelli liquidi. Il burro che si trova in commercio generalmente si ottiene con la tecnica ad affioramento ed è un sottoprodotto dei formaggi, ricco di lipidi saturi, nocivi alla salute. Quello fatto in casa con il metodo a centrifuga, contiene una quantità di grassi inferiore con una percentuale maggiore di grassi insaturi, vitamine e acqua, perciò è più leggero e meno dannoso, ma si conserva meno a lungo.

In questo breve articolo vi spiegherò, passo per passo, come ottenere burro fresco usando un frullino elettrico, con un metodo semplice e relativamente veloce.

La durata e la conservazione.

Il burro fresco si può conservare in frigorifero per 2-3 giorni al massimo e nel freezer per una settimana o due. Con l’aggiunta di sale il burro si conserva in frigo fino a 2-3 settimane, ma questo procedimento può limitarne l’utilizzo in alcune ricette, quindi è meglio aggiungerne poco.

Essendo un prodotto molto delicato, è opportuno conservare il panetto in un contenitore ben chiuso e al riparo da odori indesiderati o dalla luce solare, che ne modifica il colore.

Le dosi.

Con 500 ml di panna (da montare) si otterranno 200 g di burro.

Il procedimento.

Fate raffreddare nel freezer per 30 minuti la frusta e la ciotola (o un contenitore di vetro) che userete per montare la panna (tutto deve essere precedentemente sterilizzato con acqua bollente o alcool etilico a 95°). Raffreddate la panna facendo attenzione a non congelarla. Quando tutto sarà molto freddo, mettete la panna nella ciotola (o nel contenitore di vetro) e montatela fino a quando cambierà colore e si formerà una massa solida.

Quindi separate il latticello ( la parte liquida) dal burro (la massa di grassi), aiutandovi con un colino.

Il burro va lavato con acqua fredda e strizzato in un panno pulitissimo. Riponete il burro in una terrina sterilizzata e frustate ancora per 30 secondi o un minuto, per espellere tutto il latticello rimasto (se il risultato è già molto compatto continuate a lavorare il burro solo con il panno, senza usare la frusta elettrica una seconda volta). Quindi, risciacquate ancora il burro e strizzatelo bene usando il panno. Ripetete questo procedimento fino a quando l’acqua rimasta nella ciotola sarà completamente limpida. E’ importante che ci siano meno residui liquidi possibile per una buona conservazione del prodotto, però fate attenzione a maneggiare il burro il meno possibile, per evitare che si sciolga.

Mettete il burro in un contenitore con il coperchio (entrambi precedentemente sterilizzati) e conservate in frigorifero o nel congelatore.

Il burro fatto in casa è ottimo miscelato con altri ingredienti come il salmone e le erbe. Anche il latticello si conserva e può essere utilizzato nella preparazione di pani, dolci o alcune bevande.

How to Make Sourdough (Natural Yeast).

DSC_7382 

What is sourdough?

Sourdough is a natural yeast, obtained by fermenting flour and water. It can have a solid or a liquid consistency, depending on the amount of water used to feed it. Liquid sourdough usually rises better.

I personally recommend the preparation and use of this great ingredient because it’s completely natural, therefore much healthier and more digestible than other yeasts. Sourdough can be used to make a variety of breads, pizzas, pies and cakes with surprising results. Moreover, it makes everything taste better!

Preparing the sourdough starter.

1. First you have to make a starter. Mix 1 cup of organic wholemeal flour (the wholemeal flour is necessary for the first feed) with 1/2 cup of cool water (use non-chlorinated water, you can mix tap water with still drinking water from a bottle).
Put the ingredients in a glass, stainless steel or a plastic container for food.

DSC_7335

2. Stir all the ingredients together, until creamy and smooth, then cover the container with a damp cloth and let it sit for 24 hours.

DSC_7346

DSC_7348

3. After 24 hours remove the top half of the mixture, then feed the starter again with 1 cup of plain flour (you can use manitoba, whole spelt or wholemeal flour, if you prefer) and half a cup of water. Stir well, cover with a damp cloth and let it sit for another 24 hours.

DSC_7355

DSC_7363

DSC_7367

4. Now you can start feeding the starter every two days. Repeat this process for about 10 days, until it doubles in volume.

DSC_7376

5. After 10 days, you can start feeding your sourdough every 4-5 days and you can use it for your recipes.

Store the sourdough. 

1. Store the sourdough in a glass jar and keep it in the fridge (with the lid on).

2. Each time you feed the sourdough let it sit for 1-2 hours at room temperature in a glass jar covered with a damp cloth (with no lid on). Then remove the cloth, close the container and put it back in the refrigerator.

DSC_7385

Doses. 

1. Feed the sourdough the day before you use it (12 hours before).

2. In the recipes, the ratio of flour and sourdough used must be 3 to 1. (e.g. for 900 g of flour use 300 g of sourdough).

3. The rising time of the dough will depend on the age and strength of the yeast, at first it may take 3 to 6 hours  (however, when it doubles in size it is ready for use).

DSC_7378

DSC_6085
DSC_6203
La pasta madre.

La pasta madre è un lievito naturale che si ottiene facendo fermentare farina e acqua. Questo lievito può avere una consistenza più solida o liquida, a seconda della quantità d’acqua utilizzata, normalmente la versione più liquida ha una lievitazione migliore.

Consiglio vivamente la preparazione e l’utilizzo di questo ingrediente, essendo un lievito completamente naturale e quindi molto più digeribile e salutare rispetto ad altri lieviti comunemente utilizzati. Inoltre può essere usato facilmente nella preparazione di svariati tipi di pane, pizze torte salate e dolci con risultati sorprendenti.

Preparazione della pasta madre.

1. Per prima cosa, preparate un piccolo impasto unendo 1 tazza di farina integrale biologica (la farina integrale è necessaria per il primo impasto) a 1/2 tazza d’acqua fredda (utilizzate acqua con poco cloro, potete miscelare l’acqua del rubinetto con acqua minerale naturale).

2. Mettere gli ingredienti in un contenitore (è consigliabile utilizzare un contenitore di vetro oppure acciaio inossidabile, ma anche la plastica per alimenti va bene) e mescolare fino ad ottenere un composto cremoso. Coprire il contenitore con un panno umido e lasciate riposare per 24 ore.

3. Passate 24 ore, levate la parte dura in superficie e rinfrescare quello che resta del lievito, cioè aggiungete al composto 1 tazza di farina (potete utilizzare la 00, manitoba oppure farina integrale, come preferite) e mezzo bicchiere d’ acqua. Mescolare bene, coprire con un panno umido e lasciate riposare per altre 24 ore.

4. Ora potete rinfrescare il lievito ogni 2 giorni, utilizzando sempre una tazza di farina e 1/2 tazza d’acqua. Continuate con questa procedura per circa 10 giorni.

5. Dopo 10 giorni, potete incominciare a rinfrescare la pasta madre ogni 4-5 giorni. Arrivati a questo punto, la vostra pasta madre è pronta per essere utilizzata nelle vostre ricette.

La conservazione.

1. Conservate la pasta madre in un vasetto di vetro, chiuso con il coperchio e tenuto in frigorifero.

2. Dopo ogni rinfresco, lasciate riposare il lievito madre per una o due ore in un vasetto coperto da un panno umido a temperatura ambiente, poi chiudete il contenitore e rimettetelo nel frigorifero.

Le dosi consigliate. 

1. Nutrite la pasta madre il giorno prima di utilizzarla (almeno 12 ore prima).

2. Nelle ricette, il rapporto tra farina e pasta madre deve essere di 3 a 1, cioè su 900 g di farina utilizzeremo 300 g di lievito naturale.

3. Il tempo di lievitazione dipenderà dall’età e dalla forza della pasta madre. I tempi possono variare dalle 3 alle 6 ore, consiglio però di non guardare l’orologio ma di osservare il volume dell’impasto, quando raddoppia è pronto per l’uso.