Category Archives: Dairy-free

Chickpea Flour Bread With Pumpkin Seeds

DSC_2782

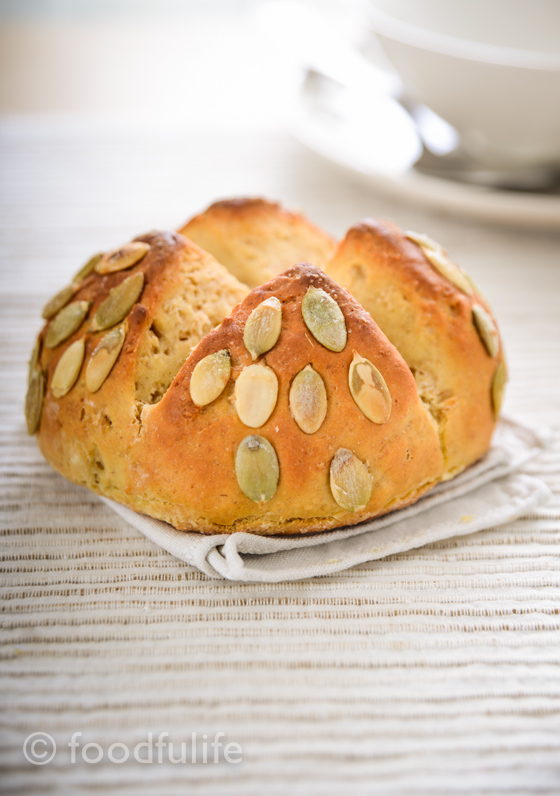
This is a delicious bread, made partially with chickpea flour, which is a rich source of  vegetable protein and has a low carbohydrate content. I’ve developed this recipe in order to create a delicious bread to be served with a light onion soup, a tasty combination for a balanced meal that will warm you up nicely during the festive season.

DSC_2820

As usual, I’ve included you all the directions you need to make the recipe using normal yeast or sourdough. If you use sourdough you can prepare the sourdough starter the night before and let it rise overnight. Then in the morning (or afternoon) you can follow the recipe as written below.

Chickpea flour bread (quickest method with normal yeast)

Cooking time: 25-30 minutes

Preparation time: 20 minutes + the rising time

Ingredients

2 small breads (4 servings)

150 g chickpea flour

150 g whole spelt flour

300 g plain flour

18 g yeast

a little brown sugar

10 g salt

water

For garnish

a handful of shelled pumpkin seeds

Method (with yeast).

1. Make the yeast starter. Mix the yeast with a little bit of warm water, then add two tablespoons of flour and a pinch of brown sugar. Make a small dough, then let double in volume.

2. Separately, mix the rest of the flour with 10 g of salt and enough water to make the bread dough. Add the yeast starter and knead well.

3. Slash an X cut on the surface and then let the dough rise until it has doubled in volume (at least 2 hours).

DSC_2745

4. Divide the dough into two equal parts, then shape two breads. Slash an X cut on both breads and garnish with the pumpkin seeds (possibly, let rise for another 30 minutes).

DSC_2748

5. Line the base of an oven tray with baking paper, then grease with a little extra virgin olive oil and dust with flour. Bake at 200 ° C (392° F) for 25-30 minutes.

DSC_2775

DSC_2783

DSC_2807

Chickpea flour bread with sourdough

Cooking time: 25-30 minutes

Preparation time: 20 minutes + the rising time

2 small breads (4 servings)

150 g chickpea flour

50 g whole spelt flour

270 g plain flour

10 g salt

water

For garnish

a handful of shelled pumpkin seeds

For the starter (to be prepared the night before).

50 g sourdough (I used a semi-solid sourdough made with plain organic flour)

100 g of whole spelt flour

a little of brown sugar

a little bit of water

Make the starter.

Mix 100 g of whole spelt flour with 50 g of sourdough and a little water, then cover with some cling film and let stand overnight.

Method (with sourdough).

1. In a large bowl, mix the rest of the flour with 10 g of salt and enough water to make a soft dough.

2. Combine the dough with the sourdough starter and then add some flour, but only if necessary (the dough shouldn’t be too sticky or dry).

3. Slash a big X on the surface of the dough, cover with a cloth and let stand in a warm place until the dough has doubled in volume (3 to 6 hours, depending on the sourdough strength).

4. Divide the dough into two equal parts and shape the breads, then slash an X on the surface and let rise once more.

5. Garnish the breads with the pumpkin seeds and bake at 200 ° C (392° F) for 25-30 minutes.

DSC_2784

DSC_2810

DSC_2813

See also the Farinata recipe (a delicious focaccia made with chickpea flour)

Pane con farina di ceci (preparazione con lievito di birra)

Tempo di cottura: 25-30 minuti

Tempo di preparazione: 20 minuti + il tempo di lievitazione

Ingredienti

Per 2 panini grossi (per 4 persone)

150 g di farina di ceci

150 g di farina di farro integrale

300 g di farina 00

18 g di lievito di birra

pochissimo zucchero di canna

10 g di sale

acqua q. b.

Per guarnire

una manciata di semi di zucca (senza buccia)

Preparazione dell’impasto con lievito di birra.

1. Sciogliete il lievito di birra in poca acqua tiepida, poi aggiungete due cucchiai di farina e un pizzico di zucchero di canna ; quindi mescolate fino a creare un panetto morbido e lasciate raddoppiare di volume.

2. A parte, mischiate le farine con il sale e aggiungete gradualmente l’acqua, fino ad ottenere un impasto uniforme. Incorporate il panetto di lievito e lavorate bene.

3. Fate un taglio a croce sulla superficie e poi fate lievitare l’impasto per 2 ore.

4. Dividete l’impasto in due parti uguali, date la forma a due panini (vedi le foto) e decorate con i semi di zucca (sarebbe meglio far lievitare per altri 30 minuti).

5. Ricoprite la teglia con carta da forno, ungete con poco olio d’oliva e infornate il pane a 200° C per 25-30 minuti.

Pane con farina di ceci (preparazione con lievito madre)

Tempo di cottura: 25-30 minuti

Tempo di preparazione: 20 minuti + il tempo di lievitazione

Ingredienti

Per due panini grandi ( 4 persone)

150 g di farina di ceci

50 g di farina di farro integrale

275 g di farina 00

10 g di sale

acqua q. b.

Per guarnire

una manciata di semi di zucca (senza buccia)

Per il panetto di lievito (da preparare la sera prima).

50 g di lievito madre (uso un lievito semisolido con base di farina biologica 00)

100 g di farina di farro integrale

pochissimo zucchero di canna

acqua q. b.

Preparazione del panetto di lievito.

Mescolate 100 g di farina di farro con 50 g di lievito madre e  poca acqua; quindi ricoprite con una pellicola e lasciate riposare per tutta la notte.

Preparazione dell’impasto con lievito madre.

1. In una ciotola grande, mischiate le farine con il sale e l’acqua necessaria per ottenere un impasto liscio e morbido.

2. Unite il lievitino al resto dell’impasto, aggiungendo un po’ di farina se necessario (l’impasto non deve risultare troppo umido).

3. Fate un taglio a croce sulla superficie, poi ricoprite  con un panno e lasciate lievitare l’impasto fino a quando sarà raddoppiato di volume (generalmente dalle 3 alle 6 ore, ma dipende dal lievito madre).

4. Dividete l’impasto in due,  date la forma a due panini (vedi le foto) e poi fate lievitare ancora.

5. Guarnite il pane con i semi di zucca e infornate a 200°C per 25-30 minuti.

Vedere anche la ricetta della Farinata

Light And Tasty Onion Soup With Chickpea Bread

DSC_2827

This week we are going to prepare a delicious and easy to make onion soup, served with a wonderful chickpea bread, especially made for this recipe. A meal so light and tasty that it could easily be considered comforting as well as healthy!

This soup is really well complemented by the chickpea bread (see the recipe), which is a good source of proteins and keeps the meal light and nicely balanced! The perfect winter dish to enjoy by the fire!

Enjoy!

DSC_2796

DSC_2724

Light onion soup (zuppa di cipolle)

Preparation time: 10 minutes

Cooking time: 40 minutes

Ingredients

For 4 servings

1 kg of onions of your choice

extra virgin olive oil

salt and pepper (use plenty, because onions are naturally quite sweet)

DSC_2719

Method.

1. Slice the onion and fry them in extra virgin olive oil.

DSC_2738

2. Using a large pan, cover the onions with water and cook until tender.

DSC_2766

3. With an immersion blender, puree the onions until you get a smooth and creamy mixture.

DSC_2768

4. Drizzle with extra virgin olive oil, season with salt and pepper, then serve with the chickpea bread!

DSC_2793

DSC_2802

DSC_2806

See also the pasta e fagioli recipe (another delicious winter dish!).

Zuppa di leggera cipolle

Tempo di preparazione: 10 minuti

Tempo di cottura: 40 minuti

Ingredienti

Per 4 persone

1 kg di cipolle di vostra scelta

olio extra vergine d’oliva q. b.

sale e pepe (abbondate perché le cipolle sono naturalmente dolci)

Preparazione.

1. Sbucciate e affettate le cipolle, poi fatele soffriggere in olio extra vergine d’oliva.

2. Riempite la pentola d’acqua, fino a ricoprire tutte cipolle; quindi fate cuocere, a fuoco moderato e con il coperchio, per 30-35 minuti.

3. Usando un frullatore ad immersione, frullate le cipolle fino ad ottenere un composto cremoso.

4. Condire con olio extra vergine d’oliva e abbondante sale e pepe. Servite la zuppa calda con del pane di farina di ceci.

DSC_2729

Traditional Recipe: La Farinata Genovese (Genoese Socca)

Basically made from 3 ingredients (chickpea flour, olive oil and water), la farinata, or socca (as it is called in Nice), is a kind of chickpea focaccia, which doesn’t contain gluten and is dairy free.  It is quite easy to prepare and it’s perfect for vegan and vegetarian diets, because it is a good source of proteins.

DSC_2043

Before getting the method and recipe right it might take a few tries, especially when it comes to finding the right balance between the ingredients. It might requires a lot of olive oil in order to become crispy on the outside and creamy on the inside, as it should be.
The farinata is traditionally only a few millimetres thin (see the pictures).

A few tips.
The ideal cooking method would also require a high temperature oven, like a wood stove, however, a good oven will do. Remember to use non-stick baking trays or baking paper.
The farinata has to be served quite hot, freshly made, otherwise it will become elastic and not very nice to eat. If you have leftovers, you can reheat the farinata in the oven the day after.

The farinata can also be enriched adding different ingredients; amongst the local most popular variations, you’ll find the onion and the artichoke farinata, also quite easy to make.

DSC_2051

Farinata could be a delicious starter or aperitif, but it is also a wonderful meal when served with a nice big salad on the side.

La farinata di ceci (Genoese socca)

Ingredients

for 3 rounded backing trays (28 cm in diameter)

1,5 litre of water

500 g chickpea flour

200 ml extra virgin olive oil

salt and pepper to taste

Method.

1. In a large bowl, vigorously whisk 1,5 litre of water with 500 g. of chickpea flour, 100 ml olive oil and some salt. Once all the ingredients are mixed well, let sit for at least 5 hours (but 10 hours would be better, so the flour can absorb the water well).

DSC_1994

2. After the resting time, remove the froth formed on the surface of the mixture with a spoon.

DSC_1997

3. Pour some extra virgin oil on a non-stick baking tray, then with a ladle add 1/3 of the mixture and season with salt and pepper.

DSC_2009

DSC_2007

4. Bake the farinata at 220°C / 428°F (or higher) until golden, then turn on the grill and cook for a little longer, in order to get a nice crispy crust on top. Remove from the oven and serve hot.

DSC_2013

DSC_2049

DSC_2056

Also see Chickpea flour bread recipe

La farinata di ceci.

Ingredients

Per 3 teglie rotonde di 28 cm di diametro

1,5 l d’ acqua

500 g di farina di ceci

sale e pepe q.b.

200 ml di olio extra vergine d’oliva

Preparazione.

1. In una ciotola grande, mescolate energicamente con una frusta 1, 5 l di acqua, 500 g. di farina di ceci, 100 ml di olio e un po’ di sale. Una volta amalgamati bene gli ingredienti, lasciate riposare per almeno 5 ore (sarebbe meglio 10 ore, per far assorbire bene l’acqua).

2. Passato il tempo necessario, togliete con un cucchiaio la schiuma formata in superficie.

3. Versate un po’ d’olio su una teglia antiaderente, poi con un mestolo aggiungete il composto liquido (non troppo perché deve restare sottile) e condite con sale e pepe.

4. Infornate a 220° C per una decina di minuti, poi accendete il grill e lasciate che si formi una crosta croccante. Sfornate e servite!

DSC_2047

DSC_2030

Vedi anche la ricetta del Pane con farina di ceci e semi di zucca

Traditional Recipe: Sicilian Almond Biscuits With Candied Cherries (Pasticcini Alle Mandorle)

These Sicilian biscuits (or small pastries) are gluten-free, dairy-free, delicious and very easy to prepare! It is better to use a piping bag to shape the biscuits, but if you don’t have one, you can roll out the dough with your hands to make small balls and then press them with your fingers, to obtain a cookie-like shape.

DSC_1945

The dough needs, at least, 30 minutes of resting time, however they will taste even better if you leave them to rest in the fridge overnight. Traditionally, we garnish these biscuits with candied cherries or almonds, so if you want you can use both. Here I prepared some of these delicious pastries with my mother, I hope you enjoy the recipe!

DSC_1930

Biscuits with almonds and candied cherries.

Preparation and cooking time: 25 minutes + resting time

Difficulty: Easy

Ingredients

For two oven trays

3 egg whites

80 g sugar

200 g almonds, shelled and finely chopped

candied cherries

a few drops of almond flavouring, or some orange zest (optional)

DSC_1904

Method.

1. Grind the almonds with the sugar, using a food processor.

DSC_1900

2. Combine the egg whites with the almond mixture and the flavourings, then put the dough in the refrigerator for at least 30 minutes.

DSC_1902

DSC_1905

3. Using a piping bag, shape the biscuits and then garnish with candied cherries.

DSC_1907

DSC_1912

DSC_1921

DSC_1924

4. Bake at 180 ° C (356° F) until golden.

DSC_1937

DSC_1942

DSC_1947

DSC_1982

Dolcetti alle mandorle con ciliegie candite.

Preparazione e cottura: 25 minutes + il riposo

Difficoltà : Facile

Ingredienti

Per 2 teglie rettangolari di media grandezza.

3 chiari d’uova

80 g di zucchero

200 g di mandorle sgusciate e tritate finemente

ciliegie candite q. b.

1 qualche goccia di aroma di mandorle, oppure una scorretta di arancia tritata (facoltativo)

Preparazione.

1. Tritate finemente le mandorle con lo zucchero.

2. Mescolate i chiari d’uova con le mandorle tritate, lo zucchero e gli aromi. Mettete il composto a riposare in frigorifero per almeno 30 minuti.

3. Usando il sac à poche, date la forma ai pasticcini (oppure formate delle palline e schiacciatele leggermente con le dita).

4. Guarnite i pasticcini con le ciliegie candite, poi infornate a 180° C fino ad ottenere dei dolcetti dorati.

DSC_1972

DSC_1985

Focaccia Rustica Alle Cipolle (Rustic Onion Focaccia)

This is another popular version of the Focaccia Alla Genovese. This onion focaccia comes from a traditional recipe, but here I am making my own adaptation, using different flours and not just plain flour (we use plain flour in the traditional recipe).

In fact, for this recipe I am preparing a dough mixing plain flour, semolina flour and spelt flour in equal parts.  It is quite a rustic focaccia, with the addition of the onions that keep the focaccia nicely moist and sweet. It is definitely something to try…

DSC_1563

Focaccia rustica con le cipolle (onion focaccia).

Ingredients

for a medium sized oven tray

150 g plain unbleached flour

150 g whole spelt flour

150 g semolina (durum wheat) flour

14 g yeast

8 g salt (and a pinch of salt to put on top)

extra virgin olive oil

1/2 a glass of water (a small glass!!)

1 large onion, finely sliced

Method.

1. Mix the yeast with some warm water, than add two tablespoons of spelt flour (take two tablespoons from the 150 g of spelt flour mentioned in the ingredient list). Create a starter and let it rise until it doubles in volume.

Note. You can use yeast or make a starter using 50 g of semisolid sourdough (I used plain flour sourdough), a pinch of barley malt, a little bit of water and 100 g of spelt flour). If you are going to use sourdough, let the starter rise over night and then follow the recipe, starting from step 2.

2. Mix the remaining flour, arrange it on a working board (or a table) and create a well in the centre. Add 8 g of salt with a little bit of warm water and combine the ingredients to create a soft dough. Add the starter and work well.

3. Let rise until the dough has doubled in volume.

4. Roll out the dough on a baking tray,previously greased with plenty of extra virgin olive oil and let rise for an hour. When the dough has risen, pressed with your fingers to create regular indents on the surface.

DSC_1546

5. Top with the onion slices, add a little bit of salt and drizzle with extra virgin olive oil.

DSC_1560

6. Bake at 200° C (392°F) until the focaccia is slightly golden. Remove the focaccia from the oven and pour half a glass of water on the surface. Bake again until golden-brown and crisp.

DSC_1570

DSC_1573

DSC_1577

DSC_1581

also see the focaccia alla genovese recipe.

Focaccia rustica con le cipolle.

Ingredienti

per una teglia da forno di media grandezza

150 g di farina 00

150 g di farina di farro integrale

150g di semola rimacinata di grano duro

14 g di lievito di birra

8 g di sale fino (e un pizzico di sale in più, da aggiungere alla fine)

olio extra vergine di oliva q.b.

Mezzo bicchiere d’acqua (un bicchiere piccolo!)

1 cipolla grande, tagliata a fettine sottili

Preparazione.

1. Sciogliete il lievito di birra in poca acqua (tiepida) e aggiungete due cucchiai di farina di farro (prendete i due cucchiai di farina di farro dai 150 g indicati negli ingredienti). Create un panetto e lasciate raddoppiare di volume.

Nota. In questa ricetta è possibile utilizzare il lievito di birra oppure il lievito madre. Se utilizzate il lievito madre, fate un lievitino con 50 g di pasta madre semisolida (io ho usato lievito madre a base di farina 00), un pizzico di malto d’orzo, un po’ d’acqua e 100 g di farina integrale di farro). Lasciare lievitare tutta la notte e poi seguite la ricetta, a partire dal secondo passaggio.

2. Mischiate bene le farine rimaste e disponetele su una spianatoia (oppure su un tavolo). Aggiungete 8 g di sale con un po’ d’acqua tiepida e lavorate fino a creare un impasto morbido. Aggiungete anche il panetto di lievito e lavorate bene.

3. Lasciate lievitare in un luogo riparato, fino a quando l’impasto sarà raddoppiato di volume.

4. Stendete la pasta su una teglia (precedentemente unta con abbondante olio extra vergine d’oliva) e lasciate lievitare per un’oretta. Quando la pasta sarà nuovamente lievitata, pressate con le dita la superficie per creare delle fossette.

5. Ricoprite la focaccia con le fette di cipolla, aggiungete ancora un po’ di sale e irrorate con abbondante olio extra vergine d’oliva.

6. Infornate a 200°, fino a quando la focaccia sarà leggermente dorata. Togliete la focaccia dal forno e versate mezzo bicchiere d’acqua sulla parte superiore, poi infornate nuovamente, fino ad ottenere una focaccia ben dorata e croccante.

Da vedere anche la ricetta della focaccia alla genovese 

Traditional Recipe: Pesto Alla Genovese

DSC_0320

Pesto is a well known basil sauce originating in Genoa. This delicious sauce is traditionally served with various kinds of pasta such as trofie, lasagne and gnocchi or used to enrich dishes like vegetables soups and even pizzas! Countless variations already exist, but the best pesto is made with only basil and extra virgin olive oil from Liguria, because they are very aromatic and really make a difference when it comes to flavour. During the preparation method, we use a mortar because it is a slow and gentle process that doesn’t alter the quality and flavour of the ingredients.

Having said that, you can make a wonderful pesto using a blender and any of your local ingredients….so give it a go!!I promise, you won’t be disappointed!

Today we will see how to prepare a delicious pesto using either a mortar or a blender…You choose! 🙂

DSC_0412

Tips.

1. In the traditional recipe we only use well-aged Parmesan and Pecorino. Both these cheeses are quite salty, therefore it is better to use only a few crystals of salt in the recipe and taste the sauce when it’s ready; you can always add the salt later, if needed.

2. It is possible to dilute the pesto with water, in order to obtain a creamier sauce. I usually mix a couple of tablespoons of hot water with the sauce, just before mixing it with the pasta. Then stir vigorously with a spoon and add the pasta.

3. To preserve the pesto, put the sauce in a jar and cover with plenty of extra virgin olive oil, then seal well with a lid and put it in the fridge. The sauce will last up to 5 days, if properly preserved.

DSC_0346

Pesto alla Genovese.

for 2 serving

40 leaves of fresh basil, washed and dried

1 clove of garlic

3 tablespoons of well-aged Parmesan cheese, grated

1 tablespoon of aged Pecorino cheese, grated (you can add more Parmesan if you don’t find the Pecorino)

1 tbsp of pine nuts

6 tablespoons of extra virgin olive or more, if needed

sea salt crystals to taste

Method 1 (traditional method with a mortar)

1. Using a mortar, crush the garlic with only a couple of salt crystals.

DSC_0333

2. Remove the stems and gradually add all the basil leaves with a couple of salt crystals at a time. Move the pestle in circular motion and firmly crush all the leaves, adding more as you go along.

DSC_0359

3. Add the pine nuts and the grated cheeses, then continue mixing the ingredients with a gentile circular motion.

DSC_0365

4. Add the extra virgin olive oil and mix until you get a creamy pesto.

DSC_0408

DSC_0390

Method 2 ((with an immersion blender or food processor)

This is definitely a quicker method, however, you have to be a little bit careful in order to avoid burning the basil leaves using the blender. You can easily avoid this, by adding some cold water (it has to be really cold) to prevent the blade from heating up and spoiling the basil.

1. Put all the ingredients in a tall container and add only 3 tablespoons of extra virgin olive oil.  Start blending and add 2 tablespoons of really cold water.

DSC_0463

2. Blend everything for a few minutes, then add the rest of the extra virgin olive oil and continue blending until you get a nice creamy pesto.

DSC_0472

DSC_0478

DSC_0481

See also the arugula pesto recipe.

DSC_0427

DSC_0429

DSC_0432

Pesto alla genovese.

Per due persone

1 spicchio d’aglio

40 foglie di basilico, lavate e asciugate

1 cucchiaio di pinoli

3 cucchiai di parmigiano ben stagionato e grattugiato

1 cucchiaio di pecorino sardo stagionato e grattugiato

Olio extra vergine d’oliva q. b.

sale grosso q. b.

Metodo 1 (con il mortaio)

Nota. Una volta aggiunto il basilico, il pestello va mosso in senso rotatorio per non rovinare le foglie. Il basilico deve mantenere il suo colore verde vivo.

1. Usando un mortaio, pestate l’aglio con due cristalli di sale grosso (useremo poco sale perché i formaggi utilizzati nella ricetta sono già salati).

2. Togliete i gambi e aggiungete gradualmente le foglie di basilico con qualche cristallo di sale. Muovete il pestello in senso rotatorio e pestate tutte le foglie.

3. Aggiungete i pinoli con i formaggi grattugiati e continuate ad amalgamare gli ingredienti con il pestello.

4. Aggiungete l’olio a filo, fino ad ottenere un battuto cremoso.

Metodo 2 ((con il frullatore ad immersione)

Per fare il pesto in modo pratico e veloce, si può utilizzare il frullatore ad immersione con un contenitore alto e stretto. Prima di tritare tutti gli ingredienti è importante aggiungere un paio di cucchiai d’acqua ghiacciata, per evitare che la lama del frullatore si scaldi e quindi rovini il basilico.

1. Mettete il basilico, i pinoli e i formaggi nel contenitore con 3 cucchiai d’olio extra vergine d’oliva e 2 cucchiai d’acqua ghiacciata.

2. Tritate per qualche minuto, poi aggiungete altro olio e tritate fino ad ottenere un pesto cremoso.

Nota.

Per ottenere un pesto ancora più cremoso, si può aggiungere un po’ d’acqua di cottura della pasta al condimento.

Vedi anche la ricetta per il pesto di rucola.

Quick And Easy: Chestnut Salad With Apples And Escarole

This week, as promised, I start a series of recipes dedicated to chestnuts. Chestnuts are a wonderful and versatile ingredient, full of fibre, nutrients and vitamins. Basically, they are carbohydrates, but they also contains some good proteins and are gluten-free. These fruits are usually roasted or boiled, sometimes used to enrich salads, stews or soups. Chestnuts flour is also quite popular, often used to make tasty breads and various desserts. Candied chestnuts are also an amazing ingredient when it comes to making desserts, but they are usually quite expensive.

DSC_9980

Today I am publishing a salad with crunchy roasted chestnuts, escarole, pine nuts and apples, packed with vitamins (B1, B2, C etc…) and minerals, to boost the immune system with plenty of flavour and texture!

DSC_0092

Salad with roasted chestnuts, escarole and apples.

Ingredients 

For 4 people

400 g of roasted chestnuts (or boiled, if you prefer) see How to make amazing roasted chestnuts

160 g of escarole or curly-leaved endive, washed and dried

1/2 red onion (optional)

30 g of raisins

40 g pine nuts

2 gala apples, washed and dried

3 tablespoons extra virgin olive oil

the juice of half a lemon

salt and pepper to taste

DSC_0015

DSC_0023

Method.

1. Cut the apples and the escarole leaves. Peel and slice the onion then put it in a cup and fill the cup with water. Leave the onion in the water for 30 minutes and then drain (this operation will make the onion sweeter).

DSC_0149

2. Arrange the escarole leaves on the plates, then add the chopped apples with the raisins, the onion and the pine nuts (divide into 4 servings).

DSC_0163

DSC_0165

3. Peal the roasted chestnuts then  add them to the salad.

DSC_0218

4. Season with 3 tablespoons of extra virgin olive oil, a few drops of lemon juice, salt and pepper.

DSC_0223

DSC_0190

DSC_0174

Insalata di caldarroste, scarola e mele.

Ingredienti

Per 4 persone

400 g di caldarroste (oppure castagne bollite),

per fare le caldarroste seguite questo link:  Come preparare ottime caldarroste a casa

160 g di indivia scarola (oppure indivia riccia) , lavata e asciugata

1/2 cipolla rossa (facoltativo)

30 g di uvetta

40 g di pinoli

2 mele gala, lavate e asciugate

3 cucchiai di olio extravergine d’oliva

il succo di mezzo limone

sale e pepe q. b.

Preparazione.

1. Tagliate le mele e le foglie di scarola. Sbucciate e affettate le cipolle.  Mettete le cipolle a mollo in acqua per 30 minuti (per renderle più dolci), poi scolate.

2. Dividendo in quattro porzioni, sistemate prima le foglie di scarola e poi aggiungete i pezzetti di mele, l’uvetta, la cipolla e i pinoli.

3. Sbucciate le caldarroste e aggiungetele all’insalata.

4. Condite con olio extra vergine d’oliva, qualche goccia di succo di limone, sale e pepe.

DSC_0215

Quick And Easy: Prawn Salad With Rocket And Pomegranate

Last but not least, today I am publishing a wonderful prawn salad with rocket leaves and lots of pomegranate seeds. Extremely easy to make and perfectly balanced, this dish is real treat!!!

It will definitely become a classic at my dinner parties!

DSC_8122

DSC_8107

Prawn salad with rocket and pomegranate.

350 g prawns tails

125 g rocket (arugula)

2 spring onions, washed and finely sliced (only the tender part)

half bulb of fennel, washed and finely sliced

2 stalks of celery, washed and finely sliced (only the tender part)

the seeds of a pomegranate

for the lime citronette

the juice of 1/2 a lime

4 tablespoons of extra virgin olive oil

salt and pepper to taste

DSC_8117

Method.

1. Peel and devein the prawns, then poach in water for a few minutes.

2. Drain the prawns and let cool.

3. Place the arugula, the fennel, the spring onions and the celery in the plates, then add the prawns and garnish with plenty of pomegranate seeds.

4. Make the lime citronette. Mix 4 tablespoons of extra virgin olive oil with the juice of half a lime, then season with salt and pepper.

5. Pour the lime dressing over the salad and serve.

Also see Rice Flour Chocolate Cookies With Pomegranate and Light Sabayon With Pomegranate And Pistachios

DSC_8068

DSC_8072

DSC_8101

Insalata di gamberi con rucola e melagrana.

350 g di code di gambero

125 g di rucola

2 cipollotti, lavati e tagliati finemente (solo la parte tenera)

2 gambi di sedano, lavati e tagliati finemente (solo la parte tenera)

1/2 finocchio, lavato e tagliato finemente

i chicchi di una melagrana

Per la citronette di lime

il succo di mezzo lime

4 cucchiai di olio extra vergine d’oliva

sale pepe q. b.

Preparazione.

1. Sgusciate i gamberi e togliete il budellino. Fate bollire i gamberi per qualche minuto.

2. Scolate i crostacei e fateli raffreddare.

3. Mettete i gamberi con la rucola, i chicchi di melagrana, il finocchio e i cipollotti nei piatti.

4. A parte, preparate la citronette di lime. Mescolate 4 cucchiai di olio extra vergine d’oliva con il succo di mezzo lime, sale e pepe.

5. Condite l’insalata di gamberi con la citronette di lime e servite.

DSC_8148

Traditional Recipe: Baked Peppers Au Gratin

A great dish to serve if you have a large number of guests to feed, because it is so easy to prepare and cook. Baked Peppers Au Gratin are a wonderful appetiser and side, served with meat or seafood, but you can have them as a vegetarian meal, with a nice salad. You can prepare a gluten-free version of this Italian traditional dish using instant polenta, instead of bread crumbs. You can also make a vegan version without the cheese.

DSC_1181

Serve Peppers Au Gratin hot or cold, they are delicious either way! But in the summer I prefer this dish cold, straight from the fridge, because the peppers need some time to absorb all the different flavours.

This is the right season to eat fresh bell peppers and there are plenty of choices when it comes to great traditional recipes with this wonderful ingredient.
Here are some other recipes using bell peppers that I have published recently on Foodfulife:

La peperonata

Roasted Bell Peppers with Garlic Vinaigrette

DSC_1210

Baked Peppers Au Gratin.

Preparation time: 10 minutes

Cooking time: 40 minutes

6 servings

Easy

Ingredients

3 large bell peppers (red and yellow)

6 tablespoons breadcrumbs

80 g freshly grated Parmesan cheese

1 tablespoon of fresh parsley, finally chopped

1/2 a tablespoon of dried oregano

2-3 cloves of garlic, crushed and finally chopped

salt and pepper to taste

extra virgin olive oil

DSC_1087

Method.

1. In a small bowl, mix the herbs with the breadcrumbs, the grated cheese, the garlic and season with some salt and pepper.

DSC_1099

2. Wash and dry the bell peppers.

DSC_1041

DSC_1053

3. Using a knife, cut the peppers in half and remove the stem, the seeds and the white parts.

DSC_1071

4. Place the peppers onto an oven tray, previously greased with a couple of tablespoons of extra virgin olive oil. With a spoon, spread the breadcrumb mixture evenly onto the peppers.

DSC_1104

5. Bake in the oven at 200°C (392° F) , until the peppers are tender and the breadcrumb mixture becomes very crunchy.

DSC_1209

DSC_1194

DSC_1193

Peperoni Gratinati Al Forno.

Tempo di preparazione: 10 minuti

Tempo di cottura: 40 minuti

6 persone

Facile

Ingredienti

3 peperoni grandi (rosso e giallo)

6 cucchiai di pangrattato

80 g di Parmigiano Reggiano, grattugiato fresco

1 cucchiaio di prezzemolo fresco, tritato finemente

1/2 cucchiaio di origano secco

2-3 spicchi d’aglio, schiacciato e tritato finemente

sale e pepe

olio extra vergine di oliva

Preparazione.

1. In una terrina, mescolate il pan grattato con l’aglio, l’origano, il prezzemolo, il parmigiano e un pò di sale e pepe.

2. Lavate e asciugate bene i peperoni.

3. Con un coltello, tagliate e rimuovete la calotta superiore del peperone. Tagliate a metà gli ortaggi e rimuovete la parte interna, con i filamenti e i semi.

4. Disponete i peperoni sopra una teglia, unta con un filo d’olio. Riempite i peperoni con il composto di pangrattato e sapori, ma senza esagerare.

5. Condite con un po’ d’olio e infornate a 200° C. Quando i peperoni saranno morbidi e il ripieno croccante spegnete il fuoco.

Barley And Shrimp Salad In Red Cabbage Leaves

Barley is a cereal that has been used in dishes for thousands of years. It’s a wonderful and versatile ingredient: it can be used in salads and soups or cooked like a risotto. Today we are going to make a light barley salad with lots of fresh vegetables and shrimps! This colourful salad could be a great side dish for a barbecue or a buffet, but could also be served on its own as a light meal.

DSC_0799

DSC_0727

Tips.

1. Pearl barley does not need soaking before cooking, it is simply boiled like rice.

2. Wash the barley under running water for a few minutes before cooking it, to remove its natural bitter taste.

3. For this recipe I am using a red Tropea’s onion, a delicious onion variety, available in Italy. If you don’t find it, you can use shallots instead. Shallots and Tropea’s onions are perfect for this recipe because they are naturally sweet and have a pleasant delicate flavour.

DSC_0720

Barley and shrimp salad in red cabbage leaves.

5 – 6 red cabbage leaves (medium size)

90 g pearl barley

250 g frozen shrimps

1/2 sweet red Tropea’s onion (or shallots)

1/2 celery stalk, finely chopped

7-8 cherry tomatoes

1 large avocado

the juice of half a lemon

2 tablespoons of fresh parsley, finely chopped

salt and pepper to taste

vegetable broth

DSC_0666

Method.

1. Cook the pearl barley in vegetable broth (I used an organic stock), for 40 minutes (the cooking time will vary depending on the variety of barley).

DSC_0704

2. Boil some water in a sauce pan, then turn off the heat and poach the shrimps for 3-4 minutes. Drain and set aside.

DSC_0711

3. Wash and dry the cabbage leaves. Peel and slice the onion and avocado, then set aside. Wash, dry and cut the celery and tomatoes.

DSC_0697

DSC_0756

4. Mix all the vegetables (including the chopped parsley) with the cooked barley and shrimps. Serve the salad in cabbage leaves and season with salt, pepper and lemon juice.

DSC_0765

DSC_0787

DSC_0810

Cestini di insalata d’orzo e gamberetti.

5-6 foglie di cavolo rosso

250 g gamberetti surgelati

1/2 cipolla rossa di Tropea (oppure lo scalogno)

1/2 gambo di sedano

7-8 pomodorini ciliegia

1 avocado grande

il succo di mezzo limone

2 cucchiai di prezzemolo fresco, tritato finemente

sale e pepe q. b.

brodo vegetale (uso del brodo fatto con del dado biologico)

Preparazione.

1. Fate cuocere l’orzo perlato nel brodo per 40 minuti (il tempo di cottura può variare a seconda della qualità di orzo).

2. Fate bollire una pentola piena d’acqua, poi spegnete il fuoco e immergetevi i gamberetti per 3-4 minuti. Scolate e mettete da parte.

3. Lavate e asciugate le foglie di cavolo. Pelate e tagliate le cipolle e l’avocado. Lavate, asciugate e tagliate a cubetti il sedano e i pomodorini.

4. Mescolate tutte le verdure (compreso il prezzemolo) con l’orzo e i gamberetti. Servite l’insalata nelle foglie di cavolo e condite con sale, pepe e il succo di limone.

DSC_0806