Category Archives: Gluten-free

Dark Chocolate Lava Cakes With A Kick! (Gluten-Free)

DSC_3359

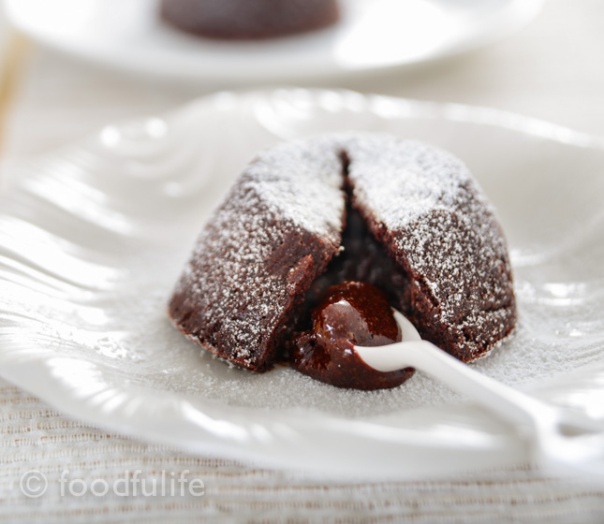
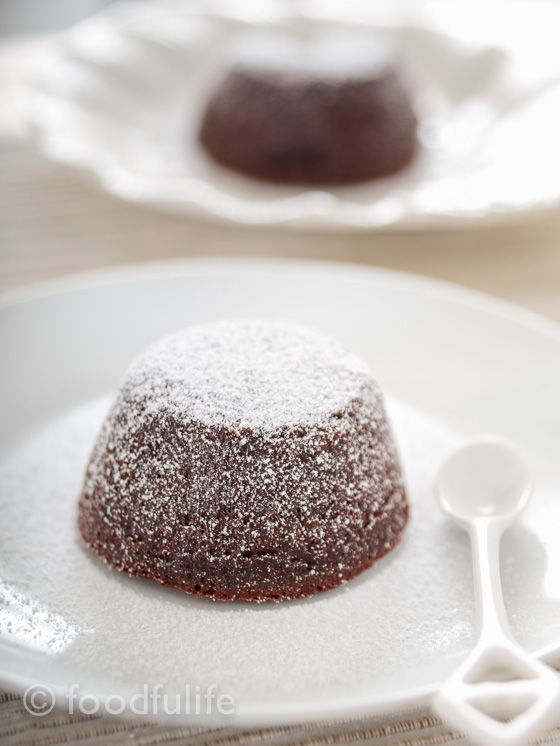
Decadent, hot and velvety creamy inside, this dessert is to die for!
It took me several days to get this recipe right! It is quite difficult to achieve the right consistency, when you make this kind of dessert without flour or caster sugar. However, the result it is simply superb!!

Yes, these wonderful lava cakes are gluten and refined sugar free (I added a little icing sugar on top, in order to take better pictures, but you don’t have to)… No one will know they are secretly healthy!

…But be careful, because the chocolate-chilli combination can be very addictive!

DSC_3337

Dark chocolate lava cakes with a kick (gluten and refined sugar free)

Cooking time: 18-19 minutes

Preparation time: 25 minutes

Ingredients

for 4 small cakes (4 servings)

80 g dark chocolate (70% cocoa solids)

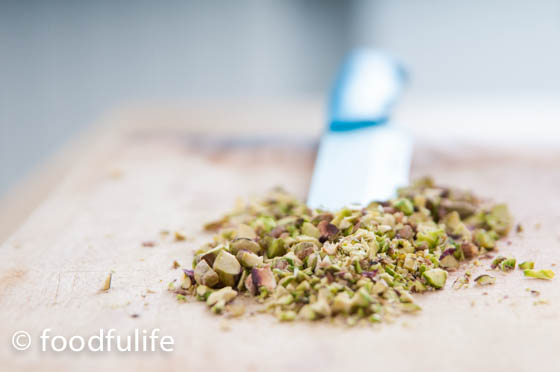
40 g almonds (with skin)

2 medium eggs, plus 1 yolk

1 pinch of salt

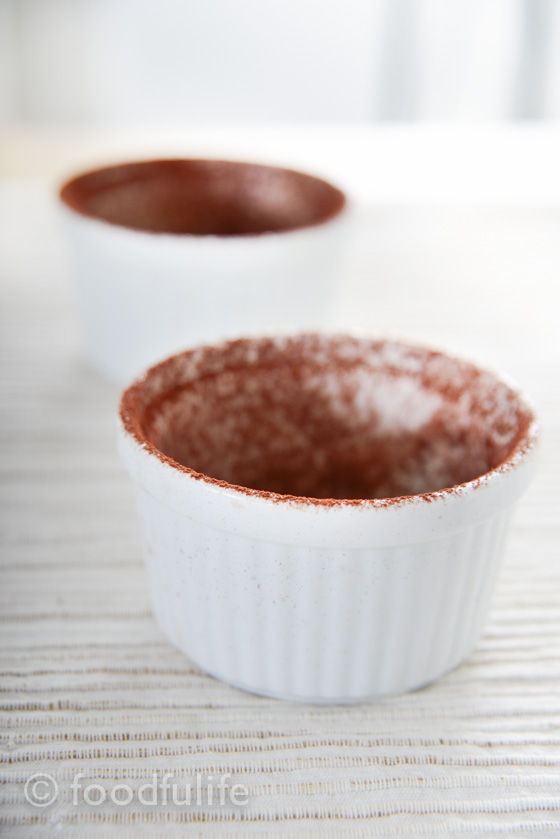
10 g unsweetened cocoa powder (plus a little more to dust the cake moulds)

80 g butter

100 g acacia honey (or the honey of your choice)

2 small dried chilli peppers (or a pinch of chilli powder)

icing sugar to decorate (optional, don’t use it if you don’t want refined sugar in the cakes)

4 small disposable aluminium cake moulds

Method.

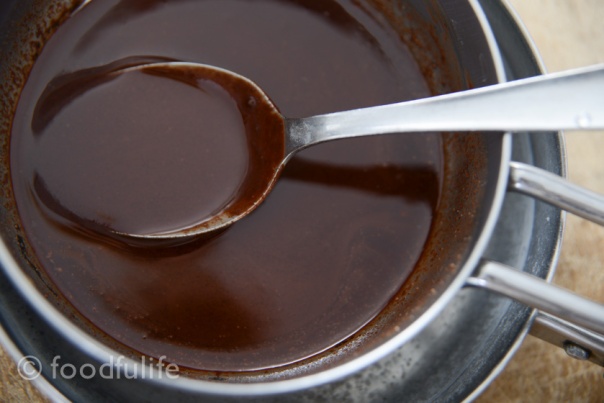
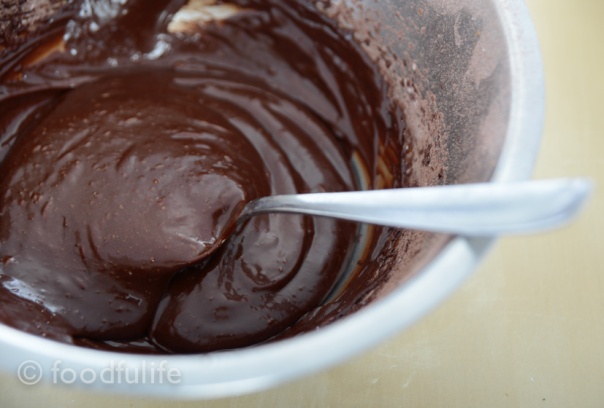
1. Melt the chocolate in a bain-marie. When the chocolate is completely melted, add the butter, let it melt and mix well; then remove from the heat.

DSC_3190

2. Lightly toast the almonds in the oven at 170° C / 338° F (just for a few minutes). Let cool, then, using a food processor, grind the almonds with the cocoa powder and the dried chillies.

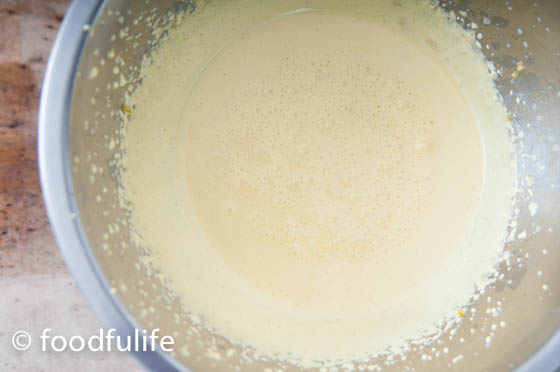
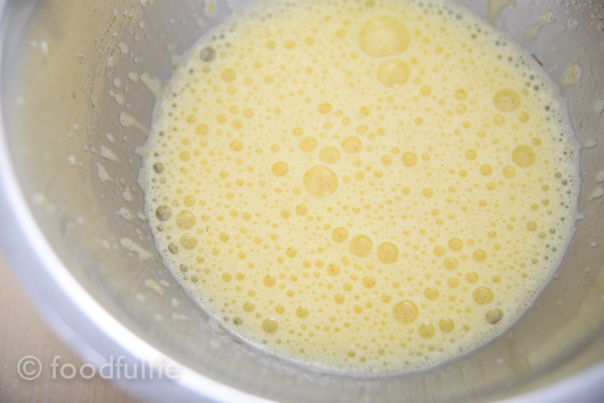
3. Separately, beat the eggs with honey with an electric beater, until the mixture is soft and fluffy.

DSC_3194

4. Incorporate the melted chocolate and butter with egg mixture. Beat for a few more minutes, then add the cocoa with the ground almonds and chillies.

DSC_3214

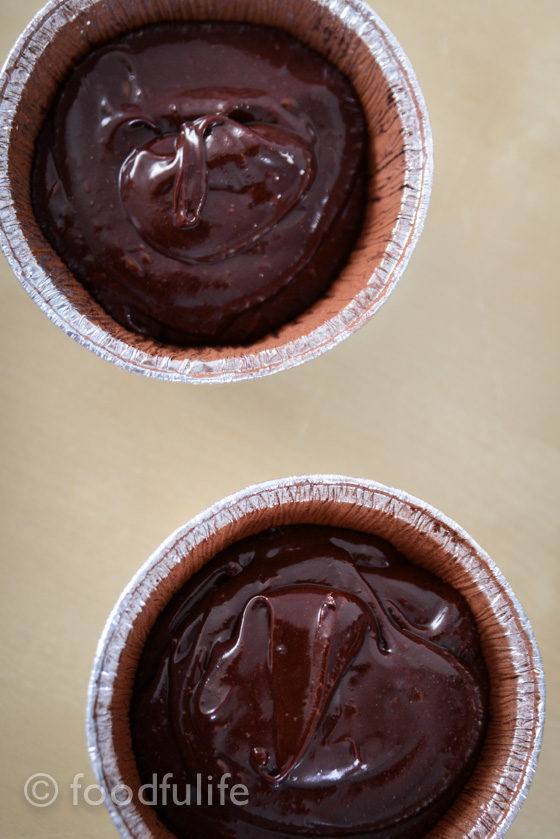
5. Grease 4 small cake moulds with butter, then dust with a little cocoa powder.

DSC_3216

DSC_3231

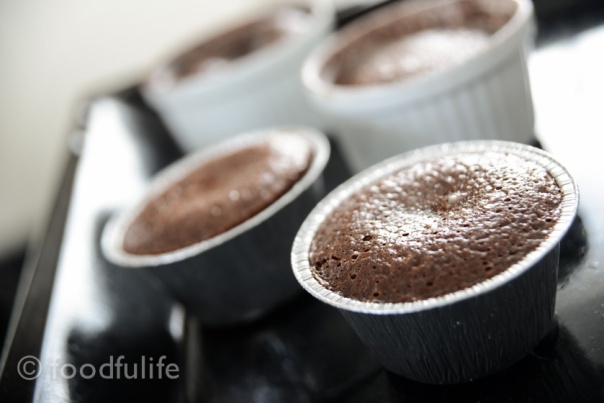
6. Bake at 160 ° C/ 320° F for 18-19 minutes.

DSC_3303

7. Garnish with icing sugar (optional) and serve hot.

DSC_3324

DSC_3335

DSC_3319

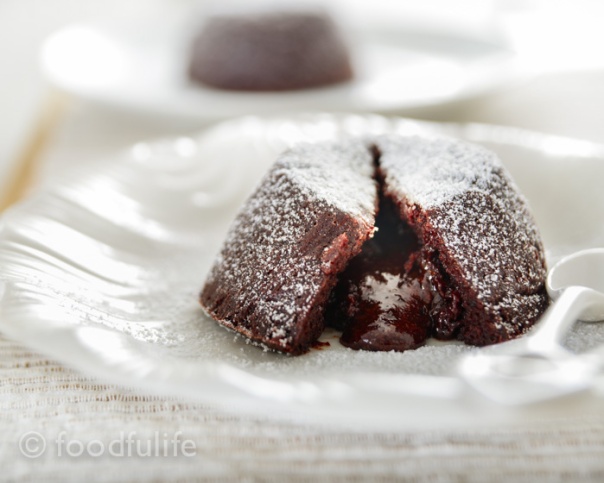
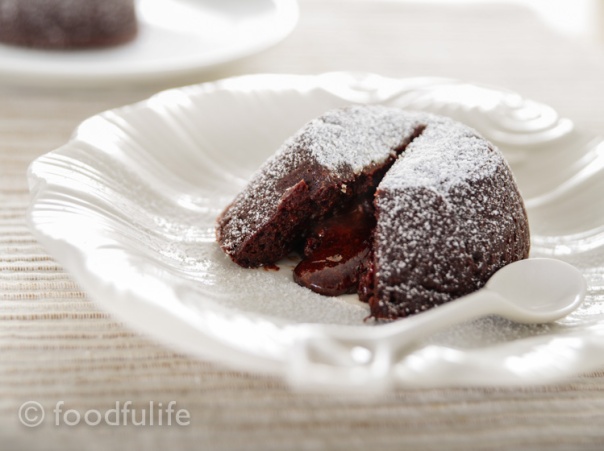
Note. The cakes should be cooked on the outside and slightly soft in the centre, make sure you don’t overcook them…One more minute can make a huge difference!

Tortini con cuore fondente al peperoncino (senza glutine)

80 g di cioccolato fondente al 70 %

40 g di mandorle (con la buccia)

2 uova medie, più un tuorlo

1 pizzico di sale

10 g di cacao amaro

80 g di burro

100 g di miele di acacia (oppure il miele che preferite)

due peperoncini secchi (oppure un po’ di peperoncino in polvere)

zucchero a velo per decorare (facoltativo, non usatelo se non volete lo zucchero nella ricetta)

4 stampini di alluminio (usa e getta)

Preparazione.

1. Fate sciogliere il cioccolato a bagnomaria. Quando il cioccolato sarà completamente sciolto, aggiungete il burro e mescolate bene.

2. Tostate leggermente le mandorle nel forno caldo per qualche minuti. Lasciate raffreddare, poi tritate molto finemente insieme al cacao e i peperoncini con un tritatutto (fate qualche pausa per non riscaldare troppo le lame).

3. A parte, sbattete le uova con il miele, fino ad ottenere un composto soffice e spumoso.

4.  Incorporate il burro e il cioccolato sciolto alle uova. Sbattete ancora per qualche minuto, poi aggiungete il cacao con la farina di mandorle e il peperoncino. Mescolate bene.

5. Imburrate gli stampini in alluminio e ricoprite con una spolverata di cacao amaro.

6. Infornate a 160° C per 18-19 minuti (non di più perché i tortini rischiano di solidificarsi troppo, mentre al centro devono restare cremosi).

7. Decorate con zucchero a velo (facoltativo) e servite i tortini caldi.

DSC_3292

Skinny “Fries”, My Way!

Low-fat and healthier than the real thing, oven-baked skinny “fries” can be even tastier than deep fried potatoes, if you add fresh herbs and garlic.
These skinny “fries” are super tasty and very crunchy!…None will know they are baked and not fried!!

Skinny fries with garlic and rosemary

Rosemary and garlic skinny “fries”.

Preparation time: 10 minutes

Cooking time: 30-35 minutes

4 Servings

Ingredients

a bunch of fresh rosemary

8 garlic cloves, peeled and cut in halves

4 medium-large potatoes

4 tablespoons extra virgin olive oil

salt and pepper to taste

Skinny fries with garlic and rosemary

what you need

2 large rectangular baking trays

a big bowl

some baking paper

a knife

a kitchen cutting board

Skinny fries with garlic and rosemary

Method.

1. Wash, peel and cut the potatoes into sticks.

Skinny fries with garlic and rosemary

2. Put the potatoes in a large bowl and mix with 4 tablespoons of extra virgin olive oil, salt and pepper.

Skinny fries with garlic and rosemary

3. Take 2 large baking trays, line them with baking paper and place the potatoes on the trays (not too many, otherwise they’ll stick together).

4. Top the potatoes with the rosemary and the garlic cloves, then bake for 30-35 minutes at 190°C (374° F).

Skinny fries with garlic and rosemary

5. Take the potatoes out of the oven, remove the garlic and rosemary and serve.

Skinny fries with garlic and rosemary

Skinny fries with garlic and rosemary

Skinny fries with garlic and rosemary

Skinny fries with garlic and rosemary

Patatine al forno con aglio e rosmarino.

Tempo di preparazione: 10 minuti

Tempo di cottura: 30-35 minuti

Per 4 persone

Ingredienti

un po’ di rosmarino fresco

8 spicchi d’aglio, puliti e tagliati a metà

4 patate medio-grandi

4 cucchiai di olio extra vergine d’oliva

sale e pepe q. b.

occorrono:

2 teglie grandi rettangolari

una ciotola grande

2 fogli di carta da forno

un coltello

un tagliere

Preparazione.

1. Lavate, sbucciate e tagliate le patate a bastoncini sottili.

2. Mettete le patate in una ciotola e mescolate con 4 cucchiai di olio extra vergine d’oliva, sale e pepe.

3. Prendete una teglia grande, ricoprite con carta da forno e posizionateci sopra le patate, lasciando un po’ di spazio tra un pezzo e l’altro (altrimenti si attaccano).

4. Aggiungete il rosmarino e gli spicchi d’aglio sopra le patate, poi infornate a 190 ° C per 30-35 minuti.

5. Levate le patate dal forno, poi togliete l’aglio e il rosmarino. Servite subito.

Skinny fries with garlic and rosemary

Skinny fries with garlic and rosemary

How To Make (Almost) Perfect Meringues

The basics.
A meringue is basically made with two ingredients: sugar and egg whites.
In Italian cuisine we often use three types of meringue: the classic, the French or Italian meringue.
While the classic and French meringues are both baked, the Italian meringue is usually pasteurised (“cooked” at a very low temperature) by adding hot sugar syrup during the preparation process and it is generally used in creamy desserts or cake decorations/ fillings.

How to make perfect meringues

Classic or French meringue?
The main difference between French and classic meringues is in the preparation methods. In fact, both these meringues are made with the same ingredients and cooking methods, but they differ in the way in which the sugar is added to the recipe and (slightly) in their final consistency. In the classic meringue the sugar is added at the end of the process, incorporating the sugar with a spatula when the egg whites are firmly whipped; while in the French meringue the sugar is added gradually during the whipping process.

DSC_3006-2

DSC_2997-4

In this article we will see the preparation process for the French meringue, which is quite light and crispy.

How to make perfect meringues

…And yes, it’s hard to get it right, but not impossible!

Basic French meringue recipe.

Preparation time: 10 minutes

Cooking time: 3 hours

Ingredients

For 25 meringues (two oven trays)

100 g egg whites

200 g granulated sugar (use icing sugar for a finer grain)

How to make perfect meringues

Method.

1. Using an electric beater, beat the egg whites with 1/3 of sugar (about 66 g) starting with a medium-low power.

How to make perfect meringues

2. Once the egg whites have doubled in volume, add another 1/3 of sugar and beat at a medium-high power.

How to make perfect meringues

3. When the egg whites are almost stiff, add the rest of the sugar and continue to beat until the mixture is thick and glossy.

How to make perfect meringues

How to make perfect meringues

4. Line the base of an oven tray with baking paper, then, using a piping bag, make the meringues (5 cm wide x 3 cm thick).

How to make perfect meringues

How to make perfect meringues

5. Bake at 85-100° C ( 185- 212°F) for 3 hours (the cooking time depends also on the oven you use). Let cool completely on wire rack and then place in a airtight container.

How to make perfect meringues

How to make perfect meringues

How to make perfect meringues

A few things to keep in mind…

About the ingredients.

1. As a basic rule, the weight of the sugar must be double compared to that of the egg whites.

2. You can add something a little acidic, like lemon juice, to help the whipping process. The doses: use 1/2 a teaspoon of lemon juice for 100 g of egg whites.

3. It is possible to add a little cornstarch in order to better maintain the shape of the meringues during the cooking process.

4. Don’t add any salt because it won’t help the whipping process. Some recipes might suggest the opposite, but it is not correct.

About the preparation method.

1. Separate the egg whites from the yolks well, even small traces of egg yolk will compromise the end result.

2. The equipment used during the whipping process should have been properly cleaned, dried and possibly quite cold. All these elements will help you to achieve the perfect meringue!

About the cooking method.

1. Cook the meringues at a very low temperature to avoid any changes in colour or cracks on the surface (basically the meringues have to dry out slowly in the oven). Best cooking temperature: 85 -100 ° C ( 185- 212°F).

2. If you want to dry the meringues completely, to preserve them for longer, you can leave them in the oven (turned off) for a few hours, after the cooking process.

How to make perfect meringues

Ricetta base per la meringa francese.

Tempo di preparazione: 10 minuti

Tempo di cottura: 3 ore

Ingredienti

Per 25 meringhe (per 2 teglie rettangolari)

100 g di albumi

200 g di zucchero semolato (potete usare zucchero a velo per una meringa con grana più fine)

Preparazione.

1. Con uno sbattitore elettrico (utilizzando una potenza medio-bassa), incominciate a montare gli albumi con 1/3 di zucchero (circa 66 g).

2. Quando gli albumi saranno raddoppiati di volume, aggiungete ancora 1/3 di zucchero e aumentate la potenza.

3. Ad albumi quasi montati a neve, aggiungere il resto dello zucchero e continuare a montare fino ad ottenere un composto denso e lucido.

4. Ricoprite la base di una teglia con carta da forno, poi, utilizzando un sac à poche, date la forma alle meringhe (5 cm di larghezza x 3 cm di altezza).

5. Infornare a 85-100 ° C per 3 ore (il tempo di cottura però dipende dal forno utilizzato). Fate raffreddare bene, poi conservate le meringhe in un contenitore a chiusura ermetica.

Note.

Per gli ingredienti.

1. Come regola generale, il peso dello zucchero deve essere il doppio di quello degli albumi.

2. Si può utilizzare del succo di limone per far montare meglio gli albumi. Dosi consigliate: 1/2 cucchiaino di succo di limone per 100 g di albumi.

3. Aggiungendo un po ‘ di amido di mais le meringhe manterranno meglio la forma durante la cottura.

4. Il sale non aiuta a montare meglio gli albumi, se potete non utilizzatelo.

Per la preparazione.

1. Separate bene gli albumi dai i tuorli, perché piccole tracce di tuorlo possono compromettere il risultato finale.

2. L’ attrezzatura deve essere pulita, asciugata e possibilmente fredda.

Per la cottura.

1. Le meringhe devono cuocere a temperatura molto bassa per evitare un cambiamento di colore o la formazione di piccole crepe sulla superficie. La temperatura di cottura più indicata è tra 85-100 ° C.

2. Le meringhe si conservano a lungo quando sono molto asciutte. A cottura terminata, potete lasciare le meringhe nel forno per qualche ora  per farle asciugare completamente.

How to make perfect meringues

Traditional Recipe: La Farinata Genovese (Genoese Socca)

Basically made from 3 ingredients (chickpea flour, olive oil and water), la farinata, or socca (as it is called in Nice), is a kind of chickpea focaccia, which doesn’t contain gluten and is dairy free.  It is quite easy to prepare and it’s perfect for vegan and vegetarian diets, because it is a good source of proteins.

DSC_2043

Before getting the method and recipe right it might take a few tries, especially when it comes to finding the right balance between the ingredients. It might requires a lot of olive oil in order to become crispy on the outside and creamy on the inside, as it should be.
The farinata is traditionally only a few millimetres thin (see the pictures).

A few tips.
The ideal cooking method would also require a high temperature oven, like a wood stove, however, a good oven will do. Remember to use non-stick baking trays or baking paper.
The farinata has to be served quite hot, freshly made, otherwise it will become elastic and not very nice to eat. If you have leftovers, you can reheat the farinata in the oven the day after.

The farinata can also be enriched adding different ingredients; amongst the local most popular variations, you’ll find the onion and the artichoke farinata, also quite easy to make.

DSC_2051

Farinata could be a delicious starter or aperitif, but it is also a wonderful meal when served with a nice big salad on the side.

La farinata di ceci (Genoese socca)

Ingredients

for 3 rounded backing trays (28 cm in diameter)

1,5 litre of water

500 g chickpea flour

200 ml extra virgin olive oil

salt and pepper to taste

Method.

1. In a large bowl, vigorously whisk 1,5 litre of water with 500 g. of chickpea flour, 100 ml olive oil and some salt. Once all the ingredients are mixed well, let sit for at least 5 hours (but 10 hours would be better, so the flour can absorb the water well).

DSC_1994

2. After the resting time, remove the froth formed on the surface of the mixture with a spoon.

DSC_1997

3. Pour some extra virgin oil on a non-stick baking tray, then with a ladle add 1/3 of the mixture and season with salt and pepper.

DSC_2009

DSC_2007

4. Bake the farinata at 220°C / 428°F (or higher) until golden, then turn on the grill and cook for a little longer, in order to get a nice crispy crust on top. Remove from the oven and serve hot.

DSC_2013

DSC_2049

DSC_2056

Also see Chickpea flour bread recipe

La farinata di ceci.

Ingredients

Per 3 teglie rotonde di 28 cm di diametro

1,5 l d’ acqua

500 g di farina di ceci

sale e pepe q.b.

200 ml di olio extra vergine d’oliva

Preparazione.

1. In una ciotola grande, mescolate energicamente con una frusta 1, 5 l di acqua, 500 g. di farina di ceci, 100 ml di olio e un po’ di sale. Una volta amalgamati bene gli ingredienti, lasciate riposare per almeno 5 ore (sarebbe meglio 10 ore, per far assorbire bene l’acqua).

2. Passato il tempo necessario, togliete con un cucchiaio la schiuma formata in superficie.

3. Versate un po’ d’olio su una teglia antiaderente, poi con un mestolo aggiungete il composto liquido (non troppo perché deve restare sottile) e condite con sale e pepe.

4. Infornate a 220° C per una decina di minuti, poi accendete il grill e lasciate che si formi una crosta croccante. Sfornate e servite!

DSC_2047

DSC_2030

Vedi anche la ricetta del Pane con farina di ceci e semi di zucca

Traditional Recipe: Sicilian Almond Biscuits With Candied Cherries (Pasticcini Alle Mandorle)

These Sicilian biscuits (or small pastries) are gluten-free, dairy-free, delicious and very easy to prepare! It is better to use a piping bag to shape the biscuits, but if you don’t have one, you can roll out the dough with your hands to make small balls and then press them with your fingers, to obtain a cookie-like shape.

DSC_1945

The dough needs, at least, 30 minutes of resting time, however they will taste even better if you leave them to rest in the fridge overnight. Traditionally, we garnish these biscuits with candied cherries or almonds, so if you want you can use both. Here I prepared some of these delicious pastries with my mother, I hope you enjoy the recipe!

DSC_1930

Biscuits with almonds and candied cherries.

Preparation and cooking time: 25 minutes + resting time

Difficulty: Easy

Ingredients

For two oven trays

3 egg whites

80 g sugar

200 g almonds, shelled and finely chopped

candied cherries

a few drops of almond flavouring, or some orange zest (optional)

DSC_1904

Method.

1. Grind the almonds with the sugar, using a food processor.

DSC_1900

2. Combine the egg whites with the almond mixture and the flavourings, then put the dough in the refrigerator for at least 30 minutes.

DSC_1902

DSC_1905

3. Using a piping bag, shape the biscuits and then garnish with candied cherries.

DSC_1907

DSC_1912

DSC_1921

DSC_1924

4. Bake at 180 ° C (356° F) until golden.

DSC_1937

DSC_1942

DSC_1947

DSC_1982

Dolcetti alle mandorle con ciliegie candite.

Preparazione e cottura: 25 minutes + il riposo

Difficoltà : Facile

Ingredienti

Per 2 teglie rettangolari di media grandezza.

3 chiari d’uova

80 g di zucchero

200 g di mandorle sgusciate e tritate finemente

ciliegie candite q. b.

1 qualche goccia di aroma di mandorle, oppure una scorretta di arancia tritata (facoltativo)

Preparazione.

1. Tritate finemente le mandorle con lo zucchero.

2. Mescolate i chiari d’uova con le mandorle tritate, lo zucchero e gli aromi. Mettete il composto a riposare in frigorifero per almeno 30 minuti.

3. Usando il sac à poche, date la forma ai pasticcini (oppure formate delle palline e schiacciatele leggermente con le dita).

4. Guarnite i pasticcini con le ciliegie candite, poi infornate a 180° C fino ad ottenere dei dolcetti dorati.

DSC_1972

DSC_1985

Quick And Easy: Chestnut Salad With Apples And Escarole

This week, as promised, I start a series of recipes dedicated to chestnuts. Chestnuts are a wonderful and versatile ingredient, full of fibre, nutrients and vitamins. Basically, they are carbohydrates, but they also contains some good proteins and are gluten-free. These fruits are usually roasted or boiled, sometimes used to enrich salads, stews or soups. Chestnuts flour is also quite popular, often used to make tasty breads and various desserts. Candied chestnuts are also an amazing ingredient when it comes to making desserts, but they are usually quite expensive.

DSC_9980

Today I am publishing a salad with crunchy roasted chestnuts, escarole, pine nuts and apples, packed with vitamins (B1, B2, C etc…) and minerals, to boost the immune system with plenty of flavour and texture!

DSC_0092

Salad with roasted chestnuts, escarole and apples.

Ingredients 

For 4 people

400 g of roasted chestnuts (or boiled, if you prefer) see How to make amazing roasted chestnuts

160 g of escarole or curly-leaved endive, washed and dried

1/2 red onion (optional)

30 g of raisins

40 g pine nuts

2 gala apples, washed and dried

3 tablespoons extra virgin olive oil

the juice of half a lemon

salt and pepper to taste

DSC_0015

DSC_0023

Method.

1. Cut the apples and the escarole leaves. Peel and slice the onion then put it in a cup and fill the cup with water. Leave the onion in the water for 30 minutes and then drain (this operation will make the onion sweeter).

DSC_0149

2. Arrange the escarole leaves on the plates, then add the chopped apples with the raisins, the onion and the pine nuts (divide into 4 servings).

DSC_0163

DSC_0165

3. Peal the roasted chestnuts then  add them to the salad.

DSC_0218

4. Season with 3 tablespoons of extra virgin olive oil, a few drops of lemon juice, salt and pepper.

DSC_0223

DSC_0190

DSC_0174

Insalata di caldarroste, scarola e mele.

Ingredienti

Per 4 persone

400 g di caldarroste (oppure castagne bollite),

per fare le caldarroste seguite questo link:  Come preparare ottime caldarroste a casa

160 g di indivia scarola (oppure indivia riccia) , lavata e asciugata

1/2 cipolla rossa (facoltativo)

30 g di uvetta

40 g di pinoli

2 mele gala, lavate e asciugate

3 cucchiai di olio extravergine d’oliva

il succo di mezzo limone

sale e pepe q. b.

Preparazione.

1. Tagliate le mele e le foglie di scarola. Sbucciate e affettate le cipolle.  Mettete le cipolle a mollo in acqua per 30 minuti (per renderle più dolci), poi scolate.

2. Dividendo in quattro porzioni, sistemate prima le foglie di scarola e poi aggiungete i pezzetti di mele, l’uvetta, la cipolla e i pinoli.

3. Sbucciate le caldarroste e aggiungetele all’insalata.

4. Condite con olio extra vergine d’oliva, qualche goccia di succo di limone, sale e pepe.

DSC_0215

How To Make Amazing Roasted Chestnuts In Your Own Home!

This is the right season to enjoy some crunchy roasted chestnuts! Golden and crunchy, roasted chestnuts are simply delicious!! When my brother and I were kids, my father used to make some roasted chestnuts before bed time….We loved it!

DSC_0128

In this post I’ll share the method to prepare amazing roasted chestnuts directly on the stove, just like my father used to do, but make sure you follow the instructions and you protect yourself with the proper equipment, in order to avoid disasters! :-). If you carefully follow all the steps this method is fairly easy and safe.

DSC_0132

Tip. During the cooking time keep away from the fire as much as possible and wear oven gloves for extra safety.

How to make roasted chestnuts 

Preparation time: 5 minutes

Cooking time:15-20 minutes

Ingredients

500 g of fresh chestnuts

just a small splash good quality white wine (avoid putting the bottle close to the fire when you cook and use it)

What you need.

a gas stove

a frying pan with holes to cook chestnuts (you can buy it or you can make your own, by piercing an old frying pan with a large nail, using a hammer)

a long stainless steel kitchen utensil (don’t use anything with plastic or wood)

Good oven gloves

Preparation.

1. Check, wash and dry the chestnuts.

DSC_0096

2. Using a sharp knife, cut the chestnuts one by one, making a 2cm long incision on the round side (make an X or 1 long cut horizontally, either way it should be fine!).

DSC_0098

DSC_0106

This operation is necessary to release the steam from the nuts while they are cooking and it will also make them easier to peel (If you skip this step the chestnuts will explode during the cooking process, so make sure you cut them properly).

Cooking Method (on the stove).

1. Put the pierced pan with the chestnuts directly on the gas stove over a moderate-high heat. Stir constantly with a long stainless steel kitchen utensil.

2. Roast the chestnuts for about 10 minutes, then add a small splash of white wine (try to keep yourself and the bottle of wine away from the heat, while you do that) and continue to roast and stir for at least 5 more minutes.

DSC_0136

3. Turn off the eat and put the chestnuts in a brown paper bag for a few minutes (this will keep them hot and moist). Peel the chestnuts while they are still hot, because once they are cool they become much more difficult to peel.

DSC_0139

Tip. You can bake the chestnuts at 220° C (428° F) for about 20 minutes, instead of cooking them on the stove top; it’s probably a safer cooking method…However, I prefer the method above, because the chestnuts are much tastier and crunchier, when cooked directly over the flame!

DSC_0108

Roasted chestnuts with roasting pan.

Come preparare ottime caldarroste a casa.

In questo articolo vedremo insieme come preparare delle ottime caldarroste, cotte direttamente sul fornello, proprio come mio padre era solito fare, quando io e mio fratello eravamo bambini.

Seguite attentamente le istruzioni indicate e vedrete che questo è un metodo abbastanza semplice e sicuro.

Nota. Durante la cottura delle caldarroste, per quanto possibile, cercate di stare lontano dal fuoco e indossate dei guanti da forno per protezione.

Preparazione delle caldarroste.

Tempo di preparazione: 5 minuti

Tempo di cottura: 15-20 minuti

Ingredienti

500 g di castagne fresche

un dito di vino bianco di buona qualità (fate attenzione a non avvicinare troppo la bottiglia di vino al fuoco)

L’attrezzatura

un fornello a gas

una padella forata per caldarroste (potete farne una voi forando più volte una vecchia padella, con un chiodo grosso e un martello).

un cucchiaio grande di acciaio con manico lungo (non utilizzate plastica o legno)

guanti da forno

Preparazione.

1. Controllate, lavate e asciugate le castagne.

2. Utilizzando un coltello molto affilato, tagliate le castagne, una ad una, facendo un’ incisione di circa 2 cm sulla parte bombata. Questa operazione è necessaria per fare evaporare l’acqua dai frutti durante la cottura, se no le castagne col calore possono esplodere.

Metodo di cottura (sul fornello)

1. Mettete la padella forata, con le castagne, direttamente sul fornello a fuoco medio. Mescolate spesso, utilizzando un grosso cucchiaio di acciaio con il manico lungo.

2. Fate arrostire le castagne per circa 10 minuti, quindi insaporite con una piccola spruzzata di vino bianco (cercate di tenere la bottiglia di vino lontana dal fuoco). Continuate a cuocere le castagne per almeno altri 5 minuti.

3. Spegnete il fuoco e mettere le castagne in un sacchetto di carta per alcuni minuti (serve a mantenerle calde e umide). Sbucciate le castagne mentre sono ancora calde perché, una volta raffreddate, sbucciarle diventa molto più difficile.

Nota. È possibile cuocere le castagne nel forno a 220 °  C per circa 20 minuti, invece di utilizzare il fornello. Io preferisco cuocerle direttamente sulla fiamma perché, in questo modo, le castagne risultano molto più croccanti e saporite

Quick And Easy: Prawn Salad With Rocket And Pomegranate

Last but not least, today I am publishing a wonderful prawn salad with rocket leaves and lots of pomegranate seeds. Extremely easy to make and perfectly balanced, this dish is real treat!!!

It will definitely become a classic at my dinner parties!

DSC_8122

DSC_8107

Prawn salad with rocket and pomegranate.

350 g prawns tails

125 g rocket (arugula)

2 spring onions, washed and finely sliced (only the tender part)

half bulb of fennel, washed and finely sliced

2 stalks of celery, washed and finely sliced (only the tender part)

the seeds of a pomegranate

for the lime citronette

the juice of 1/2 a lime

4 tablespoons of extra virgin olive oil

salt and pepper to taste

DSC_8117

Method.

1. Peel and devein the prawns, then poach in water for a few minutes.

2. Drain the prawns and let cool.

3. Place the arugula, the fennel, the spring onions and the celery in the plates, then add the prawns and garnish with plenty of pomegranate seeds.

4. Make the lime citronette. Mix 4 tablespoons of extra virgin olive oil with the juice of half a lime, then season with salt and pepper.

5. Pour the lime dressing over the salad and serve.

Also see Rice Flour Chocolate Cookies With Pomegranate and Light Sabayon With Pomegranate And Pistachios

DSC_8068

DSC_8072

DSC_8101

Insalata di gamberi con rucola e melagrana.

350 g di code di gambero

125 g di rucola

2 cipollotti, lavati e tagliati finemente (solo la parte tenera)

2 gambi di sedano, lavati e tagliati finemente (solo la parte tenera)

1/2 finocchio, lavato e tagliato finemente

i chicchi di una melagrana

Per la citronette di lime

il succo di mezzo lime

4 cucchiai di olio extra vergine d’oliva

sale pepe q. b.

Preparazione.

1. Sgusciate i gamberi e togliete il budellino. Fate bollire i gamberi per qualche minuto.

2. Scolate i crostacei e fateli raffreddare.

3. Mettete i gamberi con la rucola, i chicchi di melagrana, il finocchio e i cipollotti nei piatti.

4. A parte, preparate la citronette di lime. Mescolate 4 cucchiai di olio extra vergine d’oliva con il succo di mezzo lime, sale e pepe.

5. Condite l’insalata di gamberi con la citronette di lime e servite.

DSC_8148

Rice Flour Chocolate Cookies With Pomegranate (Gluten-Free, Low-Sugar)

Rice flour chocolate cookies with pomegranate (gluten-free, low-sugar)

To continue the series of recipes with pomegranate, this week I am publishing an easy cookie recipe, gluten-free and perfect for dark chocolate lovers! These cookies are garnished with a lot of pomegranate seeds, they are not very sweet and have a strong chocolate flavour ; I served them warm with plenty of honey on top! In this way, all the flavours and different textures really come together nicely!

Tips.

1. For the kids dip them in milk, because they have a strong dark chocolate flavour.

2. For a low-sugar recipe don’t add the honey on top of the cookies, just follow the recipe.

Rice flour chocolate cookies with pomegranate (gluten-free, low-sugar)

I hope you enjoy this autumn treat!

Rice flour chocolate cookies with pomegranate (gluten-free, low-sugar)

Rice flour dark chocolate cookies with pomegranate.

For two trays (16 cookies)

Preparation time: 20 minutes + the resting time

Cooking time: 20-30 minutes

Ingredients

100 g soft butter

100 g rice flour

150 g almonds, peeled

15 g cocoa powder (I use organic and fair trade)

60 g dark chocolate 70% cocoa (I use organic and fair trade )

50 g cornstarch

the seeds of a pomegranate

1 tablespoon honey

3 tablespoons maple syrup

a pinch of salt

a pinch of cinnamon

Method.

1. Bake the almonds at 160 ° C (320° F) for 5-10 minutes. Let cool then grind with a food processor.

Step 1. Bake the almonds, let cool and grind them.

2. Melt the chocolate using a bain-marie.

3. In a bowl, work the butter with the maple syrup, the honey and the ground almonds.

DSC_7968

4. Add the melted chocolate to the almond mixture and stir well. In another bowl, combine the rice flour, the cornstarch, the cocoa, a pinch of cinnamon, a pinch of salt, then mix everything together with the almonds. Knead for a few minutes then put in the refrigerator to cool for about 30 minutes.

DSC_7954

DSC_7971

DSC_7982

5. Line the base of two baking trays with some baking paper, then shape the cookies and garnish with the pomegranate seeds.

DSC_7985

6. Bake at 180 ° C (356°F ) for 20-30 minutes.

DSC_8006

7. Serve the cookies hot with a lot of honey on top!

DSC_8047

DSC_8059

DSC_8065

DSC_8027

Also see Light Sabayon With Pomegranate And Pistachios and Prawn Salad With Rocket And Pomegranate.

Biscotti di farina riso al cioccolato con melagrana.

Per due teglie (16 biscotti)

tempo di preparazione: 20 minuti + il riposo

tempo di cottura: 20-30 minuti

Ingredienti

100 g di burro morbido

100 g di farina di riso

150 g di mandorle, senza buccia

15 g di cacao amaro (uso il fair trade e bio)

60 g di cioccolato fondente al 70 % (uso il fair trade e bio)

50 g di amido di mais

i chicchi di una melagrana

1 cucchiaio di miele

3 cucchiai di sciroppo d’acero

un pizzico di sale

un pizzico di cannella

Preparazione.

1.Tostate le mandorle a 160 °C per 5-10 minuti. Lasciate raffreddare e tritate finemente con il tritatutto.

2. Fate sciogliere il cioccolato a bagnomaria.

3. Lavorate il burro con lo sciroppo d’acero, un cucchiaio di miele e la farina di mandorle.

4. Unite il cioccolato sciolto al composto di burro e farina di mandorle. A parte, mescolate la farina di riso con il cacao, l’amido di mais, la cannella e un pizzico di sale. Unite tutto e impastate bene per qualche minuto, poi mettete nel frigorifero a raffreddare per 30 minuti.

5. Distribuite i biscotti su due teglie rettangolari (ricoperte da carta da forno) e guarnite con dei chicchi di melagrana.

6. Infornate a 180°C  per 20-30 minuti.

7. Servite i biscotti caldi con tanto miele sopra.

DSC_8049

Light Sabayon With Pomegranate And Pistachios

Autumn has finally arrived and soon Foodfulife will turn two years old! Yep, two years ago I decided to start this incredible journey and Foodfulife is still going strong! To celebrate I will dedicate three recipes to the pomegranate, a wonderful fruit that contains important nutriments that can help us to boost our immune system during this season.

DSC_7944

Pomegranate is rich in vitamins A, B, C; it contains minerals including potassium and phosphorus, sodium, magnesium, iron and important antioxidants such as flavonoids and phytoestrogens. It has anti-aging, anti-oxidising and anti-cancerous proprieties and it may be effective in reducing the risk of heart related diseases.
Pomegranate is also a very versatile fruit to use in recipes; its delicate flavour is sweet and slightly sour and it can be used in sweet as well as savoury dishes.

DSC_7853

Today I am sharing an easy recipe with a light orange sabayon, crunchy pistachios and lots of pomegranates seeds. This is a deliciously creamy dessert with an interesting texture and lots of flavour!

DSC_7828

Light sabayon with pomegranates and pistachios.

For 4 glasses

the seeds from 2 pomegranates

40 g toasted pistachio nuts (toasted in the oven for about 10 minutes )

340 g greek yogurt

for the sabayon

6 egg yolks

130 g of brown sugar

1 tablespoon orange liqueur

DSC_7875

Method.

1. In a stainless steel bowl, combine the eggs with the sugar.

2. Place the bowl over a bain-marie (with very hot water, but not boiling) over a very low heat, then whisk the mixture.

3. Add a tablespoon of orange liqueur, whisk for a few more minutes, then turn off the heat and set aside to cool.

DSC_7886

4. Once the sabayon has cooled, mix gently with the yogurt.

5. Separately, chop the pistachios.

DSC_7865

6. Take 4 tall glasses and fill with a layer of pistachios, then alternate a layer of pomegranate seeds with one of sabayon and another of the pomegranate seeds. Finish with a layer of sabayon and garnish with pomegranate and pistachios.

DSC_7878

DSC_7907

DSC_7938

7. Place in the fridge to cool and serve.

DSC_7940

also see Rice Flour Chocolate Cookies With Pomegranate and Prawn Salad With Rocket And Pomegranate.

Zabaione allo yogurt con melagrana e pistacchi.

Per 4 bicchieri

2 melegrane

40 g di pistacchi (tostati al forno per 10 minuti)

340 g di yogurt greco

per lo zabaione

6 tuorli d’uova

130 g di zucchero di canna

1 cucchiaio di liquore all’arancia

DSC_7855

Preparazione.

1. In una ciotola di metallo, unite lo zucchero alle uova.

2. Mettete la ciotola a bagnomaria (a fuoco basso, con acqua molto calda che non deve bollire) e montate le uova fino ad ottenere una crema soffice.

3. Aggiungete un cucchiaio di liquore all’arancia, poi montate per qualche minuto e spegnete il fuoco. Lasciate raffreddare, mescolando di tanto in tanto.

4. Una volta raffreddato, unite lo zabaione allo yogurt.

5. A parte, tritate grossolanamente i pistacchi.

6. Prendete 4 bicchieri alti e ricoprite la base con uno strato di pistacchi, poi alternate uno strato di chicchi di melagrana con uno di crema, poi aggiungete altro melagrana e terminate con la crema. Guarnite con chicchi di melagrana e pistacchi.

7. Mettete nel frigo a raffreddare e poi servite.

Vedi anche Biscotti Di Farina Di Riso Al Cioccolato Con Melagrana e Insalata Con Gamberi E Rucola

DSC_7951