Tag Archives: Recipe

Traditional Recipe: Baked Peppers Au Gratin

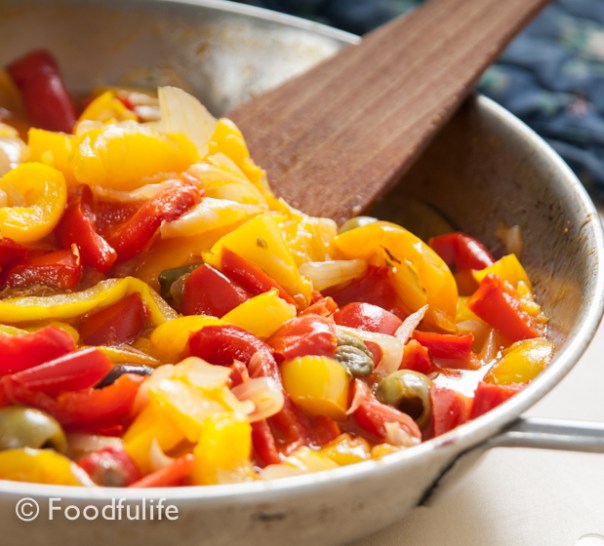
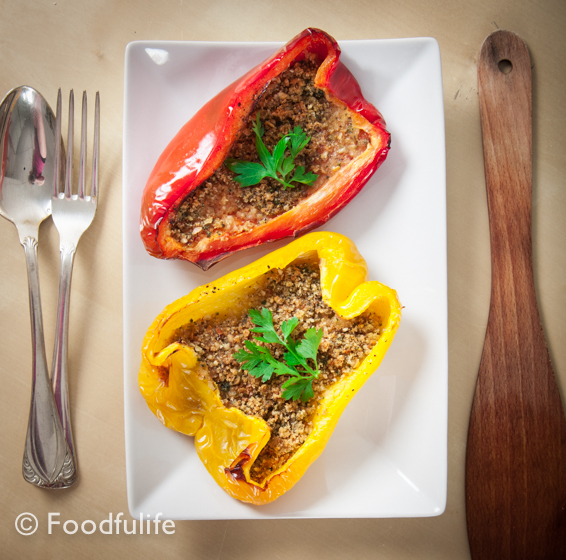
A great dish to serve if you have a large number of guests to feed, because it is so easy to prepare and cook. Baked Peppers Au Gratin are a wonderful appetiser and side, served with meat or seafood, but you can have them as a vegetarian meal, with a nice salad. You can prepare a gluten-free version of this Italian traditional dish using instant polenta, instead of bread crumbs. You can also make a vegan version without the cheese.

DSC_1181

Serve Peppers Au Gratin hot or cold, they are delicious either way! But in the summer I prefer this dish cold, straight from the fridge, because the peppers need some time to absorb all the different flavours.

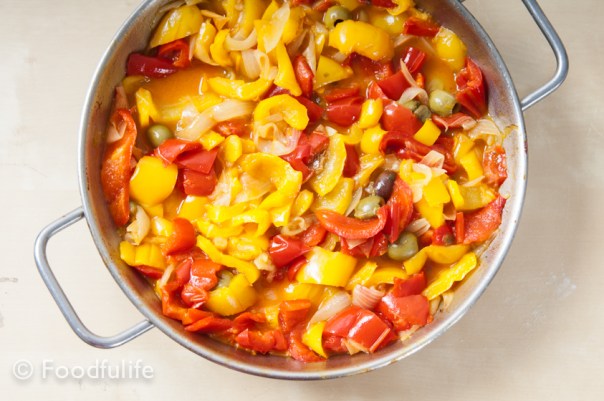
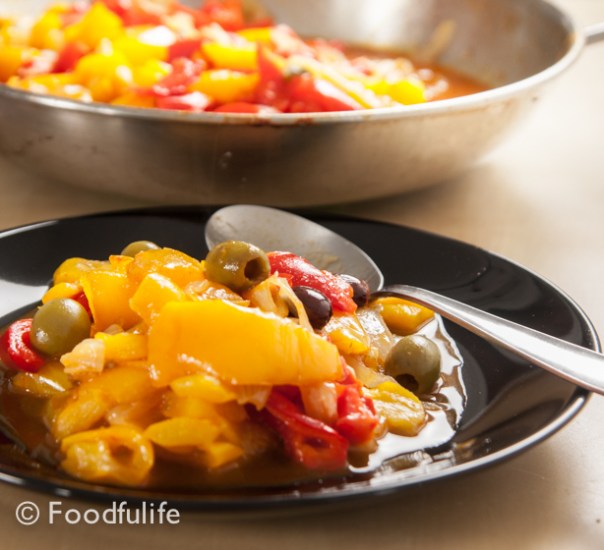
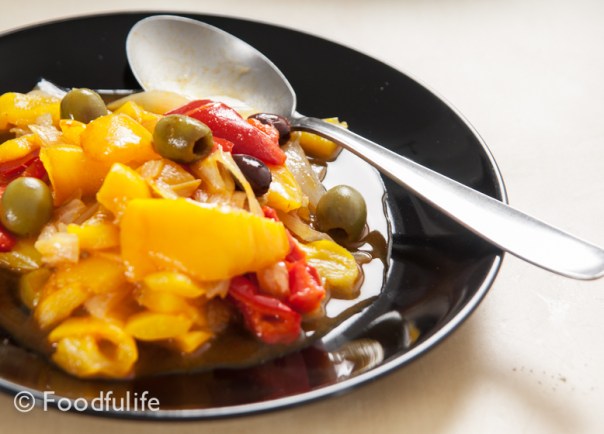
This is the right season to eat fresh bell peppers and there are plenty of choices when it comes to great traditional recipes with this wonderful ingredient.
Here are some other recipes using bell peppers that I have published recently on Foodfulife:

La peperonata

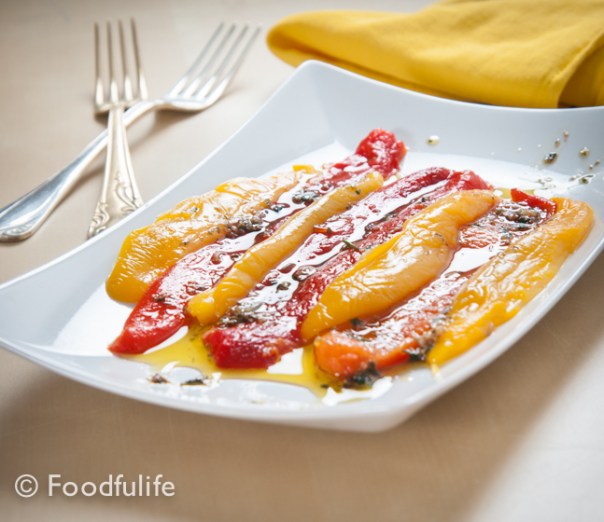
Roasted Bell Peppers with Garlic Vinaigrette

DSC_1210

Baked Peppers Au Gratin.

Preparation time: 10 minutes

Cooking time: 40 minutes

6 servings

Easy

Ingredients

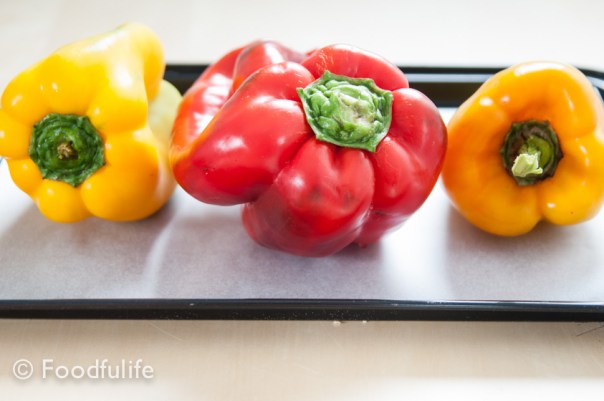
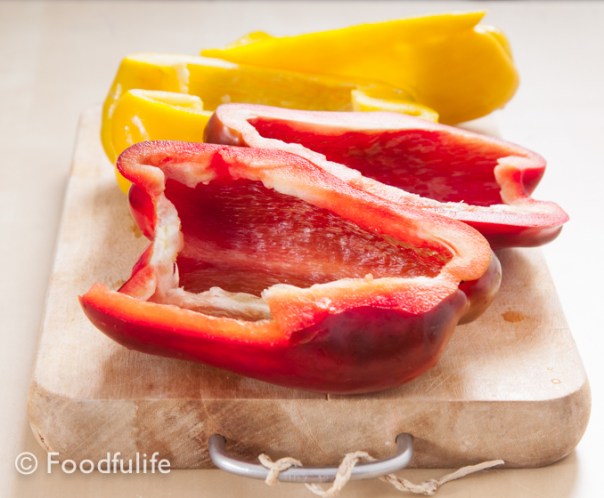
3 large bell peppers (red and yellow)

6 tablespoons breadcrumbs

80 g freshly grated Parmesan cheese

1 tablespoon of fresh parsley, finally chopped

1/2 a tablespoon of dried oregano

2-3 cloves of garlic, crushed and finally chopped

salt and pepper to taste

extra virgin olive oil

DSC_1087

Method.

1. In a small bowl, mix the herbs with the breadcrumbs, the grated cheese, the garlic and season with some salt and pepper.

DSC_1099

2. Wash and dry the bell peppers.

DSC_1041

DSC_1053

3. Using a knife, cut the peppers in half and remove the stem, the seeds and the white parts.

DSC_1071

4. Place the peppers onto an oven tray, previously greased with a couple of tablespoons of extra virgin olive oil. With a spoon, spread the breadcrumb mixture evenly onto the peppers.

DSC_1104

5. Bake in the oven at 200°C (392° F) , until the peppers are tender and the breadcrumb mixture becomes very crunchy.

DSC_1209

DSC_1194

DSC_1193

Peperoni Gratinati Al Forno.

Tempo di preparazione: 10 minuti

Tempo di cottura: 40 minuti

6 persone

Facile

Ingredienti

3 peperoni grandi (rosso e giallo)

6 cucchiai di pangrattato

80 g di Parmigiano Reggiano, grattugiato fresco

1 cucchiaio di prezzemolo fresco, tritato finemente

1/2 cucchiaio di origano secco

2-3 spicchi d’aglio, schiacciato e tritato finemente

sale e pepe

olio extra vergine di oliva

Preparazione.

1. In una terrina, mescolate il pan grattato con l’aglio, l’origano, il prezzemolo, il parmigiano e un pò di sale e pepe.

2. Lavate e asciugate bene i peperoni.

3. Con un coltello, tagliate e rimuovete la calotta superiore del peperone. Tagliate a metà gli ortaggi e rimuovete la parte interna, con i filamenti e i semi.

4. Disponete i peperoni sopra una teglia, unta con un filo d’olio. Riempite i peperoni con il composto di pangrattato e sapori, ma senza esagerare.

5. Condite con un po’ d’olio e infornate a 200° C. Quando i peperoni saranno morbidi e il ripieno croccante spegnete il fuoco.

Home-Made Pizza With Tomatoes, Rocket and Parmesan Cheese

A crunchy pizza base, topped with fresh Piccadilly tomatoes, some rocket leaves and Parmesan cheese…

An easy recipe, perfect for this season!

Enjoy!

DSC_0986

Pizza with tomatoes, rocket and Parmesan cheese.

Ingredients

for 2 large pizzas

Buy 2 ready made pizza bases or follow this recipe

For the pizza toppings

2 fresh mozzarellas (or you can use stracchino)

300 g Piccadilly tomatoes or cherry tomatoes

60 g rocket leaves (arugula)

50 g Parmesan cheese (thin slices)

Extra virgin olive oil

salt and pepper to taste

Method.

1. Wash and dry the rocket leaves and the tomatoes. Cut the tomatoes in half.

2. Using a rolling pin, roll out the pizza dough and make two large pizza bases.

DSC_0911

DSC_0926

3. Bake the pizza bases at 200 ° C (392°F) until they are crunchy (I am using a use a pizza stone, but you can use a baking tray greased with olive oil).

4. Add the mozzarella cheese and put the bases back in oven for a few minutes, to melt the cheese.

DSC_0938

DSC_0941

5. Turn off the oven and garnish your pizzas. Place the tomatoes, the rocket leaves and Parmesan cheese onto the pizza bases, then season with extra virgin olive oil, salt and pepper.

DSC_0958

DSC_0972

DSC_0965

DSC_1026

Pizza con pomodorini freschi, rucola e parmigiano.

Ingredienti

Per 2 pizze grandi

Per fare due basi per la pizza seguite questa ricetta

Per guarnire le pizze

2 mozzarelle (oppure stracchino)

300 g di pomodorini Piccadilly

60 g di rucola

50 g di scaglie di Parmigiano Reggiano

olio extra vergine d’oliva

sale e pepe q. b.

Preparazione.

1. Lavate e asciugate la rucola e i pomodorini, poi tagliate i pomodorini a metà.

2. Stendete la pasta con un matterello.

3. Infornate le basi della pizza a 200° C (uso una pietra per la cottura della pizza, ma potete usare una teglia unta). Fate cuocere fino ad ottenere una pasta croccante.

4. Aggiungete la mozzarella e infornate ancora per qualche minuto, per far sciogliere il formaggio.

5. Sfornate le pizze e spegnete il forno. Disponete i pomodorini, la rucola e il parmigiano sulle pizze, poi condite con abbondante olio extra vergine d’oliva, sale e pepe.

Traditional Recipe: Saffron Risotto

Saffron Risotto (Risotto Allo Zafferano) is a Lombard recipe, much appreciated in the North of Italy for its wonderful delicate flavour and also because is one of the simplest risotto recipes to make. This amazing risotto is usually served on its own, without meat or fish and it has a lovely saffron flavour, well complemented with the Parmesan cheese, which is added at the final stage of the recipe, like in most Italian risotto dishes.

DSC_0627

Saffron Risotto is often confused with Milanese Risotto (Risotto alla Milanese), another renowned Lombard recipe; in both these risottos we use saffron as a main ingredient but there are some differences in the ingredients.

Tips.

1. It is very important to only use good quality products, in order to make a delicious risotto.

2. Also see How To Make A Perfect Risotto

DSC_0660

Saffron Risotto (Risotto allo Zafferano) 

Medium difficulty

Preparation time: 5 minutes (not considering the broth)

Cooking time: 25-30 minutes

Ingredients

For 4 servings

350 g (12.3 oz) Carnaroli rice or Arborio rice

a pinch of saffron (enough to colour the rice of a bright yellow)

1 large onion, very finely chopped

1 glass of good white wine (not acidic, this is very important!)

150 g (5.3 oz)  freshly grated Grana Padano cheese

125 g (4.4 oz) good quality fresh butter

1 litre (33, 8 fl oz us) hot vegetable broth (see below)

For vegetable broth

1 large carrot

1 large onion

1 celery stalk (also use the leaves, if you have them)

salt and pepper to taste

Method.

1. In a large pan, prepare the vegetable broth. Wash, clean and roughly chop the vegetables, then fill the pan with plenty of water and cook the vegetables until tender. Season with some fine sea salt (do not exceed), then sift the broth and remove the vegetables.

DSC_0600

2. Sauté the onion in 80 g of butter, over a low heat for about 10-15 minutes.

DSC_0605

3. Add the rice and fry for a few minutes over a medium heat, then pour in a glass of white wine and stir. Shimmer until all the wine evaporates.

DSC_0609

4. Lower the heat and add the hot broth (a little at a time), stirring constantly. Let the broth evaporate and continue adding the broth and stirring, until the rice is creamy and properly cooked. During the cooking time add the saffron (diluted in a little bit of warm vegetable broth).

DSC_0615

DSC_0620

5. Turn off the heat and add the finals ingredients to the risotto. Add the rest of the butter, 3-4 tablespoons of grated Grana Padano and season with salt and pepper ( taste it and season only if needed), then stir and cover with a lid. Let the risotto rest for a few minutes and serve.

DSC_0645

DSC_0639

DSC_0629


How To Make A Perfect Risotto

Risotto is one of the finest Italian dishes and is appreciated all over the world. There are endless variations. Each region has its own traditional risotto recipes made with seafood, meat or vegetables. Today we are going to explore the method to make a perfect risotto, the Italian way!

Four important steps.

To make a good risotto it is important to follow each recipe step by step. There are 4 basic steps in the preparation process of each risotto:

1. Sauté the onions

2. Fry the rice

3. Cook the risotto

4. Let the risotto rest

Today we are going to see each of these steps in depth.

DSC_0597

A few notes on the preparation process.

1. The preparation time and the ingredients will vary depending on the recipe.

2. During the whole process you have to constantly stir the risotto, therefore it’s important to prepare all the ingredients before you start cooking.

3. Don’t reheat the risotto because the rice will become chewy and dry. Prepare the risotto and serve it.

DSC_0594

Method.

1. Sauté the onions. Sauté the onions in butter over a very low heat, until they are very tender and almost transparent.

Notes. The onions have to dissolve in your mouth when you taste the risotto. You can replace the onions with shallots, spring onions or garlic, depending on the recipe.

DSC_0607

2. Fry the rice. When the onions are ready, add the rice and then fry it over a medium heat for a few minutes (stir constantly).

DSC_0608

3. Cook the risotto. After frying the rice, add the wine.  Once the wine flavour is absorbed and the alcohol evaporated, add the hot broth (usually a full ladle at a time) and cover the rice with it. Continue cooking and stirring. Once the liquid is almost completely absorbed, add more broth until you reach the ideal cooking consistency.

DSC_0602

Notes. Use hot broth, because a cold broth will lower the temperature and compromise the cooking process.

DSC_0613

4. Let the risotto rest. When the risotto is creamy and properly cooked, add the final ingredients (usually butter and cheese), stir well, cover with a lid and let the rice rest for a few minutes. Now the risotto is ready to be served.

Note. This will make the risotto very creamy and tasty.

Also see Traditional Recipe: Saffron Risotto

DSC_0639


Traditional Recipe: Roasted Bell Peppers With Garlic Vinaigrette

Bell peppers are delicious, rich in vitamin C and antioxidants and come in a variety of colours. In Italy we usually cook red and yellow peppers and we don’t use green peppers as much, because they are more acidic and bitter in taste. Bell peppers are usually roasted, fried, grilled or stewed with different ingredients. Today we are going to roast the peppers and season them with a light vinaigrette made with extra virgin olive oil, a splash of balsamic vinegar and enriched with fresh herbs and garlic.

Roasted peppers are a very simple but effective appetiser or side dish, I personally really like them and I could eat lots! If you prefer a more complex dish you can use them to make a sauce to complement or season pasta and meat dishes, or simply used them as a tasty ingredient in salads.

DSC_0574

Roasted bell peppers with garlic vinaigrette.

medium difficulty

Ingredients

for 4 people

3 large bell peppers.

DSC_0545

For the garlic vinaigrette.

4 tablespoons of extra virgin olive oil

1 clove of garlic, crushed

1/2 tablespoon of dried oregano

1/2 tablespoon of finely chopped fresh parsley

1 tablespoon of good balsamic vinegar

salt and pepper to taste

Method.

1. Wash and dry the bell peppers.

DSC_0523

2. Roast the whole peppers in the oven at 200°C (392° F ) on a baking sheet (The cooking time will vary depending on the size and thickness of the peppers. When the skin starts darkening slightly and detaching from the flesh, the peppers are ready).

DSC_0531

3. Once the peppers are slightly soft, turn off the oven. Put the hot peppers in plastic bags (or an airtight container) and seal well (In this way, the steam will make removing the skin from the flesh mush easier).

4. Let cool, then remove the pepper from the bag and throw away the water created from the steam. Remove the skin on each pepper, using a small sharp knife.

DSC_0538

5. Slice the peppers vertically into two, then remove and discard the stem and the seeds. Slice each pepper vertically into 8 pieces and serve cold with the garlic and herb vinaigrette.

DSC_0546

DSC_0579

For the vinaigrette.

Mix 4 tablespoons of extra virgin olive oil with the herbs, the garlic and some salt and pepper. Season and serve.

Tip. For extra flavour you can add half a tablespoon of anchovy paste to the sauce.

DSC_0543

DSC_0571

Peperoni arrosto con vinaigrette all’ aglio.

media difficoltà

Ingredienti

Per 4 persone

3 peperoni abbastanza grossi (rossi e gialli)

Per la vinaigrette all’ aglio

4 cucchiai di olio extra vergine di oliva

1 spicchio d’aglio, sbucciato e ben schiacciato

1/2 cucchiaio di origano essiccato

1/2 cucchiaio di prezzemolo fresco tritato

1 cucchiaio di aceto balsamico

sale e pepe q.b.

Preparazione.

1. Lavate bene i peperoni e asciugateli.

2. Mettete i peperoni interi a cuocere in forno a 200° C ( uso una teglia grande ricoperta da un foglio di carta da forno). Il tempo di cottura varierà a seconda della grandeza e dello spessore dei peperoni; quando la buccia si colorirà e si staccherà dalla polpa, i peperoni sono pronti.

3. Mettete i peperoni ancora caldi in un contenitore con il coperchio, poi chiudete bene e lasciate raffreddare (con questo metodo il vapore farà staccare con più facilità la buccia dalla polpa).

4. Aprite e buttate via l’acqua che si è formata per il vapore. Con un coltello, levate la buccia ai peperoni.

5. Tagliate a metà i peperoni e rimuovete la parte interna con i semi. Tagliate ancora i peperoni in verticale fino ad ottenere 6-8 fette lunghe per peperone.

Per la vinaigrette.

Mescolate l’olio extra vergine di oliva con le erbe, l’aglio, il sale e pepe. Condite i peperoni e servire.

Tip. Per insaporire ulteriormente si può aggiungere mezzo cucchiaio di pasta d’acciughe al condimento.

DSC_0588

Traditional Recipe: Torta Caprese

DSC_8662

As the name suggests, the Torta Caprese (Caprese cake) originally comes from Capri, a beautiful little island, near Naples.
Dark brown, a little bit crunchy on the outside but soft and moist in the centre, this delicious and decadent chocolate cake is widely appreciated all over Italy. It is also an amazing gluten-free cake, because it doesn’t contain any flour; although, in some recipes a little bit of flour might be used to dust the baking tin.

DSC_8668

Tips.

1. The Torta Caprese is usually cooked in a large round baking tin (this is 26 cm wide) and shouldn’t be too thick.

2. This is a dark chocolate cake which suits better an adult taste, because it’s not very sweet. It is possible to adjust the recipe for the kids using a sweeter dark chocolate, adding 20 g of sugar to the ingredients and dusting with plenty of icing sugar.

DSC_8661

Torta Caprese.

For 8 servings

easy

Cooking time: 1 hour

Preparation time: 20 minutes

Ingredients

300 g (10.58 oz) almonds (without the skin)

170 g (5.99 oz) butter, softened

100 g (3.5 oz) brown sugar

45 g (1.5 oz) honey

200 g (7.05 oz) dark chocolate (70% cocoa solids)

4 eggs

icing sugar for garnish

cocoa powder to taste

a pinch of salt

Method

1. Toast the almonds in the oven for a few minutes at 180 ° C (356°F). Let cool then grind finely.

DSC_8583

DSC_8588

2. Cut and melt the chocolate in bain-marie for a few minutes.

DSC_8598

3. In a large bowl, mix the butter with 4 egg yolks, honey, the brown sugar and a pinch of salt. Then add the ground almonds with the chocolate and mix well.

DSC_8605

4. Separately, whip all the egg whites until stiff, then gently mix with the rest of the ingredients.

DSC_8594

DSC_8611

5. Grease with butter and line the base and sides of a large cake tin (I am using a tin 26 cm wide) with baking paper (roughly cut down to size). Then fill with the mixture and bake at 150 ° C (302°F) for about 1 hour.

DSC_8613

DSC_8627

6. Take the cake out of the oven and let cool. Dust with some cocoa powder, decorate with icing sugar and serve.

DSC_8629

DSC_8638

DSC_8640

Torta Caprese.

Per 8 persone

Facile

Tempo di cottura: 1 ora

Tempo di preparazione: 20 minuti

Ingredienti

300 g di mandorle sbucciate

170 g di burro morbido (e del burro in più per imburrare la teglia)

100 g di zucchero di canna

45 g di miele

200 g di cioccolato fondente al 70 %

4 uova

zucchero e velo q. b. per guarnire

un pizzico di sale

cacao amaro in polvere q. b.

Preparazione.

1. Tostate le mandorle nel forno per qualche minuto a 180° C. Lasciatele raffreddare e poi tritatele molto finemente.

2. Fate fondere il cioccolato a bagnomaria.

3. In una terrina grande, amalgamate il burro con i tuorli d’uova, il miele, lo zucchero e un pizzico di sale, fino ad ottenere una crema. Aggiungete anche le mandorle con il cioccolato fuso e mescolate bene.

4. A parte, montate gli albumi a neve e uniteli al resto degli ingredienti, mescolando delicatamente dal basso verso l’alto.

5. Imburrate la teglia (uso una teglia larga 26 cm) e ricopritela con della carta da forno (tagliata di misura). Versate il composto nella teglia e infornate a 150°C per circa 1 ora.

6. Sfornate la torta e lasciatela raffreddare. Spolverate con un po’ di cacao amaro, decorate con dello zucchero a velo e servite.

DSC_8665

Light Wholemeal Spelt Brioches

Brioche and cappuccino are, without a doubt, Italians’ favourite breakfast! Yes, our ideal breakfast would be a brioche filled with plenty of custard and a nice warm cappuccino, topped with a lot of cocoa powder! It’s not something we would have every day (even though some people might do) but it’s something we’d treat ourself with during weekends and special occasions. Sometimes waking up to a warm brioche and a cappuccino is a really nice way to start the day in full swing!

DSC_8493

Since I started this blog, I have always wanted to try and make my own brioches, but for one reason or another I kept on postponing it…Last week I finally gave it a go and here is my brioche recipe! I have to say, I thought it was going to be much more complicated! The method is not too difficult if you follow all the steps of the recipe, it just takes some time and care. You can prepare your brioches in your spare time and store them in the freezer, where they will last up to a month. They are very nice when you warm them up in the morning!

Italian brioches have a similar shape to croissants but the dough is sweeter and softer. This recipe is quite light, it has some fibres and it’s not too sweet, so you can fill the brioches with whatever you like, if you wish.

Wholemeal Spelt Brioches (sourdough recipe).

Medium difficulty

Ingredients

For 2 trays (approximately 12-14 brioches)

For the starter

100 g (3.5 oz)  manitoba flour

50 g (1.7 oz) semisolid sourdough (made with manitoba flour, or plain flour)

water

For the dough

150 g (5.29 oz) manitoba flour

100 g (3.5 oz) plain flour

100 g (3.5 oz) wholemeal spelt flour

100 ml (3.38 us fl oz) milk (at room temperature)

2 egg (1 egg for the dough and 1egg to brush on top of the brioches)

1 egg yolk

60 g (2.1 oz) butter, softened

a pinch of salt

50 g (1.7 oz) brown sugar

1 teaspoon of honey

2 drops of vanilla extract

a little bit of grated lemon zest (use an organic lemon)

icing sugar

DSC_8377

Method.

1. Prepare the sourdough starter the night before and let it rise overnight at room temperature. Mix 100 g manitoba flour with 50 g of sourdough and enough water to get a smooth and moist dough. Cover it with cling film and let it rise for 12 hours.

DSC_8372

2. The next morning, mix the rest of the flour with the starter, then add 1 egg, the egg yolk, the brown sugar, a few drops of vanilla extract, a little bit of grated lemon zest and honey. Mix well. Add the butter and a pinch of salt. Knead well, adding a little ‘flour if necessary.

DSC_8379

3. Allow the dough to rise until it doubles in volume (it will take a few hours).

DSC_8400

4. When risen, gently roll out the dough using a rolling pin. Then divide the sheet of dough into 2 and cut a few triangles (see the picture).

DSC_8403

DSC_8410

5. Roll each triangle and shape the brioches like small croissants. Then place them on 2 baking sheets greased with butter and dusted with flour. Brush your brioches with a beaten egg (or milk).

DSC_8416

DSC_8417

DSC_8418

DSC_8425

DSC_8434

6. Bake at 200 ° C (392° F) for about 20 minutes with steam (you can do that by putting a small pan filled with boiling water in the oven; while the brioches are cooking the water will release steam and the brioches will remain soft inside). Let cool and dust with icing sugar.

DSC_8457

DSC_8469

DSC_8508

DSC_8505

Brioches semi-integrali di farro (con lievito madre).

media difficoltà

Ingredienti

Per 2 teglie (circa 12-14 brioches)

Panetto di lievito o biga

100 g di farina manitoba

50 g di lievito madre semisolido (con base di farina manitoba o farina 00)

acqua q. b.

Per l’impasto

150 g di farina manitoba

100 g di farina 00

100 g di farina integrale di farro

100 ml di latte a temperatura ambiente

2 uova (1 uovo servirà per lucidare le brioches)

1 tuorlo

60 g di burro ammorbidito

un pizzico di sale

50 g di zucchero integrale di canna

1 cucchiaino di miele

2 gocce di estratto di vaniglia

un po’ di buccia grattugiata di un limone biologico

zucchero a velo q. b.

Preparazione.

1. Preparate il panetto di lievito la sera prima e lasciate lievitare tutta la notte a temperatura ambiente. Mescolate 100 g di farina manitoba e 50 g di lievito madre con un po’ d’acqua. Coprite con la pellicola e lasciate lievitare per 12 ore (a temperatura ambiente).

2. La mattina dopo mischiate le farine e aggiungete il panetto lievitato, un uovo intero, un tuorlo, 50 g di zucchero di canna, l’estratto di vaniglia, la buccia di limone e il miele. Amalgamate bene, poi aggiungete il burro e un pizzico di sale. Lavorate bene l’impasto, aggiungendo un po’ di farina se necessario.

3. Lasciate lievitare l’impasto fino a quando sarà raddoppiato di volume.

4. Dopo la lievitazione stendete l’impasto delicatamente con un matterello, poi dividetelo in due e tagliate dei triangoli.

5. Arrotolate le brioches e mettetele su due teglie imburrate e infarinate. Spennellate le brioches con dell’uovo sbattuto per lucidarle (potete anche usare del latte al posto dell’uovo).

6. Cuocete a 200 °C per circa 20 minuti con del vapore (cioè mettete nel forno anche un pentolino di metallo colmo d’acqua bollente; con questo metodo le brioches resteranno morbide dentro e non si asciugheranno). Lasciate raffreddare e spolverate con zucchero a velo.

Traditional Recipe: La Peperonata

DSC_8575

Peperonata is a delicious traditional Italian dish made with yellow and red bell peppers and a few other ingredients. It’s a dish full of character and flavour! It can be a great side dish and it can be a fantastic appetizer, when served with grilled rustic bread, like a bruschetta. The recipe I am publishing this week is my mother’ s peperonata. My mother made a few adaptations to the traditional recipe to achieve a creamier and very tasty dish. Nothing can beat my mother’ s peperonata! So sweet, flavourful and delicate at the same time; it really melts in the mouth!

DSC_8543

While cooking, the onions will melt creating a lovely creamy sauce which works perfectly with the rest of the ingredients. Give it a try, you’ll love it!

Tips. For extra flavour you can use Ketchup instead of tomato paste. The cooking time might vary for the thickness of the peppers.

DSC_8547

La Peperonata.

Ingredients

For 4-6 servings

Easy

Preparation and cooking time: 50 minutes

3 tablespoons extra virgin olive oil

2 large onions, chopped

4 bell peppers (2 yellow and 2 red)

1 tablespoon of capers (possibly in vinegar)

6 good quality pitted green olives

6 good quality pitted black olives

1/2 a tablespoon tomato paste (or tomato ketchup)

white wine (only if necessary)

a handful of pine nuts (optional)

salt and pepper to taste

Method.

1. Cut each pepper into 4 pieces and then slice them horizontally into slices (2 cm thick). Cut also the onions into thick slices.

DSC_8522

2. In a large frying pan, sauté the onion and the peppers with a clove of garlic in 3 tablespoons of extra virgin olive oil.

DSC_8524

DSC_8526

3. Add the capers, the olives​​ and the pine nuts.

DSC_8530

4. Add some tomato paste (or tomato ketchup), then cover and cook for 40 minutes over a low heat (add a little of white wine if it’s too dry). Let simmer until the peppers get really tender.

DSC_8535

5. Remove the lid and let most of the juices evaporate. Season with salt and pepper, then serve (you can serve the peperonata hot or cold).

DSC_8563

La Peperonata.

Ingredienti

Per 4-6 persone

Facile

Tempo di preparazione e cottura: 50 minuti

3 cucchiai d’olio extra vergine d’oliva

2 cipolle tagliate grosse

4 peperoni, due gialli e due rossi

1 cucchiaio di capperi sott’aceto

6 olive verdi

6 olive nere

1/2 cucchiaio di passata di pomodoro (oppure ketchup, per una peperonata più saporita)

vino bianco q. b. (facoltativo)

una manciata di pinoli (facoltativo)

sale e pepe q. b.

Preparazione.

1. Tagliate i peperoni in 4 pezzi e poi a strisce orizzontali. Affettate le cipolle grossolanamente.

2. In una padella grande, fate soffriggere la cipolla, i peperoni e uno spicchio d’aglio tagliato a metà.

3. Aggiungete ai peperoni un cucchiaio abbondante di capperi, 6 olive verdi, 6 olive nere e alcuni pinoli.

4. Aggiungete il concentrato di pomodoro, poi coprite e fate cuocere a fuoco lento per 40 minuti (se occorre aggiungete un po’ di vino bianco).

5. Quasi a fine cottura, levate il coperchio e fate ritirare un po’ il liquido. Aggiungete il pepe, il sale e servite.  La peperonata è ottima anche servita fredda.

DSC_8580

Traditional Recipe: Focaccia Alla Genovese (Genoese Focaccia Bread)

DSC_6297

Shiny and crunchy on the outside, soft and moist on the inside, only genoese focaccia has certain qualities which, all together, define one of the best focaccias you can ever taste. Focaccia alla genovese has a distinctive olive oil taste and it requires a long leavening time in order to be so soft and delicious. Apparently, you can only taste the real thing in Genoa and this might depend on several factors (the ingredients, the humidity in the air, the water and, last but not least, the old traditional recipe).

DSC_6304

Today I am going to give you two recipes that you can use to make an amazing focaccia, either with normal yeast or sourdough. In the second recipe, the recipe with normal yeast, I reduced the leavening time to make it more manageable, but, of course, if you let it rise for longer it will get softer and the result will be much better.

Focaccia Alla Genovese (with sourdough).

Ingredients

350 g (12.3 oz) plain flour

6-7 tablespoons of extra virgin olive oil

100 g (3.52 oz) semiliquid sourdough (you can replace the sourdough with 20 g of yeast)

8 g  (0.28 oz) ground sea salt

a pinch of barley malt

water

Method.

1. In a bowl, make a starter by mixing 150 g (5.29 oz) flour with 100 g (3.52 oz) of semiliquid sourdough, a little bit of water, a pinch of barley malt. Mix everything, wrap the bowl with cling film and let rise overnight (at room temperature).

DSC_6146

2. Mix the starter with the rest of the flour, some water, some salt and a tablespoon of olive oil. Knead vigorously until you get a smooth dough (make a moist dough).

DSC_6115

3. Cover with a damp kitchen towel and let rise for, at least, 3 hours. After 3 hours, knead again for a few minutes then let rise for another 3 hours (actually until the dough doubles in volume).

DSC_6118

4. Gently roll out the dough on a baking sheet, previously greased with 3 tablespoons of extra virgin olive oil. Make some wells by pressing with your fingers in the dough.

DSC_6126

DSC_6159

5. Let rise for 2 hours, then brush with plenty extra virgin olive oil mixed with a little bit of water and bake at 190° C (374° F) for about 30 minutes.

DSC_6203

6. Remove from the oven, brush with more olive oil (add water if the dough is too dry), then season with salt and serve.

DSC_6215

DSC_6238

DSC_6263

Focaccia bread (quicker recipe with yeast).

ingredients

350 g (12.3 oz) plain flour

6-7 tablespoons extra virgin olive oil

20 g (0.70 oz) yeast

7 g (0.24 oz) ground sea salt

a pinch of barley malt

some water

Method.

1. In a bowl, combine the yeast with 3 tablespoons of warm water, a pinch of barley malt and 4 tablespoons of flour. Mix well, cover with cling film and let it rise for 1 hour.

2. Mix the yeast with the rest of the flour, a tablespoon of olive oil, some water and a little bit of salt. Knead well until dough is smooth.

3. Allow to rise for 1-2 hours, then roll out the dough with a rolling pin (without pressing too much).

4. Let rise again for 30 minutes, then make some wells in the surface of the dough, by pressing with your fingers. Brush with plenty of extra virgin olive oil mixed with some water and bake at 190° C (374° F) for about 30 minutes.

5. Remove from the oven, brush with more olive oil (add water if the dough is too dry), then season with the rest of the salt and serve.

DSC_6308

Focaccia Alla Genovese (con lievito madre).

Ingredienti

350 g di farina 00

6-7 cucchiai d’olio extra vergine d’oliva

100 g di lievito madre semiliquido

8 g di sale marino macinato

malto d’orzo

acqua q. b.

Preparazione.

1. In una ciotola, mischiate 150 g di farina con 100 g di lievito madre, un po’ d’acqua e pochissimo malto d’orzo. Mescolate energicamente, poi sigillate con la pellicola e lasciate lievitare per tutta la notte (a temperatura ambiente).

2. Unite al lievito il resto della farina, poi aggiungete un pizzico di sale, poca acqua e un cucchiaio d’olio. Lavorate energicamente fino ad ottenere un impasto omogeneo (l’impasto deve essere anche umido).

3. Coprite con un panno umido e fate lievitare per almeno 3 ore. Raggiunta la prima lievitazione, impastate ancora per qualche minuto e lasciate lievitare finché l’impasto sarà raddoppiato di volume.

4. Stendete delicatamente l’impasto su una teglia (unta abbondantemente).

5. Create dei piccoli crateri con le dita e spennellate l’impasto con acqua e olio. Fate lievitare per altre 2 ore, poi infornate a 190° C per circa 30 minuti.

6. Spennellate ancora con olio abbondante (aggiungete un po’ d’acqua se la focaccia è troppo secca), salate e servite.

Focaccia (preparazione veloce).

Ingredienti

350 g di farina 00

6-7 cucchiai di olio extra vergine d’oliva

20 g di lievito di birra

7 g di sale marino macinato

malto d’orzo

acqua q. b.

Preparazione.

1. In una ciotola, mischiate il lievito con 3 cucchiai di acqua tiepida, pochissimo malto d’orzo e 4 cucchiai di farina. Mescolate bene, ricoprite con la pellicola e lasciate lievitare per 1 ora.

2. Unite l’impasto con il lievito al resto della farina, poi aggiungete un cucchiaio d’olio, un po’ d’acqua e un po’ di sale. Mescolate bene, fino ad ottenere un impasto liscio.

3. Lasciate lievitare per 1-2 ore, poi stendete l’impasto con il matterello (senza schiacciarlo troppo) e formate dei piccoli crateri con la punta delle dita.

4. Fate lievitare ancora per 30 minuti, poi spennellate con abbondante olio d’oliva mischiato ad acqua. Infornate a 190° per circa 30 minuti.

5. Sfornate la focaccia e spennellate con olio abbondante (aggiungete un po’ d’ acqua se è secca). Salate con il sale rimasto e servite.

Prawns With Pineapple In Sweet And Sour Sauce

A touch of exotic flavour in this light stir-fry recipe. By now you all know, I like to prepare different things and vary my diet. Well, this week I thought that a stir-fry would be really lovely to celebrate the warm weather. I could just imagine enjoying this dish with a nice glass of chilled white wine during a lovely sunset, sitting by the sea…Just perfect!!

DSC_3128

Prawns with pineapple in sweet and sour sauce.

Ingredients

For 3 servings

Easy

Preparation: 20 minutes

250 g (8.8 oz) of cleaned and peeled prawns

2 spring onions,  sliced

1 big red bell pepper

350 g (12.3 oz) pineapple (cleaned)

4 radishes (without leaves)

3 tablespoons soy sauce (use a naturally fermented soy sauce, which meets gluten free standards)

2 tablespoons lime juice

3 tablespoons extra virgin olive oil

ground black pepper to taste

fresh chillies to taste (optional)

DSC_3100

Method.

1. Cut and clean the pineapple, removing all the hard parts (including the centre).

DSC_3089

2. Wash and cut the bell pepper, then wash and slice the radishes.

DSC_3099

3. In a frying pan (or a wok), sauté the garlic and the spring onions for a few minutes with 3 tablespoons of extra virgin olive oil.

4. Add the pineapple and bell pepper, cut into small cubes. Fry for 5 minutes, then add the prawns and stir.

DSC_3110

DSC_3122

5. Separately, mix the lime juice with the soy sauce, previously diluted with a little bit of water. Pour into the pan and stir well.

DSC_3117

6. Stir fry over a medium heat for a few minutes, then turn off the heat. Add the crunchy radishes, season with black pepper and serve with a cup of steamed basmati rice. You can add some fresh chillies if you wish.

DSC_3120

DSC_3135-2

DSC_3160

DSC_3155

Gamberi in salsa agrodolce.

Ingredienti

Per 3 persone

Facile

Preparazione: 20 minuti

250 g di gamberi puliti

2 spicchi d’aglio, tagliati a pezzi

2 cipollotti, tagliati a fettine

1 peperone rosso (abbastanza grosso)

350 g di ananas (già pulito)

4 ravanelli (senza foglie)

3 cucchiai di salsa di soia (usate una salsa di soia fermentata naturalmente)

2 cucchiai di succo di lime

3 cucchiai di olio extra vergine d’oliva

pepe q. b.

peperoncino q. b. (facoltativo)

Preparazione.

1. Tagliate e pulite l’ananas, togliendo tutte le parti dure (compresa la parte dura al centro).

2. Lavate, tagliate a pezzi il peperone e affettate i ravanelli. Mettete i ravanelli da parte.

3. In una padella (o un wok), fate soffriggere i cipollotti e l’aglio per qualche minuto, in abbondante olio extra vergine d’oliva.

4. Aggiungete l’ananas e il peperone (tagliati a cubetti abbastanza piccoli). Fate soffriggere per 5 minuti, poi aggiungete i gamberi.

5. A parte, unite il succo di lime alla salsa di soia, precedentemente allungata con un po’ d’acqua. Amalgamate il tutto e versate il condimento in padella. Mescolate bene.

6. Fate friggere a fuoco medio per qualche minuto, poi spegnete il fuoco e aggiungete le fette di ravanelli. Servite con del riso basmati e aggiungete del pepe e/o peperoncino, se lo desiderate.