All posts by Serena @ foodfulife

How To Make Amazing Roasted Chestnuts In Your Own Home!

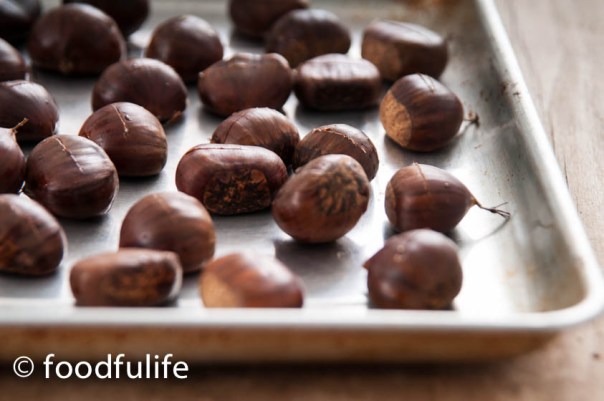
This is the right season to enjoy some crunchy roasted chestnuts! Golden and crunchy, roasted chestnuts are simply delicious!! When my brother and I were kids, my father used to make some roasted chestnuts before bed time….We loved it!

DSC_0128

In this post I’ll share the method to prepare amazing roasted chestnuts directly on the stove, just like my father used to do, but make sure you follow the instructions and you protect yourself with the proper equipment, in order to avoid disasters! :-). If you carefully follow all the steps this method is fairly easy and safe.

DSC_0132

Tip. During the cooking time keep away from the fire as much as possible and wear oven gloves for extra safety.

How to make roasted chestnuts 

Preparation time: 5 minutes

Cooking time:15-20 minutes

Ingredients

500 g of fresh chestnuts

just a small splash good quality white wine (avoid putting the bottle close to the fire when you cook and use it)

What you need.

a gas stove

a frying pan with holes to cook chestnuts (you can buy it or you can make your own, by piercing an old frying pan with a large nail, using a hammer)

a long stainless steel kitchen utensil (don’t use anything with plastic or wood)

Good oven gloves

Preparation.

1. Check, wash and dry the chestnuts.

DSC_0096

2. Using a sharp knife, cut the chestnuts one by one, making a 2cm long incision on the round side (make an X or 1 long cut horizontally, either way it should be fine!).

DSC_0098

DSC_0106

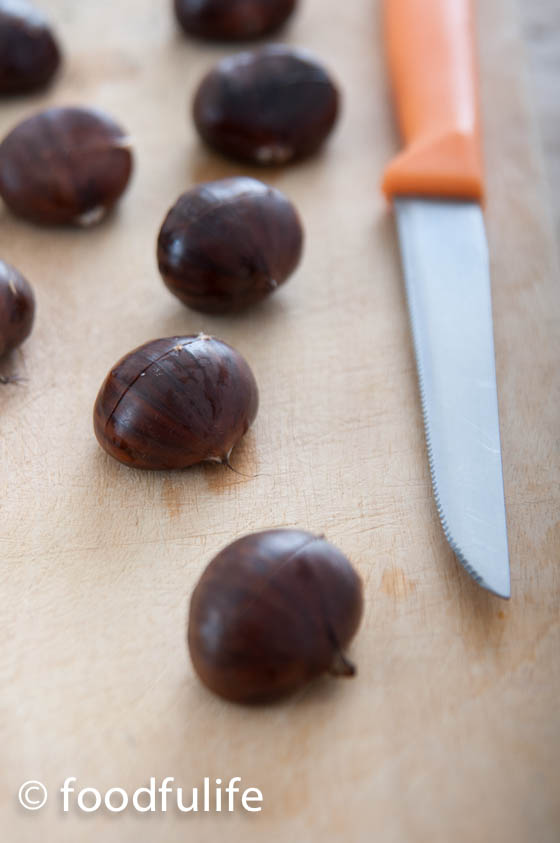
This operation is necessary to release the steam from the nuts while they are cooking and it will also make them easier to peel (If you skip this step the chestnuts will explode during the cooking process, so make sure you cut them properly).

Cooking Method (on the stove).

1. Put the pierced pan with the chestnuts directly on the gas stove over a moderate-high heat. Stir constantly with a long stainless steel kitchen utensil.

2. Roast the chestnuts for about 10 minutes, then add a small splash of white wine (try to keep yourself and the bottle of wine away from the heat, while you do that) and continue to roast and stir for at least 5 more minutes.

DSC_0136

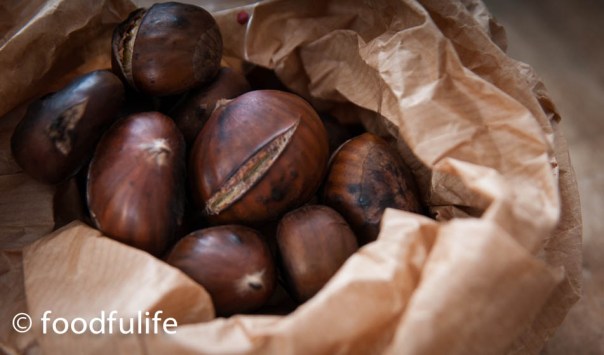
3. Turn off the eat and put the chestnuts in a brown paper bag for a few minutes (this will keep them hot and moist). Peel the chestnuts while they are still hot, because once they are cool they become much more difficult to peel.

DSC_0139

Tip. You can bake the chestnuts at 220° C (428° F) for about 20 minutes, instead of cooking them on the stove top; it’s probably a safer cooking method…However, I prefer the method above, because the chestnuts are much tastier and crunchier, when cooked directly over the flame!

DSC_0108

Roasted chestnuts with roasting pan.

Come preparare ottime caldarroste a casa.

In questo articolo vedremo insieme come preparare delle ottime caldarroste, cotte direttamente sul fornello, proprio come mio padre era solito fare, quando io e mio fratello eravamo bambini.

Seguite attentamente le istruzioni indicate e vedrete che questo è un metodo abbastanza semplice e sicuro.

Nota. Durante la cottura delle caldarroste, per quanto possibile, cercate di stare lontano dal fuoco e indossate dei guanti da forno per protezione.

Preparazione delle caldarroste.

Tempo di preparazione: 5 minuti

Tempo di cottura: 15-20 minuti

Ingredienti

500 g di castagne fresche

un dito di vino bianco di buona qualità (fate attenzione a non avvicinare troppo la bottiglia di vino al fuoco)

L’attrezzatura

un fornello a gas

una padella forata per caldarroste (potete farne una voi forando più volte una vecchia padella, con un chiodo grosso e un martello).

un cucchiaio grande di acciaio con manico lungo (non utilizzate plastica o legno)

guanti da forno

Preparazione.

1. Controllate, lavate e asciugate le castagne.

2. Utilizzando un coltello molto affilato, tagliate le castagne, una ad una, facendo un’ incisione di circa 2 cm sulla parte bombata. Questa operazione è necessaria per fare evaporare l’acqua dai frutti durante la cottura, se no le castagne col calore possono esplodere.

Metodo di cottura (sul fornello)

1. Mettete la padella forata, con le castagne, direttamente sul fornello a fuoco medio. Mescolate spesso, utilizzando un grosso cucchiaio di acciaio con il manico lungo.

2. Fate arrostire le castagne per circa 10 minuti, quindi insaporite con una piccola spruzzata di vino bianco (cercate di tenere la bottiglia di vino lontana dal fuoco). Continuate a cuocere le castagne per almeno altri 5 minuti.

3. Spegnete il fuoco e mettere le castagne in un sacchetto di carta per alcuni minuti (serve a mantenerle calde e umide). Sbucciate le castagne mentre sono ancora calde perché, una volta raffreddate, sbucciarle diventa molto più difficile.

Nota. È possibile cuocere le castagne nel forno a 220 °  C per circa 20 minuti, invece di utilizzare il fornello. Io preferisco cuocerle direttamente sulla fiamma perché, in questo modo, le castagne risultano molto più croccanti e saporite

Lots Of Roasted Chestnuts…Coming soon!

DSC_0091


Two amazing years…

This months we celebrate foodfulife’s second anniversary! I have to thank all of you, friends and bloggers, for supporting the blog and keeping me going! Blogging is an amazing experience!!! I hope to continue this journey with a lot of new ideas and recipes…

Here is a collection of the most viewed recipes from this year.

Enjoy your day!

Fried sage leaves

A traditional genoese starter.

DSC_6355

Buckwheat gnocchi

Very tasty and soft gluten-free gnocchi.

DSC_4831

Salmon with lime and balsamic vinaigrette 

So simple and tasty! This is one of my favourite dishes!

Salmon with lime and balsamic vinaigrette (front view with seasoned salmon)

Focaccia alla genovese

Focaccia prepared in the traditional way.

DSC_6242

Torta Caprese

A wonderful dark chocolate cake made with almond flour…To die for!

DSC_8638

Torta Paradiso (heaven cake)

A heavenly soft and delicate cake that kids simply adore!!!

Torta Paradiso (Heaven cake)

Rich chocolate tart with fresh raspberries

A vegan dark chocolate tart, so rich and delicious!

DSC_5698

Also very popular the how to series of posts…

Torta Della Nonna (Grandma’s Custard Pie) easy step by step

DSC_8217

Torta Della Nonna (Grandma’s Pie) is a delicious and delicate pie made with a soft shortcrust pastry and filled with plenty of thick Italian custard (Crema Pasticciera) and garnished with lots of pine nuts and icing sugar. It’s a Florentine recipe, but is also quite popular in Liguria; in fact many bakeries and coffee shops make this wonderful cake in Genoa. I thought it might be difficult for you to come and have a taste so here is the recipe for you to enjoy! 🙂

DSC_8227_01

Tips.

1. It can be quite a difficult to cover the pie with the thin layer of pastry, but you can simplify the recipe using only one layer of shortcrust for the pie case.

2. You might need less custard to fill the pie crust, I used a little less.

DSC_8231

Torta Della Nonna.

Preparation time: 50 minutes + resting time

Cooking time: 40 minutes

Medium difficulty

Ingredients

For the pastry (with the ingredients listed here, follow the method in this recipe)

350 g sifted flour

165 g butter

165 g of sugar

3 egg yolks

a pinch of salt

1/2 teaspoon of baking powder

2 drops of vanilla extract

For the custard or crema pasticciera (with the ingredients listed here, follow the method in this recipe)

1 litre of milk

8 egg yolks

140 g caster sugar

90 g sifted flour

the grated zest of 1 unwaxed lemon (possibly organic)

To garnish

icing sugar to taste

100 g pine nuts

Method.

1. Prepare the shortcrust pastry and place in the refrigerator to cool for 40 minutes.

2. Prepare the custard and let cool, stirring occasionally.

3. Place the pine nuts in water with ice for 30 minutes (so that they won’t burn when you cook them), then dry them with a kitchen towel.

DSC_8159

4. Cut the dough into two pieces, keeping in mind that one pieces should be a bit bigger than the other for the pie crust.

5. Using two pieces of baking paper, roll out the bigger piece of dough (5 mm thickness) to make a tart case with a slightly higher edge. Place the baking paper with the pastry onto the cake tin ( 22 cm wide).

DSC_8156

DSC_8162

6. Pierce the pastry with a fork, then fill with the custard.

DSC_8171

7. Roll out a disk of pastry (5 mm thick), then cover the pie and seal the two layers of pastry. Using a pastry cutter, cut and remove the excess pastry, then top with the pine nuts.

DSC_8175_01

DSC_8180

8. Bake at 180° C (356° F) for 40 minutes and let cool.

DSC_8186_01

9. Place in the fridge for at least an hour, then garnish with icing sugar.

DSC_8204

DSC_8215

DSC_8233_01

If you like this recipe please support the blog by following Foodfulife on Facebook….Thank you so much!!!!

Torta della nonna.

Tempo di preparazione: 50 minuti + il riposo

Tempo di cottura 40 minuti

Media difficoltà

Ingredienti

Per la frolla (con ingredienti scritti qui, seguite la preparazione di questa ricetta)

350 g farina setacciata

165 g burro

165 g di zucchero

3 tuorli d’uova

un pizzico di sale

1/2 bustina di lievito per dolci

2 gocce di estratto di vaniglia

Per la crema (con gli ingredienti scritti qui, seguite la preparazione di questa ricetta)

1 litro di latte intero

8 tuorli d’uova

140 g di zucchero semolato

90 g farina setacciata

la buccia di un limone grattugiato, non trattato e possibilmente bio

Per decorare

zucchero a velo vanigliato q. b.

100 g di pinoli

Preparazione

1. Preparate la pasta frolla e mettetela in frigo a raffreddare.

2. Preparate la crema pasticciera e lasciatela raffreddare, mescolando di tanto in tanto.

3. Mettete i pinoli in acqua con del ghiaccio per 30 minuti (per evitare di bruciarli durante la cottura), poi asciugateli bene con la carta da cucina.

4. Tagliate la pasta in due, tenendo presente che un pezzo dovrà essere un po’ più grande dell’altro per la base della torta.

5. Stendete il pezzo più grande tra due fogli di carta da forno (lo spessore deve essere di circa 5 mm) , come per fare una crostata con il bordo alto. Aiutandovi la carta da forno, trasferite la sfoglia di pasta su una teglia (larga 22 cm).

6. Bucherellate la frolla con una forchetta e riempite con la crema pasticciera.

7. Stendete un disco con la pasta rimasta (di spessore 5 mm), poi ricoprite la torta e sigillate i bordi. Tagliate la pasta in eccesso e ricoprite la torta con i pinoli.

8. Cuocete in forno a 180° per 40 minuti, poi fate raffreddare.

9. Mettete la torta a rassodare nel frigo per almeno un’oretta.  Prima di servire, decorate con abbondante zucchero a velo.

Segui Foodfulife su facebook per tante altre ricette golose!

Quick And Easy: Prawn Salad With Rocket And Pomegranate

Last but not least, today I am publishing a wonderful prawn salad with rocket leaves and lots of pomegranate seeds. Extremely easy to make and perfectly balanced, this dish is real treat!!!

It will definitely become a classic at my dinner parties!

DSC_8122

DSC_8107

Prawn salad with rocket and pomegranate.

350 g prawns tails

125 g rocket (arugula)

2 spring onions, washed and finely sliced (only the tender part)

half bulb of fennel, washed and finely sliced

2 stalks of celery, washed and finely sliced (only the tender part)

the seeds of a pomegranate

for the lime citronette

the juice of 1/2 a lime

4 tablespoons of extra virgin olive oil

salt and pepper to taste

DSC_8117

Method.

1. Peel and devein the prawns, then poach in water for a few minutes.

2. Drain the prawns and let cool.

3. Place the arugula, the fennel, the spring onions and the celery in the plates, then add the prawns and garnish with plenty of pomegranate seeds.

4. Make the lime citronette. Mix 4 tablespoons of extra virgin olive oil with the juice of half a lime, then season with salt and pepper.

5. Pour the lime dressing over the salad and serve.

Also see Rice Flour Chocolate Cookies With Pomegranate and Light Sabayon With Pomegranate And Pistachios

DSC_8068

DSC_8072

DSC_8101

Insalata di gamberi con rucola e melagrana.

350 g di code di gambero

125 g di rucola

2 cipollotti, lavati e tagliati finemente (solo la parte tenera)

2 gambi di sedano, lavati e tagliati finemente (solo la parte tenera)

1/2 finocchio, lavato e tagliato finemente

i chicchi di una melagrana

Per la citronette di lime

il succo di mezzo lime

4 cucchiai di olio extra vergine d’oliva

sale pepe q. b.

Preparazione.

1. Sgusciate i gamberi e togliete il budellino. Fate bollire i gamberi per qualche minuto.

2. Scolate i crostacei e fateli raffreddare.

3. Mettete i gamberi con la rucola, i chicchi di melagrana, il finocchio e i cipollotti nei piatti.

4. A parte, preparate la citronette di lime. Mescolate 4 cucchiai di olio extra vergine d’oliva con il succo di mezzo lime, sale e pepe.

5. Condite l’insalata di gamberi con la citronette di lime e servite.

DSC_8148

Rice Flour Chocolate Cookies With Pomegranate (Gluten-Free, Low-Sugar)

Rice flour chocolate cookies with pomegranate (gluten-free, low-sugar)

To continue the series of recipes with pomegranate, this week I am publishing an easy cookie recipe, gluten-free and perfect for dark chocolate lovers! These cookies are garnished with a lot of pomegranate seeds, they are not very sweet and have a strong chocolate flavour ; I served them warm with plenty of honey on top! In this way, all the flavours and different textures really come together nicely!

Tips.

1. For the kids dip them in milk, because they have a strong dark chocolate flavour.

2. For a low-sugar recipe don’t add the honey on top of the cookies, just follow the recipe.

Rice flour chocolate cookies with pomegranate (gluten-free, low-sugar)

I hope you enjoy this autumn treat!

Rice flour chocolate cookies with pomegranate (gluten-free, low-sugar)

Rice flour dark chocolate cookies with pomegranate.

For two trays (16 cookies)

Preparation time: 20 minutes + the resting time

Cooking time: 20-30 minutes

Ingredients

100 g soft butter

100 g rice flour

150 g almonds, peeled

15 g cocoa powder (I use organic and fair trade)

60 g dark chocolate 70% cocoa (I use organic and fair trade )

50 g cornstarch

the seeds of a pomegranate

1 tablespoon honey

3 tablespoons maple syrup

a pinch of salt

a pinch of cinnamon

Method.

1. Bake the almonds at 160 ° C (320° F) for 5-10 minutes. Let cool then grind with a food processor.

Step 1. Bake the almonds, let cool and grind them.

2. Melt the chocolate using a bain-marie.

3. In a bowl, work the butter with the maple syrup, the honey and the ground almonds.

DSC_7968

4. Add the melted chocolate to the almond mixture and stir well. In another bowl, combine the rice flour, the cornstarch, the cocoa, a pinch of cinnamon, a pinch of salt, then mix everything together with the almonds. Knead for a few minutes then put in the refrigerator to cool for about 30 minutes.

DSC_7954

DSC_7971

DSC_7982

5. Line the base of two baking trays with some baking paper, then shape the cookies and garnish with the pomegranate seeds.

DSC_7985

6. Bake at 180 ° C (356°F ) for 20-30 minutes.

DSC_8006

7. Serve the cookies hot with a lot of honey on top!

DSC_8047

DSC_8059

DSC_8065

DSC_8027

Also see Light Sabayon With Pomegranate And Pistachios and Prawn Salad With Rocket And Pomegranate.

Biscotti di farina riso al cioccolato con melagrana.

Per due teglie (16 biscotti)

tempo di preparazione: 20 minuti + il riposo

tempo di cottura: 20-30 minuti

Ingredienti

100 g di burro morbido

100 g di farina di riso

150 g di mandorle, senza buccia

15 g di cacao amaro (uso il fair trade e bio)

60 g di cioccolato fondente al 70 % (uso il fair trade e bio)

50 g di amido di mais

i chicchi di una melagrana

1 cucchiaio di miele

3 cucchiai di sciroppo d’acero

un pizzico di sale

un pizzico di cannella

Preparazione.

1.Tostate le mandorle a 160 °C per 5-10 minuti. Lasciate raffreddare e tritate finemente con il tritatutto.

2. Fate sciogliere il cioccolato a bagnomaria.

3. Lavorate il burro con lo sciroppo d’acero, un cucchiaio di miele e la farina di mandorle.

4. Unite il cioccolato sciolto al composto di burro e farina di mandorle. A parte, mescolate la farina di riso con il cacao, l’amido di mais, la cannella e un pizzico di sale. Unite tutto e impastate bene per qualche minuto, poi mettete nel frigorifero a raffreddare per 30 minuti.

5. Distribuite i biscotti su due teglie rettangolari (ricoperte da carta da forno) e guarnite con dei chicchi di melagrana.

6. Infornate a 180°C  per 20-30 minuti.

7. Servite i biscotti caldi con tanto miele sopra.

DSC_8049

Light Sabayon With Pomegranate And Pistachios

Autumn has finally arrived and soon Foodfulife will turn two years old! Yep, two years ago I decided to start this incredible journey and Foodfulife is still going strong! To celebrate I will dedicate three recipes to the pomegranate, a wonderful fruit that contains important nutriments that can help us to boost our immune system during this season.

DSC_7944

Pomegranate is rich in vitamins A, B, C; it contains minerals including potassium and phosphorus, sodium, magnesium, iron and important antioxidants such as flavonoids and phytoestrogens. It has anti-aging, anti-oxidising and anti-cancerous proprieties and it may be effective in reducing the risk of heart related diseases.
Pomegranate is also a very versatile fruit to use in recipes; its delicate flavour is sweet and slightly sour and it can be used in sweet as well as savoury dishes.

DSC_7853

Today I am sharing an easy recipe with a light orange sabayon, crunchy pistachios and lots of pomegranates seeds. This is a deliciously creamy dessert with an interesting texture and lots of flavour!

DSC_7828

Light sabayon with pomegranates and pistachios.

For 4 glasses

the seeds from 2 pomegranates

40 g toasted pistachio nuts (toasted in the oven for about 10 minutes )

340 g greek yogurt

for the sabayon

6 egg yolks

130 g of brown sugar

1 tablespoon orange liqueur

DSC_7875

Method.

1. In a stainless steel bowl, combine the eggs with the sugar.

2. Place the bowl over a bain-marie (with very hot water, but not boiling) over a very low heat, then whisk the mixture.

3. Add a tablespoon of orange liqueur, whisk for a few more minutes, then turn off the heat and set aside to cool.

DSC_7886

4. Once the sabayon has cooled, mix gently with the yogurt.

5. Separately, chop the pistachios.

DSC_7865

6. Take 4 tall glasses and fill with a layer of pistachios, then alternate a layer of pomegranate seeds with one of sabayon and another of the pomegranate seeds. Finish with a layer of sabayon and garnish with pomegranate and pistachios.

DSC_7878

DSC_7907

DSC_7938

7. Place in the fridge to cool and serve.

DSC_7940

also see Rice Flour Chocolate Cookies With Pomegranate and Prawn Salad With Rocket And Pomegranate.

Zabaione allo yogurt con melagrana e pistacchi.

Per 4 bicchieri

2 melegrane

40 g di pistacchi (tostati al forno per 10 minuti)

340 g di yogurt greco

per lo zabaione

6 tuorli d’uova

130 g di zucchero di canna

1 cucchiaio di liquore all’arancia

DSC_7855

Preparazione.

1. In una ciotola di metallo, unite lo zucchero alle uova.

2. Mettete la ciotola a bagnomaria (a fuoco basso, con acqua molto calda che non deve bollire) e montate le uova fino ad ottenere una crema soffice.

3. Aggiungete un cucchiaio di liquore all’arancia, poi montate per qualche minuto e spegnete il fuoco. Lasciate raffreddare, mescolando di tanto in tanto.

4. Una volta raffreddato, unite lo zabaione allo yogurt.

5. A parte, tritate grossolanamente i pistacchi.

6. Prendete 4 bicchieri alti e ricoprite la base con uno strato di pistacchi, poi alternate uno strato di chicchi di melagrana con uno di crema, poi aggiungete altro melagrana e terminate con la crema. Guarnite con chicchi di melagrana e pistacchi.

7. Mettete nel frigo a raffreddare e poi servite.

Vedi anche Biscotti Di Farina Di Riso Al Cioccolato Con Melagrana e Insalata Con Gamberi E Rucola

DSC_7951

Happy Autumn!

DSC_7855

Sunday Meal Menu, Italian Style!

A delicious menu for a Sunday meal with friends and family…

Click on the name of the dish or on the picture to view the recipe.

Gorgonzola Salad With Rustic Bread

DSC_3238

Stuffed Vegetables (vegetarian and gluten-free)

DSC_7735

Pizza With Fresh Tomatoes, Rocket And Parmesan Cheese 

DSC_0986

 Torta Caprese

DSC_8662

Stuffed Vegetables (Gluten-Free and Vegetarian)

Stuffed vegetables (gluten-free and vegetarian)_ Verdure ripiene vegetariane, senza glutine.

Stuffed vegetables are a typical genoese dish, which requires quite a long preparation and cooking time, but it’s worth it! In this case, I adapted my mom’s recipe to create a gluten-free, vegetarian dish, using ricotta, plenty of fresh marjoram (which is also in the traditional recipe) and some gluten-free breadcrumbs. These stuffed vegetables are incredibly tasty, soft in the middle and crunchy on the outside; a wonderful Sunday meal to share with family and friends!

My advice is to make plenty, keep them in the fridge and eat them the next day, they taste even better!

DSC_7725

Stuffed vegetables without meat and gluten-free.

Cooking time: 1 hour 15 minutes

Preparation time: 30 minutes

difficulty: medium

Ingredients

for 1 medium-large tray of stuffed vegetables

2 medium potatoes

4 medium-large zucchini (to be divided into 8 pieces)

2 onions, plus 1 small onion to sauté

1 clove of garlic

1 egg

50 g grated Parmesan cheese

125 g ricotta

3 full tablespoons of fresh marjoram, chopped

5 tablespoons of extra virgin olive oil

some gluten-free bread crumbs to sprinkle on top and 2 tablespoons to add to the stuffing (or you can use pre-cooked polenta)

salt and pepper to taste

Method.

1. Steam all vegetables, until they are cooked but still crunchy.

2. Slice the potatoes, then place the smallest slices in a bowl and set aside for the stuffing.

3. Using a spoon and a knife, scoop out the central part of the zucchini and cut the onions in half (from the centre, not from the roots). Remove the central and the outer layers of onions, then put them in the bowl with the rest of the vegetables for the stuffing.

DSC_7641

DSC_7627

4. In a frying pan, sauté the onion with a clove of garlic, both finely chopped (add the garlic after a few minutes, to prevent burning).

DSC_7651

5. Remove the excess water, then using a food processor, puree all the vegetables for the stuffing. Fry over a medium heat, stirring well, until the mixture gets a little bit drier.

DSC_7654

6. In a food processor, mix the ricotta with the Parmesan cheese, 2 tablespoons of gluten-free bread crumbs, the marjoram and an egg. In a large bowl, add the vegetables puree to the ricotta mixture, then mix and season with salt and pepper.

DSC_7659

DSC_7660

7. Grease a baking tray with 2 tablespoons of extra virgin olive oil, then place the vegetables onto the tray and fill them with the stuffing.

DSC_7630

DSC_7673

8. Sprinkle some gluten-free bread crumbs on top, season with a little more extra virgin olive oil and bake at 200 ° C (392° F), until the vegetables are well coloured (about 30-40 minutes).

DSC_7735

DSC_7728

Verdure ripiene senza carne e senza glutine.

Cottura: 1 ora e 15 minuti

Preparazione: 30 minuti

Difficoltà media

Ingredienti

per 1 teglia medio-grande

2 patate di media grandezza

4 zucchini medio-grossi (da dividere in 8 pezzi)

2 cipolle , più 1 cipolla per il soffritto da mettere da perte

1 spicchio d’aglio

1 uova

50 g di parmigiano grattugiato

125 g di ricotta

3 cucchiai abbondanti di maggiorana fresca e tritata

5 cucchiai d’olio extravergine d’oliva

pangrattato senza glutine q. b. (oppure potete usare della polenta istantanea)

sale e pepe q. b.

Preparazione.

1. Fate cuocere a vapore tutte le verdure e toglietele dal fuoco ancora sode.

2. Tagliate le patate a fette, poi mettete le fette piccole e rotte in un contenitore per il ripieno.

3. Tagliate gli zucchini e scavate la polpa usando un cucchiaino e un coltello. Tagliate le cipolle a metà (non dalle radici ma dal centro), poi prendete la parte centrale e lo strato esterno delle cipolle e metteteli, con la polpa degli zucchini, nel contenitore per il ripieno.

4. In una padella, fate soffriggere 1 cipolla e uno spicchio d’aglio, entrambi tritati finemente (aggiungete l’aglio qualche minuto dopo, per evitare che si bruci).

5. Strizzate bene le verdure del ripieno per togliere l’acqua in eccesso, poi frullate e aggiungete al soffritto. Fate asciugare a fuoco medio e mescolando bene.

6. A parte, frullate la ricotta con il parmigiano, la maggiorana, due cucchiai di pangrattato senza glutine e un uovo. In una terrina grande, unite il purea di verdure passata in padella al composto di ricotta, poi mescolate e insaporite con sale e pepe.

7. Ungete una teglia con 2 cucchiai di olio extravergine d’oliva, disponetevi le verdure tagliate a metà, poi riempitele con il ripieno e spolverate con abbondante pangrattato senza glutine.

8. Condite con un filo d’olio e infornate a 200°C, finché le verdure saranno ben colorate (30-40 minuti).

DSC_7714