Tag Archives: Gluten-free

Traditional Recipe: La Peperonata

DSC_8575

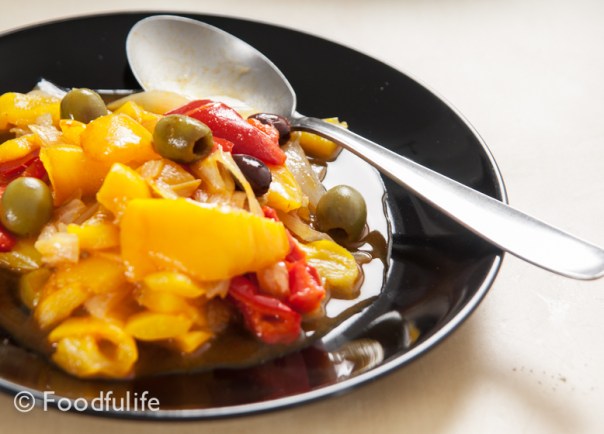
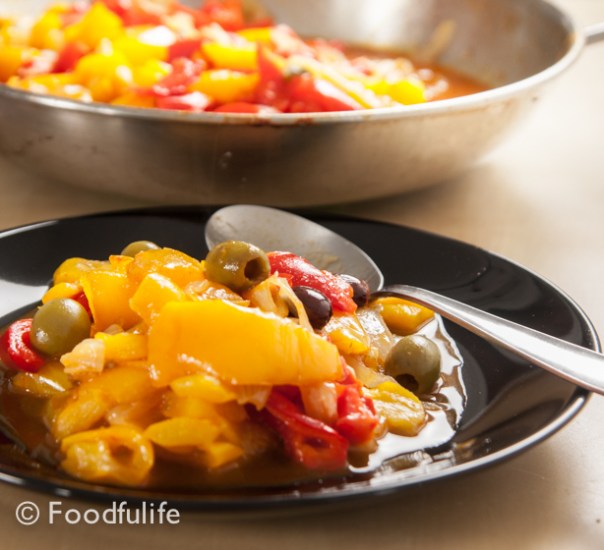
Peperonata is a delicious traditional Italian dish made with yellow and red bell peppers and a few other ingredients. It’s a dish full of character and flavour! It can be a great side dish and it can be a fantastic appetizer, when served with grilled rustic bread, like a bruschetta. The recipe I am publishing this week is my mother’ s peperonata. My mother made a few adaptations to the traditional recipe to achieve a creamier and very tasty dish. Nothing can beat my mother’ s peperonata! So sweet, flavourful and delicate at the same time; it really melts in the mouth!

DSC_8543

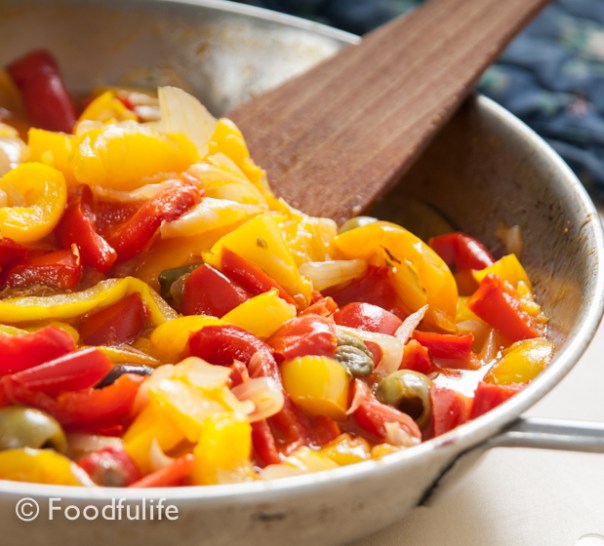
While cooking, the onions will melt creating a lovely creamy sauce which works perfectly with the rest of the ingredients. Give it a try, you’ll love it!

Tips. For extra flavour you can use Ketchup instead of tomato paste. The cooking time might vary for the thickness of the peppers.

DSC_8547

La Peperonata.

Ingredients

For 4-6 servings

Easy

Preparation and cooking time: 50 minutes

3 tablespoons extra virgin olive oil

2 large onions, chopped

4 bell peppers (2 yellow and 2 red)

1 tablespoon of capers (possibly in vinegar)

6 good quality pitted green olives

6 good quality pitted black olives

1/2 a tablespoon tomato paste (or tomato ketchup)

white wine (only if necessary)

a handful of pine nuts (optional)

salt and pepper to taste

Method.

1. Cut each pepper into 4 pieces and then slice them horizontally into slices (2 cm thick). Cut also the onions into thick slices.

DSC_8522

2. In a large frying pan, sauté the onion and the peppers with a clove of garlic in 3 tablespoons of extra virgin olive oil.

DSC_8524

DSC_8526

3. Add the capers, the olives​​ and the pine nuts.

DSC_8530

4. Add some tomato paste (or tomato ketchup), then cover and cook for 40 minutes over a low heat (add a little of white wine if it’s too dry). Let simmer until the peppers get really tender.

DSC_8535

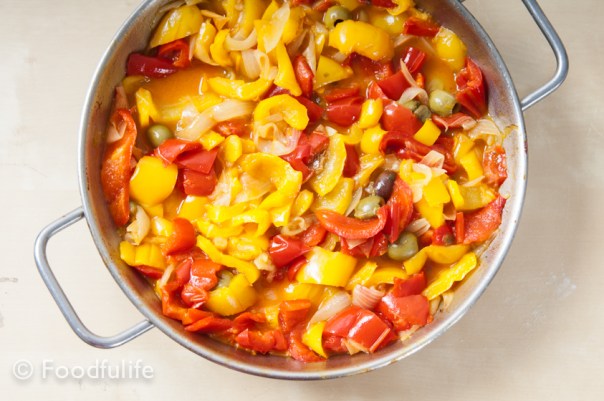
5. Remove the lid and let most of the juices evaporate. Season with salt and pepper, then serve (you can serve the peperonata hot or cold).

DSC_8563

La Peperonata.

Ingredienti

Per 4-6 persone

Facile

Tempo di preparazione e cottura: 50 minuti

3 cucchiai d’olio extra vergine d’oliva

2 cipolle tagliate grosse

4 peperoni, due gialli e due rossi

1 cucchiaio di capperi sott’aceto

6 olive verdi

6 olive nere

1/2 cucchiaio di passata di pomodoro (oppure ketchup, per una peperonata più saporita)

vino bianco q. b. (facoltativo)

una manciata di pinoli (facoltativo)

sale e pepe q. b.

Preparazione.

1. Tagliate i peperoni in 4 pezzi e poi a strisce orizzontali. Affettate le cipolle grossolanamente.

2. In una padella grande, fate soffriggere la cipolla, i peperoni e uno spicchio d’aglio tagliato a metà.

3. Aggiungete ai peperoni un cucchiaio abbondante di capperi, 6 olive verdi, 6 olive nere e alcuni pinoli.

4. Aggiungete il concentrato di pomodoro, poi coprite e fate cuocere a fuoco lento per 40 minuti (se occorre aggiungete un po’ di vino bianco).

5. Quasi a fine cottura, levate il coperchio e fate ritirare un po’ il liquido. Aggiungete il pepe, il sale e servite.  La peperonata è ottima anche servita fredda.

DSC_8580

Delicious Summer Veggie Kebabs

Since the hot weather has finally arrived, it’s time to dust off the barbecue and eat plenty of fresh vegetables and delicious summer fruits! This time of the year we can be really creative with the dishes! Today we are going to prepare some fresh and light summer veggie kebabs and then, we are going to a party! It’s time to participate in Fiesta Friday, a lovely blog event hosted by my friend and talented blogger Angie, from the Novice Gardener, and co-hosted by other wonderful bloggers. This week, Fiesta Friday #21 is co-hosted by  Elaine@Foodbod and Julianna@Foodie On Board.

DSC_3367

This is a lovely light recipe, fresh and full of mediterranean flavours! It could be served as an aperitif, a side dish or a delicious light meal…You choose!

Enjoy!

Tip. You can remove the the bell pepper skin after grilling the vegetables, if you wish.

I left it because it’s quicker.

DSC_3349

Summer Veggie Kebabs.

Ingredients

4 servings

1 red bell pepper

1 yellow bell pepper

1 small aubergine

2 courgettes

green picked olives

1 small fresh goat’s cheese (150 g)

anchovies

cherries tomatoes

8 wooden skewers

For the dressing

6 tablespoons of extra virgin olive oil

2 crushed clove of garlic

some dried or fresh origano

2 small fresh chillies, cut into slices

salt and bleck pepper to taste

DSC_3256

DSC_3257

Method.

1. Wash the vegetables, cut them into thin slices and grill them on an electric grill or on a grill pan, previously greased with a little extra virgin olive oil.

DSC_3263

DSC_3268

DSC_3273

2. Roll the zucchini with the goat’s cheese in the center. Roll the yellow pepper with the anchovies and the red pepper with the olives in the center.

DSC_3275

DSC_3276

3. In a small bowl, mix the extra virgin olive oil and some dried origano with crushed garlic and chillies, salt and pepper.

4. Pierce the stuffed vegetables with the wooden skewers and make 8 kebabs. Serve cold with some garlic-olive oil sauce on the side.

DSC_3282

DSC_3284

DSC_3329

DSC_3336

DSC_3369

Spiedini saporiti di verdure.

Ingredienti

Per 4 persone

1 peperone rosso

1 peperone giallo

1 melanzana

2 zucchine

olive verdi snocciolate

1 formaggio fresco di capra (150 g)

acciughe sott’olio

pomodorini ciliegia

8 stecchi di legno per gli spiedini

Per il condimento

6 cucchiai di olio extra vergine d’oliva

2 spicchi d’aglio (schiacciati e tagliati finemente)

un mazzetto di origano fresco o un cucchiaio di origano secco

2 peperoncini tagliati a fettine

sale e pepe q. b.

Preparazione.

1. Lavate e tagliate le verdure a fette. Fate grigliare tutte  le verdure su una bistecchiera (o una piastra elettrica), spennellata con abbondante olio extra vergine d’oliva.

2. Arrotolate gli zucchini con un pezzetto di formaggio di capra e le melanzane con mezzo pomodorino al centro. Arrotolate anche il peperone rosso con le olive e il peperone giallo con le acciughe.

3. A parte, mescolate 6 cucchiai di olio extra vergine d’oliva con l’origano, l’aglio schiacciato, il peperoncino a fettine, il sale e il pepe.

4. Infilzate le verdure con gli stecchi e create gli spiedini alternando i sapori. Servite gli spiedini freddi con l’olio aromatizzato.

Mango Panna Cotta

Panna cotta is one of the most appreciated Italian desserts and is well known all over the world. This amazing dessert is probably widely appreciated, not only for its wonderful velvety texture and delicate flavour but also for the simplicity of the preparation method. The traditional recipe is usually prepared with cream, sugar and vanilla pods and served with fruit, chocolate or caramel sauce. In addition to the traditional recipe, there are many variations which include different ingredients, in order to get more creative and complex flavour combinations (we have already prepared a double chocolate panna cotta, in a previous post).

In this recipe, I added the mango pulp with a hint of lemon flavour, to celebrate the warm season. The result is an extremely velvety, exotic and charming dessert!

You’ll love it!!!

DSC_8005

 Tips.

1. To make a slightly lighter dessert you can replace 50 ml of whipping cream with 50 ml of whole milk.

2. It’s important to strain the mango puree well, because the mango pulp contains little hairy bits which can compromise the smoothness and texture of the dessert.

3. In this recipe, I added 1 tablespoon of honey, but half a tablespoon was actually enough for my taste. With half a tablespoon of honey you get a less sweet but more delicate panna cotta, which in my opinion, suits an adult taste best. You can taste the mixture with 1/2 tablespoon of honey and then decide whether you want to add more or not. For children, the preparation with a tablespoon of honey is perfect!

DSC_7961

Mango Panna Cotta.

Preparation: 20 minute + 3 hours in the fridge

Easy

Ingredients

for 2 servings

150g (5.2 oz) mango (+ a few pieces of fresh mango)

1 tablespoon of honey

the zest of half a lemon (or 1 drop of lemon essential oil)

2 gelatine leaves

200 ml ( 6.76 us fl oz) whipping or double cream

a few mint leaves

DSC_7943

Method

1. Leave the gelatine leaves to soak for about 10 minutes.

DSC_7932

2. Pour the cream into a small saucepan with the honey and the lemon zest (or lemon essential oil). Cook over a moderate heat for a few minutes, until the cream is quite hot (but do not boil). Then add the gelatine leaves, stir very well and turn off the heat.

DSC_7934

3. Peel the mango and cut it into pieces. Puree the fruit in a blender with the warm cream.

4. Using a strainer, pour the mixture into small one-portion pots and let cool. Then put the pots in the refrigerator to set for about 3 hours.

DSC_7947

5.  Serve the panna cotta with some fresh mango and a few mint leaves on top.

DSC_7984

DSC_7980

DSC_7988

DSC_7958

Panna Cotta al Mango.

Difficoltà: facile

Preparazione: 20 minuti + 3 ore nel frigorifero

Ingredienti

per 2 panne cotte

150 g di mango (+ qualche pezzo di mango da aggiungere alla fine, come guarnizione)

Scorza di mezzo limone (oppure 1 o 2 goccia di olio essenziale di limone)

1 cucchiaio di miele

2 fogli di colla di pesce

200 ml di panna

qualche foglia di menta

Metodo

1. Mettete a bagno, in acqua tiepida, i fogli di gelatina per 10 minuti.

2. Riscaldate la panna in un pentolino (a fuoco basso) con il miele e la scorza di limone (oppure l’olio essenziale di limone). Aggiungete la gelatina, mescolate per qualche minuto e spegnete il fuoco.

3. Togliete la buccia al mango, tagliatelo a pezzi e frullatelo bene insieme alla panna (ancora calda).

4. Usando un colino, filtrate la panna e versatela negli stampini. Lasciate raffreddare e poi mettete in frigorifero per 3 ore a rassodare.

5. Servite con dei pezzi di mango fresco e qualche foglia di menta.

DSC_8008

Budget Friendly And Full Of Flavour!

This week we are going to prepare a lovely spring risotto with corn salad and fresh peas. This is a cheap and easy risotto to make, perfect for this season! You don’t usually cook corn salad, but a few weeks ago I had some left in the fridge, so I made a soup with it to use it up and It was really lovely!

Corn salad can be used instead of spinach or asparagus, and in fact the taste is somewhere in between the two vegetables, but very delicate. Moreover, It’s cheaper than a bunch of asparagus, which is great! Give it a try, you’ll love it!!!

DSC_7108

DSC_7063

Risotto With Fresh Peas And Corn Salad.

Cooking time: 35 minutes

Preparation: 20 minutes

Ingredients

for 2 servings

160 g (5.6 oz, 3/4 cup) arborio rice

100 g (3.5 oz) fresh peas without the pods (about 200 g ,7 oz, with the pods)

100 g (3.5 oz) of corn salad (lamb’s lettuce), washed and roughly chopped

3 shallots, peeled and finely chopped

1 clove garlic, peeled and finely chopped

3 tablespoons extra virgin olive oil

a small piece of butter (which you can replace with 1 tablespoon of olive oil, if you wish)

700 ml (3 cups vegetable stock), warm (made with an organic stock cube and water)

4 tablespoons of grated Parmesan cheese

salt and pepper to taste

a hint of nutmeg (optional, but very nice!)

DSC_7045

DSC_7075

Method.

1. In a large heavy based pan, pour 3 tablespoons of extra virgin olive oil, add a small piece of butter and gently fry the shallots over a low heat (without burning them). After a few minutes add the garlic, then stir.

DSC_7079

2. Add the rice and the peas and stir. After 2 minutes, gradually pour in the vegetable stock.

DSC_7081

DSC_7085

3. Simmer and stir at a moderate heat until the broth is mostly absorbed. Add the corn salad, then lower the heat and simmer for another 10 minutes (stirring continuously) until creamy.

DSC_7086

DSC_7096

4. Turn off the heat, season with a hint of nutmeg, 2 tablespoons of Parmesan cheese, salt and pepper; then put the lid on the pan and let the risotto sit for a few minutes. Serve with plenty of grated Parmesan on top.

DSC_7103

Tip. Garnish the dish with some fresh corn salad leaves.

Risotto Con Piselli Freschi e Valerianella.

Preparazione: 20 minuti

Cottura: 35 minuti

Ingredienti

per 2 persone

160 g riso arborio

100 g di piselli freschi sbucciati (200 g circa di peso con il bacello)

100 g di valerianella, lavata e tagliata grossolanamente

50 g di scalogno, sbucciato e tritato finemente

1 spicchio d’aglio, sbucciato e tritato

3 cucchiai di olio extra vergine d’oliva

una nonce di burro (che potete sostituire con 1 cucchiaio d’olio in più, se lo desiderate)

700 ml di brodo vegetale, caldo (fatto con un dado biologico)

un pizzico di noce moscata

sale e pepe q. b.

parmigiano grattugiato q. b.

Preparazione.

1. In una pentola grande a fondo spesso, versate 3 cucchiai di olio extra vergine d’oliva, aggiungete il burro e fate soffriggere lo scalogno a fiamma bassa. Dopo qualche minuto aggiungete l’aglio.

2. Unite al soffritto anche il riso e i piselli. Fate rosolare per qualche minuto, poi annaffiate con abbondante brodo vegetale. Continuate ad aggiungere il brodo gradualmente, durante la cottura.

3. Fate cuocere a fuoco moderato (mescolando sempre), finché il brodo si sarà ritirato quasi completamente. Aggiungete la valerianella verso fine cottura, poi abbassate il fuoco e fate cuocere per altri 10 minuti (sempre mescolando).

4. Spegnete il fuoco, condite con un pizzico di noce moscata, qualche cucchiaio di parmigiano, sale e pepe; lasciate riposare per qualche minuto il risotto, chiudendo la pentola con un coperchio. Servite con abbondante parmigiano.

DSC_7125

Salmon with lime and balsamic vinaigrette

I must admit, I came across the salmon-balsamic vinegar combination totally by accident. I was trying out a new dish that went horribly wrong, when I dropped some balsamic vinegar on a piece of salmon by mistake…Yes, in my kitchen these kind of things can happen! 🙂

DSC_6967

Anyway, I loved it! So I changed the recipe completely and I made a light balsamic vinaigrette as a salmon dressing. I know it is not a new combination, but it was the first time for me.
I love the way in which the balsamic vinegar aroma enhances the natural sweetness of salmon without covering its delicate flavour. The aniseed-tinged wild fennel leaves add a note of distinctive freshness to the recipe. If you can’t find wild fennel, you can use normal fennel leaves, they are probably a little bit easier to get and very similar in taste.

DSC_6993

Salmon with lime and balsamic vinaigrette.

Preparation: 15 minutes

Ingredients

For 2 servings

2 salmon steaks

1 lime

a few sprigs of fresh wild fennel, washed

6 radishes, washed

a stalk of celery, washed

for the balsamic vinaigrette

2 tablespoons of extra virgin olive oil

2 tablespoons of balsamic vinegar

a few drops of lime juice

Black pepper and salt to taste

DSC_6873

DSC_6883

DSC_6910

Method

1. Wash and cut a lime into thin slices, then put a few slices on top of the salmon, with a sprig of wild fennel.

DSC_6924

2. Steam the salmon steaks for 8-10 minutes.

3. Place the salmon steaks on the plates, garnish with a few radishes and the celery, both finely sliced. Then, add some wild fennel leaves (roughly chopped).

DSC_6978

For the vinaigrette.

1. Mix 2 tablespoons of extra virgin olive oil with 2 tablespoons of balsamic vinegar, a few drops of lime juice, salt and pepper to taste.

DSC_6943

2. Serve with the vinaigrette on the side.

DSC_6961

DSC_7011

Salmone con lime e aceto balsamico vinaigrette.

Preparation: 15 minutes

Ingredienti

Per due persone

2 tranci di salmone

1 lime intero

6 ravanelli, lavati

un gambo di sedano, lavato

qualche rametto di finocchio selvatico, lavato

Per la vinaigrette di aceto balsamico

2 cucchiai di olio extra vergine d’oliva

2 cucchiai di aceto balsamico

qualche goccia di succo di lime

Pepe e sale q.b.

Preparazione.

1. Lavate e tagliate un lime a fette molto sottili. Mettete le fette di lime sul salmone, con qualche rametto di finocchio selvatico.

2. Fate cuocere a vapore i tranci di salmone per 8-10 minuti.

3. Disponete il salmone sui piatti, guarnite ogni piatto con tre ravanelli tagliati a fette molto sottili e con un gambo di sedano tagliato alla julienne.

Per la vinaigrette.

1. Mescolate 2 cucchiai di olio extravergine d’oliva con 2 cucchiai di aceto balsamico, qualche goccia di succo di lime, sale e pepe.

2. Servite il salmone con il condimento a parte.

DSC_7021

DSC_6958

Crunchy and Colourful Salad (Low-fat And Packed With Vitamin C!!)

Spring is here and with it comes the time of serious dieting! From this week on I want to dedicate a little time to preparing light recipes and meals.
To start with, I prepared a beautiful and super-healthy salad with only a little amount of calories, but full of crunchy flavours!

DSC_6721

This salad can definitely be a very satisfying low-cal lunch, low in fat and carb, but rich in fibres, potassium, protein and vitamin C.
As a side dish, it goes well with several courses and you can serve it with feta cheese, if you prefer a richer kind of salad.
If I were to imagine this salad as a dress, it would be a feel-good garment made ​​of a strong natural fibre, with a very cheerful but elegant floral pattern. Suitable for mid-season, with a comfortable slimming line. Definitely a perfect fit!… I know, It’s just a salad! 🙂

Corn salad with red cabbage, fava beans and apples.

Ingredients

Preparation: 15 minutes

For 2 servings

60 g (2 oz) corn salad (or lamb’s lettuce)

a handful of almonds, shelled

50 g (1.76 oz) fresh fava beans (with the pods removed)

2 small apples, washed

130 g (4.58 oz) red cabbage

the juice of 1/2 a lemon

salt and pepper to taste

4 tablespoons of extra virgin olive oil to taste

DSC_6693

Method.

1. Wash, and clean and dry the corn salad.

2. Wash, and slice the cabbage finely and arrange it on the plates.

3. Place the fava beans over the cabbage, then add the salad leaves.

DSC_6668

4. Cut and marinate the apples in the juice of half a lemon for a few minutes. Then, mix the apples and the almonds with the salad (breaking some almonds into pieces).

DSC_6673

DSC_6680

DSC_6724

5. Season with plenty of extra virgin olive oil, salt and pepper.

DSC_6709

DSC_6742

Insalata croccante con cavolo rosso, fave e valerianella.

Ingredienti

Per 2 persone

Preparazione:15 minuti

60 g di valerianella

una manciata di mandorle sgusciate

50 g di fave fresche, senza scorza

2 mele, lavate

130 g di cavolo rosso

il succo di mezzo limone

sale e pepe q.b.

4 cucchiai di olio extravergine d’oliva q.b.

Preparazione.

1. Lavate e asciugate la valerianella.

2. Lavate il cavolo e tagliatelo finemente. Sistematelo sul fondo dei piatti.

3. Aggiungete le fave, posizionatele sopra il cavolo con la valerianella.

4. Aggiungete le mandorle (sbriciolandone solo alcune) con le mele tagliate a pezzetti e precedentemente marinate nel succo di mezzo limone per qualche minuto.

5. Condite con abbondante olio extra vergine d’oliva, sale e pepe.

Rich Chocolate Tart with Fresh Raspberries…Yes, but it’s different!

Vegan, dairy-free, gluten-free, egg-free, with only a little refined sugar and absolutely delicious!!!!

I must admit I was a little bit sceptical about vegan desserts, I thought that without dairy products, desserts would just taste dull! So I decided to give it a try and make this vegan chocolate tart, because I usually like to try things before I make a judgement, especially when I am talking about recipes. I am glad to say that I was wrong! I might even dedicate an entire post to the lovely vegan chocolate ganache that I’ve made for this recipe, because I think it deserves a little place on its own in this blog and a few more words given over to it.

So, today we are going to prepare a delicious mini chocolate tart with a lot of fresh raspberries on top! As a filling, I made a rich dark chocolate ganache. Usually, the chocolate ganache is prepared with heavy whipping cream or butter, I used rice milk instead and I thickened the sauce with a little cornstarch. The result is a velvety smooth chocolate filling that contains little refined sugar and is dairy-free.

This is an amazing vegan dessert that everyone can enjoy!

DSC_5795

DSC_5793

Rich Chocolate Tart with Fresh Raspberries

 Ingredients

For the pastry

2-3 servings. 

50 g (1.7 oz) skinless almonds (or hazelnuts, if you prefer)

60 g (2 oz) dark chocolate (organic, with 70% cocoa solids)

60 g (2 oz) rice flour

30 g (1 oz) of potato starch

1/2 teaspoon of baking powder

2 tablespoons of sunflower oil

1 tablespoon of agave syrup (or 1 tablespoon of honey, if you are not on a vegan diet)

a pinch of salt

For the dark chocolate ganache 

60 g (2 oz) of dark chocolate (organic, 70 % cocoa)

100 ml (3.38 fl oz US, 0.175 pt UK) rice milk (replace with soya or almond milk, if you prefer)

1 tablespoon of agave syrup (or 2 tablespoon of honey, if you are not on a vegan diet)

1/2 a tablespoon of cornstarch

To garnish

100 g (3.5 oz) raspberries, fresh and washed

a few chocolate chips

DSC_5601

Method. 

For the pastry. 

Preparation: 20 minutes

Cooking: 15 minutes

1. In a double boiler (bain-marie), melt 60 g (2 oz) of dark chocolate.

DSC_5626

2. Finely grind the almonds using a food processor, until you get a fine paste.

DSC_5619

3. In a small bowl, sift the flour and the potato starch using a fine strainer. Then, mix in the melted chocolate, the almond paste, 1/2 a teaspoon of baking powder, a pinch of salt, 2 tablespoons of sunflower oil and 1 tablespoon of agave syrup (or 1 tablespoon of honey).

DSC_5630

4. Place the dough in the refrigerator for 15 minutes.

DSC_5632

5. Lightly grease the base of a small cake pan (15-17 cm or 6 – 7 inches of diameter) and bake at 170 ° C (338° F) for about 15 minutes.

DSC_5643

For the chocolate ganache.

Preparation: 20 minutes

1. In a double boiler (or bain-marie), melt 60 g (2 oz) of dark chocolate.

2. In a small pan, heat 100 ml (3.38 fl oz US) of rice milk and add it (gradually and stirring) to the melted chocolate (both must be warm).

DSC_5639

3. In another pan, mix 1/2 a tablespoon of cornstarch with 1 tablespoon of the chocolate mixture and stir well. Gradually add the rest of the chocolate mixture, then cook over a low heat and stir until the chocolate ganache has thickened (it will take only a few minutes).

DSC_5646

4. Turn off the heat, add 1 tablespoon of agave syrup (or 2 tablespoon of honey) and mix well. Let cool.

DSC_5650

To garnish.

Refrigeration: 30 minutes

1. Pour the chocolate ganache into the base of the tart, then put the cake in the refrigerator for about 30 minutes.

DSC_5689

2. Garnish with plenty of raspberries and some chocolate chips.

DSC_5698

DSC_5794

DSC_5800

DSC_5808

 Crostata di lamponi con ganache di cioccolato fondente.

Ingredienti

Per la base.

2-3 porzioni.

50 g di mandorle, senza pelle (oppure nocciole, se preferite)

60 g di farina di riso

30 g di fecola di patate

60 g di cioccolato fondente bio ( con 70% di cacao)

1/2 cucchiaino di lievito per torte

2 cucchiai di olio di semi di girasole

1 cucchiaio di sciroppo d’agave (oppure 1 cucchiaio di miele bio, se non seguite una dieta vegana)

un pizzico di sale

Per la ganache al cioccolato fondente

100 ml di latte di riso (oppure latte di mandorle, soia o latte normale)

1 cucchiaio di sciroppo d’agave (oppure 2 cucchiai di miele bio, se non seguite una dieta vegana)

60 g di cioccolato fondente bio (con 70% di cacao)

1/2 cucchiaio di amido di mais

Per guarnire

100 g di lamponi (freschi e ben lavati)

un po’ di scaglie di cioccolato per decorare

Preparazione.

Per la base.

1. Fate sciogliere 60 g di cioccolato fondente a bagnomaria.

2. Tritate molto finemente le mandorle usando un tritatutto.

3. In una terrina, setacciate la farina e la fecola di patate usando un colino molto fine. Aggiungete il cioccolato sciolto, la pasta di mandorle, il lievito per dolci, un pizzico di sale, due cucchiai d’olio di semi di girasole e 1 cucchiaio di sciroppo d’agave (oppure 1 cucchiaio di miele).

4. Impastate bene e mettete in frigo per 15 minuti.

5. Ungete leggermente la base di una piccola teglia (15-16 cm di diametro) e infornate a 170° per 15 minuti.

Per la ganache al cioccolato.

1. Fate sciogliere 60 g di cioccolato fondente a bagnomaria.

2. Scaldate 100 ml di latte di riso in un pentolino e unitelo al cioccolato ancora caldo, mescolando bene.

3. In un altro pentolino, unite una piccola quantità di latte di riso al cioccolato con mezzo cucchiaio di amido di mais (mescolando energicamente). In modo molto graduale, aggiungete tutto il latte al cioccolato, poi fate rassodare la ganache sul fuoco a fiamma bassa, per qualche minuto (continuando a mescolare).

4. Spegnete il fuoco e aggiungete 1 cucchiaio di sciroppo d’agave (oppure 2 cucchiai di miele). Mescolate ancora, poi lasciate raffreddare.

 Per guarnire.

1. Versate la crema sulla base della crostata e mettete in frigorifero per 30 minuti.

2. Guarnite con un doppio strato di lamponi e scaglie di cioccolato.

Gluten-free Buckwheat Gnocchi (Step by Step)

I adore gnocchi! Gnocchi with pesto has been my favourite pasta dish since I was a kid. In Italy there are numerous variations of this wonderful pasta, some of which are really colourful and tasty. Today we are going to prepare a gluten-free version made with buckwheat flour. This flour might be a little expensive, but I decided to use it because of the benefits that introducing gluten-free meals in our every-day diet have. Even though I don’t have intolerances or allergies, but also because I think it’s delicious. Of course, it is also a good alternative to traditional gnocchi for celiac people.

DSC_4831

 A few words about Buckwheat. 

Buckwheat is related to sorrel, knotweed and rhubarb. The seeds are fruit seeds, not cereals, very similar to sunflower seeds, and with a distinctive triangular shape. They are rich in protein, important minerals ( iron, phosphorus, zinc, selenium and potassium.) and vitamins B. Buckwheat is normally used in flour or grains. The flour is very tasty and perfect for pasta recipes, in fact, in Italy it is widely used in many traditional dishes.

DSC_4890

Ingredients

Preparation: 25 minutes

Potatoes Cooking time: 15-20 minutes + time to cool

Gnocchi Cooking time: 5 minutes

Serves 4-5

1 kg (35.2 oz) large potatoes

200 g (7.05 oz) buckwheat flour (and a little bit more for dusting)

50 g  (1.76 oz) potato starch

salt to taste

 Tools 

wooden board or table

A large pan (with a steaming basket  or you can use a steamer if you prefer this cooking method)

a large sieve (to sift the flour)

potato ricer (or a potato masher)

a knife

a fork (or a gnocchi board)

DSC_4828

 Method

1.Wash, then steam or boil the potatoes for 15-20 minutes (if you boil, put them in cold salted water and then, bring to the boil). Mash the potatoes and let cool. Once they have cooled down, add the flour and starch (previously sifted and mixed).

DSC_4863

DSC_4864

2. Combine all the ingredients, add some salt and work until you get a soft and smooth dough (adding some flour, if necessary).

DSC_4871

3. Dust the board, then divide the dough into 4-5 equal pieces and roll each piece into long ropes (the ropes should be 1,5 cm [0.39 uk inches] high). Cut each rope into small pieces (3 cm [ 1.18 uk inches] long and 1,5 cm [ 0.39 uk inches] high).

DSC_4878

DSC_4882

4. Use a fork to indent the gnocchi by pressing the centre and roll each piece on the fork (watch the video below) , in this way the gnocchi will absorb the condiment better.

DSC_1055

DSC_1060

Watch the video:

5. Add more flour to prevent the gnocchi from sticking together and lay them a little apart from each other on a table, previously covered with clean kitchen cloths (I used a plate because I prepared only one portion). Cook as soon as possible.

DSC_4965

 Tips.

Boil in plenty of salted water for a few minutes. Once they rise, gently drain and season as you prefer (serve these wonderful gnocchi with pesto or with a nice tomato sauce. If you don’t follow a vegan or a low-cal diet I suggest you try them with a gorgonzola sauce).

DSC_4981

Gnocchi di patate e grano saraceno.

Preparazione: 25 minuti

Cottura delle patate: 15-20 minuti + il tempo di farle un po’ raffreddare

Cottura degli gnocchi: 5 minuti

Ingredienti

per 4-5 persone

1 kg di patate farinose

200 g di farina di grano saraceno ( e un po’ di più per infarinare)

50 g di fecola di patate

sale q.b.

Utensili

una spianatoia di legno abbastanza grande

Una pentola grande (con cestello per cottura a vapore oppure una  vaporiera, se preferite questo tipo di cottura)

un setaccio o un colino grande (per setacciare la farina)

uno schiaccia patate

un coltello

una forchetta

 Preparazione

1. Lavate bene le patate e fate cuocere a vapore per 15-20 minuti (o lessatele mettendole in acqua fredda salata e portando a bollore). Schiacciate le patate e lasciate raffreddare. Aggiungete la farina e la fecola (setacciate e mescolate in precedenza).

2. Amalgamate gli ingredienti con un po’ di sale, fino ad ottenere un impasto morbido ed uniforme. Nel caso fosse necessario, aggiungete un po’ di farina.

3. Infarinate la superficie della spianatoia, dividete l’impasto in 4-5 pezzi uguali e rotolate ogni pezzo fino a formare dei filoncini molto lunghi e alti 1,5 cm. Tagliate ogni cilindro di pasta in piccoli gnocchi (lunghi 3 cm e alti 1,5 cm circa).

4. Usate una forchetta per rigare gli gnocchi (guarda il video).

5. Appoggiate gli gnocchi distanti tra loro su un tavolo coperto da strofinacci puliti, leggermente infarinati (nelle foto uso un piatto perché ho preparato una porzione sola).

 Note.

Per la cottura consiglio di far bollire in acqua abbondante e salata per qualche minuto. Poi scolate e condite come preferite. Un ottimo condimento per gli gnocchi di grano saraceno potrebbe essere una salsa al gorgonzola, oppure condite semplicemente con del buon pesto o una salsa al pomodoro, se seguite una dieta vegana o a basso contenuto calorico.

Special Stuffed Calamari (Quinoa Recipe)

DSC_4810

Stuffed calamari (calamari ripieni) is a very popular dish in Italy. Normally, the recipe is made with bread stuffing and some variation on the other ingredients. This time, we are going to prepare a quinoa stuffing with peas, anchovies and garlic. It is a wonderful starter and a great main meal served with vegetables. It might seem a little complex to prepare, but it’s such a delicious full-flavoured dish that it’s worth a try!

Tip. Calamari ( squid) should be fresh and properly cleaned before you start the preparation. It’s very important not to over cook the seafood, because calamari can become very chewy and unpleasant to eat. If that happens continue to cook them until they become tender again (in this case, remember to add more wine and some vegetable or fish stock).

DSC_4813

 Stuffed Calamari (quinoa recipe)

Ingredients 

for 3 servings

Preparation: 40 minutes

400g (14.1 oz) cleaned calamari (squid)

1 clove of garlic

2 tablespoons extra virgin olive oil

1 splash of white wine (non-acidic)

salt and pepper to taste

For the filling

50 g (1.76 oz) quinoa (uncooked)

3 tablespoons extra virgin olive oil

2 cloves of garlic

2 anchovies

3 tablespoons finely chopped fresh parsley

20 g (0.7 oz) of frozen peas

1 egg

30 g (1.05 oz) grated Parmesan cheese

White wine (good quality)

Salt and pepper to taste

 Method

1. Wash the quinoa, using a strainer under running water, for a few minutes (to remove the natural bitter taste).

DSC_4725

2 . Cook for 15 minutes in 200 ml (6.76 us oz fl, 0.35 uk pt) of water, then cover with a lid and set aside.

3.  Separate the tentacles from the top of the body of the calamari. Finely chop the tentacles.

DSC_4746

DSC_4747

4. Chop two cloves of garlic and two anchovies and gently fry them over a low heat with three tablespoons of extra virgin olive oil.

DSC_4756

5. Add the chopped tentacles with the peas and (after a couple of minutes) drizzle with a little bit of white wine.

DSC_4760

DSC_4766

6. Add the quinoa with two tablespoons of parsley, then stir and after a few minutes turn off the heat.

DSC_4770

7. Combine the ingredients with an egg, the Parmesan cheese, some salt and pepper and mix well. Stuff the calamari using a teaspoon (and your fingers) or a piping bag ( fill only 2/3 to avoid braking the calamari during the cooking time) . Seal the calamari with toothpicks.

DSC_4772

DSC_4774

DSC_4783

DSC_4795

8. Put the calamari in a frying pan with two tablespoons of extra virgin olive oil, a chopped clove of garlic, a splash of white wine and season with salt and pepper. Cook for 10 minutes at a medium heat,  after 5 minutes add a tablespoon of parsley and stir. Serve warm.

DSC_4803

DSC_4811

Calamari ripieni con quinoa.

 Ingredienti

per 3 persone

400 g di calamari puliti (senza dente)

1 spicchio d’aglio

2 cucchiai di olio extra vergine d’oliva

1 spruzzata di vino bianco (non acido)

sale e pepe q b

 Per il ripieno

50 g quinoa (cruda)

3 cucchiai di olio extra vergine d’oliva

2 spicchi d’aglio

3 cucchiai di prezzemolo (tritato finemente)

20 g di piselli surgelati

Sale e pepe q b

1 uova

30 g Parmigiano Reggiano grattugiato

vino bianco (non acido) q b

2 acciughe sott’ olio (alici)

 Preparazione

1. Lavate la quinoa, utilizzando un colino sotto l’acqua del rubinetto, per qualche minuto (questa operazione serve a togliere il sapore amaro della quinoa).

2. Fate bollire per 15 minuti in 200 ml d’acqua, poi spegnete il fuoco, coprite con un coperchio e mettete da parte.

3. Usando un coltello, separate i tentacoli dalle tasche dei calamari. Tritate finemente i tentacoli.

4. Tritate e fate soffriggere a fuoco basso due spicchi d’aglio e due acciughe con tre cucchiai di olio extra vergine d’oliva.

5. Aggiungete i tentacoli tritati con i piselli e annaffiate con un po’ di buon vino. Fate ritirare a fuoco lento.

6. Aggiungete la quinoa con due cucchiai di prezzemolo, mescolando per qualche minuto e poi spegnete il fuoco.

7. Unite agli ingredienti un uovo, del parmigiano, sale, pepe e mescolate bene. Riempite i calamari usando un cucchiaino o la saccapoche (riempite solo 2/3, per evitare che si rompano durante la cottura). Chiudete con degli stuzzicadenti.

8. Mettete i calamari in una padella con due cucchiai d’olio, uno spicchio d’aglio tritato, uno spruzzo di vino bianco e un po’ di sale e pepe. Fate cuocere per 10 minuti a fuoco medio, aggiungendo un cucchiaio di prezzemolo dopo 5 minuti. Spegnete e servite.

Gluten-free Valentine’s Day Menu

Some ideas for a romantic dinner for two…

Steamed prawn and bell pepper kebabs (divide the ingredients by two to make 4 kebabs)

DSC_3570

Salmon with rocket and oranges

DSC_3892

Double chocolate panna cotta with caramel sauce (single serving to share)

DSC_4151   or

Bavarian cream with chocolate caramel sauce

(divide by two the ingredients to make a 2-servings dessert, but make the sauce as indicated in the recipe because it’ s already a small quantity)

DSC_5894