Tag Archives: Food

How To Make Perfect Pastry (Basic Shortcrust Pastry Recipe).

A perfect shortcrust should have a light crumbly texture which melts in the mouth when you bite into it and tastes heavenly! This is why shortcrust pastry is the most popular when it comes to home-made desserts. Today we are going to look at the basics of the preparation method, including some possible variations.

This is a fairly simple method, but there are some important steps to follow in order to get it right. To obtain a crumbly and light pastry it is important to handle the butter and flour as little as possible, to avoid warming the pastry up with your hand. If the butter melts too much during the preparation method the pastry will change consistency and the result will be heavier than it should be.

DSC_3769

Tips.

1. If the dough is too dry you can add 1/2 egg white or a few tablespoons of water.

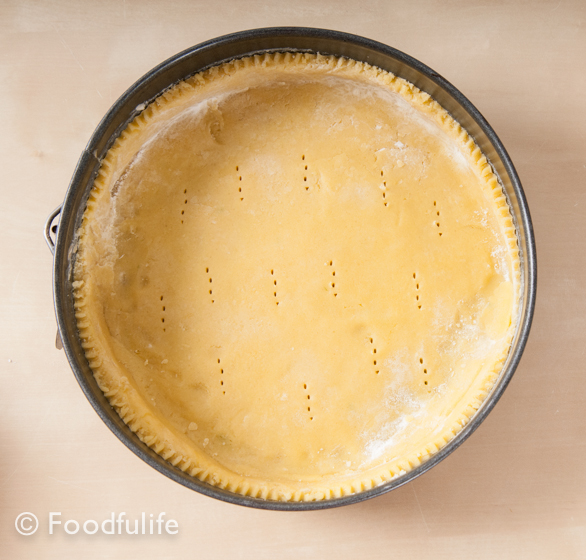
2. The ideal thickness for the base of a tart is about 3-5 mm, while 1/2 cm is the ideal thickness for a cookie dough.

3. It is possible to freeze the pastry and use it within a month.

Shortcrust Pastry Basic Recipe.

Medium difficulty

Ingredients

for a 24 cm in diameter cake tin (for 6 servings)

250 g plain flour, sifted

125 g butter, cut into small pieces

100 g sugar

3 egg yolks

aromas (lemon zest or orange zest, vanilla seeds, vanilla extract etc. ..)

a pinch of salt

DSC_3653

Method. 

1. On a board, using a spatula, mix the butter with the sugar.

DSC_3659

2. Add the egg yolks, one at a time.

DSC_3665

3. Add the sifted flour and the aromas. Knead well using a spatula and your hands (this operation should require as little time as possible).

DSC_3674

DSC_3680

4. Roll out the dough on a sheet of baking paper, cover with a second sheet, then fold it and place in refrigerator for at least 30 minutes.

DSC_3685

DSC_3690

5. After the required amount of time, remove the dough from the refrigerator. Beat the dough with a rolling pin to soften its consistency and proceed with your recipe.

DSC_3703

DSC_3739

DSC_3771

Basic variations.

For a more crumbly pastry:
Use hard-boiled yolks instead of raw and/ or add more butter to the recipe. If you add butter remember that you can add up to 80% of the total weight of the flour (e.i. if you use 500 g of flour, you can use up to 400 g of butter).

For a lighter pastry:
You can decrease the butter down to a minimum of 30% of the total weight of the flour used in the recipe.

For a crunchier pastry:
Increase the dose of sugar, bearing in mind that the dough will be sweeter.

For a finer pastry:
Use icing sugar instead of caster sugar. You can also use Italian flour 00, which is finer than plain flour.

For a drier pastry (e.g. to make cookies):
Use whole eggs (whites and yolks), adding 25 g of sugar and 25 g of butter.

For a taller pastry (for example to make cookies):
Add 1 teaspoon of baking powder to the dough.

Also see Cooking Method: Shortcrust Pastry Tart Case

Preparazione Base Della Pasta Frolla (Metodo A Mano).
Oggi vedremo insieme la preparazione base per fare la pasta frolla, la pasta più utilizzata per i dolci fatti in casa. E’ un metodo abbastanza semplice, che però comporta un minimo di attenzione nella preparazione e nella cottura, specialmente se si fanno delle crostate che richiedono una cottura in bianco, cioè senza il ripieno.
Per ottenere una buona pasta frolla, friabile e leggera al punto giusto, è importante che si proceda con gli ingredienti ancora freddi e si eviti di maneggiare troppo il burro e la farina durante la lavorazione, per non riscaldarli.

Note.

1. Nel caso l’impasto risultasse troppo asciutto si può aggiungere 1/2 albume oppure qualche cucchiaio d’acqua, per dare più elasticità.

2. E’ possibile surgelare la pasta frolla e utilizzarla entro un mese dal congelamento.

3. Se volete prepare la base di una crostata lo spessore ideale è di 3-5 mm e invece 1/2 cm è lo spessore ideale per i biscotti.

Ricetta base per la pasta frolla.

Media difficoltà

Ingredienti

per foderare uno stampo 24 cm di diametro (per 6 persone)

250 g di farina 00

125 g di burro a pezzetti

100 g di zucchero

3 tuorli d’uova

aromi (la buccia di limone o arancia grattugiata, i semi di vaniglia ecc..)

un pizzico di sale

Preparazione.

1. Su una spianatoia e utilizzando una spatola, per non riscaldare l’impasto, tagliate e amalgamate il burro con lo zucchero.

2. Aggiungete i tuorli, uno alla volta, al resto degli ingredienti.

3. Aggiungete gli aromi e la farina. Lavorate bene tutti gli ingredienti, sempre con la spatola e aiutandovi con le mani solo se necessario.

4. Stendete l’impasto su un foglio di carta da forno e ricopritelo con un secondo foglio. Piegate l’impasto a portafoglio e mettetelo nel frigo per almeno 30 minuti.

5. Passato il tempo necessario, togliete l’impasto dal frigorifero, battetelo con un matterello per ammorbidirlo e procedete con la vostra ricetta.

Possibili varianti nella consistenza.

1. Per una pasta frolla più friabile:
Utilizzate nell’impasto i tuorli delle uova sode, invece che crude e (oppure) aumentate la dose di burro. Se aggiungete il burro, non bisogna superare l’80% del peso della farina (cioè su 500 g di farina si possono utilizzare fino a 400 g di burro).

2. Per una pasta frolla più leggera:
Si può diminuire il burro fino al 30% dell’intero peso della farina utilizzata nella ricetta.

3. Per una pasta frolla più croccante:
Aumentate la dose di zucchero, tenendo presente che l’impasto sarà più dolce.

4. Per una pasta frolla più fine:
Utilizzate lo zucchero a velo al posto di quello semolato.

5. Per una pasta frolla più secca (ad esempio per fare i biscotti):
Utilizzate le uova intere (albumi e tuorli), aggiungendo 25 g di zucchero e 25 g di burro all’impasto.

6. Per una pasta frolla più gonfia (ad esempio per fare i biscotti):
Aggiungete 1 cucchiaino di lievito per dolci all’impasto.

Vedere anche Cottura in bianco della pasta frolla

Traditional Recipe: Baked Peppers Au Gratin

A great dish to serve if you have a large number of guests to feed, because it is so easy to prepare and cook. Baked Peppers Au Gratin are a wonderful appetiser and side, served with meat or seafood, but you can have them as a vegetarian meal, with a nice salad. You can prepare a gluten-free version of this Italian traditional dish using instant polenta, instead of bread crumbs. You can also make a vegan version without the cheese.

DSC_1181

Serve Peppers Au Gratin hot or cold, they are delicious either way! But in the summer I prefer this dish cold, straight from the fridge, because the peppers need some time to absorb all the different flavours.

This is the right season to eat fresh bell peppers and there are plenty of choices when it comes to great traditional recipes with this wonderful ingredient.
Here are some other recipes using bell peppers that I have published recently on Foodfulife:

La peperonata

Roasted Bell Peppers with Garlic Vinaigrette

DSC_1210

Baked Peppers Au Gratin.

Preparation time: 10 minutes

Cooking time: 40 minutes

6 servings

Easy

Ingredients

3 large bell peppers (red and yellow)

6 tablespoons breadcrumbs

80 g freshly grated Parmesan cheese

1 tablespoon of fresh parsley, finally chopped

1/2 a tablespoon of dried oregano

2-3 cloves of garlic, crushed and finally chopped

salt and pepper to taste

extra virgin olive oil

DSC_1087

Method.

1. In a small bowl, mix the herbs with the breadcrumbs, the grated cheese, the garlic and season with some salt and pepper.

DSC_1099

2. Wash and dry the bell peppers.

DSC_1041

DSC_1053

3. Using a knife, cut the peppers in half and remove the stem, the seeds and the white parts.

DSC_1071

4. Place the peppers onto an oven tray, previously greased with a couple of tablespoons of extra virgin olive oil. With a spoon, spread the breadcrumb mixture evenly onto the peppers.

DSC_1104

5. Bake in the oven at 200°C (392° F) , until the peppers are tender and the breadcrumb mixture becomes very crunchy.

DSC_1209

DSC_1194

DSC_1193

Peperoni Gratinati Al Forno.

Tempo di preparazione: 10 minuti

Tempo di cottura: 40 minuti

6 persone

Facile

Ingredienti

3 peperoni grandi (rosso e giallo)

6 cucchiai di pangrattato

80 g di Parmigiano Reggiano, grattugiato fresco

1 cucchiaio di prezzemolo fresco, tritato finemente

1/2 cucchiaio di origano secco

2-3 spicchi d’aglio, schiacciato e tritato finemente

sale e pepe

olio extra vergine di oliva

Preparazione.

1. In una terrina, mescolate il pan grattato con l’aglio, l’origano, il prezzemolo, il parmigiano e un pò di sale e pepe.

2. Lavate e asciugate bene i peperoni.

3. Con un coltello, tagliate e rimuovete la calotta superiore del peperone. Tagliate a metà gli ortaggi e rimuovete la parte interna, con i filamenti e i semi.

4. Disponete i peperoni sopra una teglia, unta con un filo d’olio. Riempite i peperoni con il composto di pangrattato e sapori, ma senza esagerare.

5. Condite con un po’ d’olio e infornate a 200° C. Quando i peperoni saranno morbidi e il ripieno croccante spegnete il fuoco.

Traditional Recipe: Saffron Risotto

Saffron Risotto (Risotto Allo Zafferano) is a Lombard recipe, much appreciated in the North of Italy for its wonderful delicate flavour and also because is one of the simplest risotto recipes to make. This amazing risotto is usually served on its own, without meat or fish and it has a lovely saffron flavour, well complemented with the Parmesan cheese, which is added at the final stage of the recipe, like in most Italian risotto dishes.

DSC_0627

Saffron Risotto is often confused with Milanese Risotto (Risotto alla Milanese), another renowned Lombard recipe; in both these risottos we use saffron as a main ingredient but there are some differences in the ingredients.

Tips.

1. It is very important to only use good quality products, in order to make a delicious risotto.

2. Also see How To Make A Perfect Risotto

DSC_0660

Saffron Risotto (Risotto allo Zafferano) 

Medium difficulty

Preparation time: 5 minutes (not considering the broth)

Cooking time: 25-30 minutes

Ingredients

For 4 servings

350 g (12.3 oz) Carnaroli rice or Arborio rice

a pinch of saffron (enough to colour the rice of a bright yellow)

1 large onion, very finely chopped

1 glass of good white wine (not acidic, this is very important!)

150 g (5.3 oz)  freshly grated Grana Padano cheese

125 g (4.4 oz) good quality fresh butter

1 litre (33, 8 fl oz us) hot vegetable broth (see below)

For vegetable broth

1 large carrot

1 large onion

1 celery stalk (also use the leaves, if you have them)

salt and pepper to taste

Method.

1. In a large pan, prepare the vegetable broth. Wash, clean and roughly chop the vegetables, then fill the pan with plenty of water and cook the vegetables until tender. Season with some fine sea salt (do not exceed), then sift the broth and remove the vegetables.

DSC_0600

2. Sauté the onion in 80 g of butter, over a low heat for about 10-15 minutes.

DSC_0605

3. Add the rice and fry for a few minutes over a medium heat, then pour in a glass of white wine and stir. Shimmer until all the wine evaporates.

DSC_0609

4. Lower the heat and add the hot broth (a little at a time), stirring constantly. Let the broth evaporate and continue adding the broth and stirring, until the rice is creamy and properly cooked. During the cooking time add the saffron (diluted in a little bit of warm vegetable broth).

DSC_0615

DSC_0620

5. Turn off the heat and add the finals ingredients to the risotto. Add the rest of the butter, 3-4 tablespoons of grated Grana Padano and season with salt and pepper ( taste it and season only if needed), then stir and cover with a lid. Let the risotto rest for a few minutes and serve.

DSC_0645

DSC_0639

DSC_0629


How To Make A Perfect Risotto

Risotto is one of the finest Italian dishes and is appreciated all over the world. There are endless variations. Each region has its own traditional risotto recipes made with seafood, meat or vegetables. Today we are going to explore the method to make a perfect risotto, the Italian way!

Four important steps.

To make a good risotto it is important to follow each recipe step by step. There are 4 basic steps in the preparation process of each risotto:

1. Sauté the onions

2. Fry the rice

3. Cook the risotto

4. Let the risotto rest

Today we are going to see each of these steps in depth.

DSC_0597

A few notes on the preparation process.

1. The preparation time and the ingredients will vary depending on the recipe.

2. During the whole process you have to constantly stir the risotto, therefore it’s important to prepare all the ingredients before you start cooking.

3. Don’t reheat the risotto because the rice will become chewy and dry. Prepare the risotto and serve it.

DSC_0594

Method.

1. Sauté the onions. Sauté the onions in butter over a very low heat, until they are very tender and almost transparent.

Notes. The onions have to dissolve in your mouth when you taste the risotto. You can replace the onions with shallots, spring onions or garlic, depending on the recipe.

DSC_0607

2. Fry the rice. When the onions are ready, add the rice and then fry it over a medium heat for a few minutes (stir constantly).

DSC_0608

3. Cook the risotto. After frying the rice, add the wine.  Once the wine flavour is absorbed and the alcohol evaporated, add the hot broth (usually a full ladle at a time) and cover the rice with it. Continue cooking and stirring. Once the liquid is almost completely absorbed, add more broth until you reach the ideal cooking consistency.

DSC_0602

Notes. Use hot broth, because a cold broth will lower the temperature and compromise the cooking process.

DSC_0613

4. Let the risotto rest. When the risotto is creamy and properly cooked, add the final ingredients (usually butter and cheese), stir well, cover with a lid and let the rice rest for a few minutes. Now the risotto is ready to be served.

Note. This will make the risotto very creamy and tasty.

Also see Traditional Recipe: Saffron Risotto

DSC_0639


Traditional Recipe: Roasted Bell Peppers With Garlic Vinaigrette

Bell peppers are delicious, rich in vitamin C and antioxidants and come in a variety of colours. In Italy we usually cook red and yellow peppers and we don’t use green peppers as much, because they are more acidic and bitter in taste. Bell peppers are usually roasted, fried, grilled or stewed with different ingredients. Today we are going to roast the peppers and season them with a light vinaigrette made with extra virgin olive oil, a splash of balsamic vinegar and enriched with fresh herbs and garlic.

Roasted peppers are a very simple but effective appetiser or side dish, I personally really like them and I could eat lots! If you prefer a more complex dish you can use them to make a sauce to complement or season pasta and meat dishes, or simply used them as a tasty ingredient in salads.

DSC_0574

Roasted bell peppers with garlic vinaigrette.

medium difficulty

Ingredients

for 4 people

3 large bell peppers.

DSC_0545

For the garlic vinaigrette.

4 tablespoons of extra virgin olive oil

1 clove of garlic, crushed

1/2 tablespoon of dried oregano

1/2 tablespoon of finely chopped fresh parsley

1 tablespoon of good balsamic vinegar

salt and pepper to taste

Method.

1. Wash and dry the bell peppers.

DSC_0523

2. Roast the whole peppers in the oven at 200°C (392° F ) on a baking sheet (The cooking time will vary depending on the size and thickness of the peppers. When the skin starts darkening slightly and detaching from the flesh, the peppers are ready).

DSC_0531

3. Once the peppers are slightly soft, turn off the oven. Put the hot peppers in plastic bags (or an airtight container) and seal well (In this way, the steam will make removing the skin from the flesh mush easier).

4. Let cool, then remove the pepper from the bag and throw away the water created from the steam. Remove the skin on each pepper, using a small sharp knife.

DSC_0538

5. Slice the peppers vertically into two, then remove and discard the stem and the seeds. Slice each pepper vertically into 8 pieces and serve cold with the garlic and herb vinaigrette.

DSC_0546

DSC_0579

For the vinaigrette.

Mix 4 tablespoons of extra virgin olive oil with the herbs, the garlic and some salt and pepper. Season and serve.

Tip. For extra flavour you can add half a tablespoon of anchovy paste to the sauce.

DSC_0543

DSC_0571

Peperoni arrosto con vinaigrette all’ aglio.

media difficoltà

Ingredienti

Per 4 persone

3 peperoni abbastanza grossi (rossi e gialli)

Per la vinaigrette all’ aglio

4 cucchiai di olio extra vergine di oliva

1 spicchio d’aglio, sbucciato e ben schiacciato

1/2 cucchiaio di origano essiccato

1/2 cucchiaio di prezzemolo fresco tritato

1 cucchiaio di aceto balsamico

sale e pepe q.b.

Preparazione.

1. Lavate bene i peperoni e asciugateli.

2. Mettete i peperoni interi a cuocere in forno a 200° C ( uso una teglia grande ricoperta da un foglio di carta da forno). Il tempo di cottura varierà a seconda della grandeza e dello spessore dei peperoni; quando la buccia si colorirà e si staccherà dalla polpa, i peperoni sono pronti.

3. Mettete i peperoni ancora caldi in un contenitore con il coperchio, poi chiudete bene e lasciate raffreddare (con questo metodo il vapore farà staccare con più facilità la buccia dalla polpa).

4. Aprite e buttate via l’acqua che si è formata per il vapore. Con un coltello, levate la buccia ai peperoni.

5. Tagliate a metà i peperoni e rimuovete la parte interna con i semi. Tagliate ancora i peperoni in verticale fino ad ottenere 6-8 fette lunghe per peperone.

Per la vinaigrette.

Mescolate l’olio extra vergine di oliva con le erbe, l’aglio, il sale e pepe. Condite i peperoni e servire.

Tip. Per insaporire ulteriormente si può aggiungere mezzo cucchiaio di pasta d’acciughe al condimento.

DSC_0588

Traditional Recipe: Focaccia Alla Genovese (Genoese Focaccia Bread)

DSC_6297

Shiny and crunchy on the outside, soft and moist on the inside, only genoese focaccia has certain qualities which, all together, define one of the best focaccias you can ever taste. Focaccia alla genovese has a distinctive olive oil taste and it requires a long leavening time in order to be so soft and delicious. Apparently, you can only taste the real thing in Genoa and this might depend on several factors (the ingredients, the humidity in the air, the water and, last but not least, the old traditional recipe).

DSC_6304

Today I am going to give you two recipes that you can use to make an amazing focaccia, either with normal yeast or sourdough. In the second recipe, the recipe with normal yeast, I reduced the leavening time to make it more manageable, but, of course, if you let it rise for longer it will get softer and the result will be much better.

Focaccia Alla Genovese (with sourdough).

Ingredients

350 g (12.3 oz) plain flour

6-7 tablespoons of extra virgin olive oil

100 g (3.52 oz) semiliquid sourdough (you can replace the sourdough with 20 g of yeast)

8 g  (0.28 oz) ground sea salt

a pinch of barley malt

water

Method.

1. In a bowl, make a starter by mixing 150 g (5.29 oz) flour with 100 g (3.52 oz) of semiliquid sourdough, a little bit of water, a pinch of barley malt. Mix everything, wrap the bowl with cling film and let rise overnight (at room temperature).

DSC_6146

2. Mix the starter with the rest of the flour, some water, some salt and a tablespoon of olive oil. Knead vigorously until you get a smooth dough (make a moist dough).

DSC_6115

3. Cover with a damp kitchen towel and let rise for, at least, 3 hours. After 3 hours, knead again for a few minutes then let rise for another 3 hours (actually until the dough doubles in volume).

DSC_6118

4. Gently roll out the dough on a baking sheet, previously greased with 3 tablespoons of extra virgin olive oil. Make some wells by pressing with your fingers in the dough.

DSC_6126

DSC_6159

5. Let rise for 2 hours, then brush with plenty extra virgin olive oil mixed with a little bit of water and bake at 190° C (374° F) for about 30 minutes.

DSC_6203

6. Remove from the oven, brush with more olive oil (add water if the dough is too dry), then season with salt and serve.

DSC_6215

DSC_6238

DSC_6263

Focaccia bread (quicker recipe with yeast).

ingredients

350 g (12.3 oz) plain flour

6-7 tablespoons extra virgin olive oil

20 g (0.70 oz) yeast

7 g (0.24 oz) ground sea salt

a pinch of barley malt

some water

Method.

1. In a bowl, combine the yeast with 3 tablespoons of warm water, a pinch of barley malt and 4 tablespoons of flour. Mix well, cover with cling film and let it rise for 1 hour.

2. Mix the yeast with the rest of the flour, a tablespoon of olive oil, some water and a little bit of salt. Knead well until dough is smooth.

3. Allow to rise for 1-2 hours, then roll out the dough with a rolling pin (without pressing too much).

4. Let rise again for 30 minutes, then make some wells in the surface of the dough, by pressing with your fingers. Brush with plenty of extra virgin olive oil mixed with some water and bake at 190° C (374° F) for about 30 minutes.

5. Remove from the oven, brush with more olive oil (add water if the dough is too dry), then season with the rest of the salt and serve.

DSC_6308

Focaccia Alla Genovese (con lievito madre).

Ingredienti

350 g di farina 00

6-7 cucchiai d’olio extra vergine d’oliva

100 g di lievito madre semiliquido

8 g di sale marino macinato

malto d’orzo

acqua q. b.

Preparazione.

1. In una ciotola, mischiate 150 g di farina con 100 g di lievito madre, un po’ d’acqua e pochissimo malto d’orzo. Mescolate energicamente, poi sigillate con la pellicola e lasciate lievitare per tutta la notte (a temperatura ambiente).

2. Unite al lievito il resto della farina, poi aggiungete un pizzico di sale, poca acqua e un cucchiaio d’olio. Lavorate energicamente fino ad ottenere un impasto omogeneo (l’impasto deve essere anche umido).

3. Coprite con un panno umido e fate lievitare per almeno 3 ore. Raggiunta la prima lievitazione, impastate ancora per qualche minuto e lasciate lievitare finché l’impasto sarà raddoppiato di volume.

4. Stendete delicatamente l’impasto su una teglia (unta abbondantemente).

5. Create dei piccoli crateri con le dita e spennellate l’impasto con acqua e olio. Fate lievitare per altre 2 ore, poi infornate a 190° C per circa 30 minuti.

6. Spennellate ancora con olio abbondante (aggiungete un po’ d’acqua se la focaccia è troppo secca), salate e servite.

Focaccia (preparazione veloce).

Ingredienti

350 g di farina 00

6-7 cucchiai di olio extra vergine d’oliva

20 g di lievito di birra

7 g di sale marino macinato

malto d’orzo

acqua q. b.

Preparazione.

1. In una ciotola, mischiate il lievito con 3 cucchiai di acqua tiepida, pochissimo malto d’orzo e 4 cucchiai di farina. Mescolate bene, ricoprite con la pellicola e lasciate lievitare per 1 ora.

2. Unite l’impasto con il lievito al resto della farina, poi aggiungete un cucchiaio d’olio, un po’ d’acqua e un po’ di sale. Mescolate bene, fino ad ottenere un impasto liscio.

3. Lasciate lievitare per 1-2 ore, poi stendete l’impasto con il matterello (senza schiacciarlo troppo) e formate dei piccoli crateri con la punta delle dita.

4. Fate lievitare ancora per 30 minuti, poi spennellate con abbondante olio d’oliva mischiato ad acqua. Infornate a 190° per circa 30 minuti.

5. Sfornate la focaccia e spennellate con olio abbondante (aggiungete un po’ d’ acqua se è secca). Salate con il sale rimasto e servite.

A Delicate Menu For Two

Today’s menu is a delicious dinner for two, with 3 elegant and delicate courses,

quite easy to prepare.

Risotto with fresh peas and corn salad

DSC_7107

Salmon with lime and balsamic vinaigrette

DSC_7011

Mango Panna Cotta

DSC_7980

Serve with chilled white wine.

Prawns With Pineapple In Sweet And Sour Sauce

A touch of exotic flavour in this light stir-fry recipe. By now you all know, I like to prepare different things and vary my diet. Well, this week I thought that a stir-fry would be really lovely to celebrate the warm weather. I could just imagine enjoying this dish with a nice glass of chilled white wine during a lovely sunset, sitting by the sea…Just perfect!!

DSC_3128

Prawns with pineapple in sweet and sour sauce.

Ingredients

For 3 servings

Easy

Preparation: 20 minutes

250 g (8.8 oz) of cleaned and peeled prawns

2 spring onions,  sliced

1 big red bell pepper

350 g (12.3 oz) pineapple (cleaned)

4 radishes (without leaves)

3 tablespoons soy sauce (use a naturally fermented soy sauce, which meets gluten free standards)

2 tablespoons lime juice

3 tablespoons extra virgin olive oil

ground black pepper to taste

fresh chillies to taste (optional)

DSC_3100

Method.

1. Cut and clean the pineapple, removing all the hard parts (including the centre).

DSC_3089

2. Wash and cut the bell pepper, then wash and slice the radishes.

DSC_3099

3. In a frying pan (or a wok), sauté the garlic and the spring onions for a few minutes with 3 tablespoons of extra virgin olive oil.

4. Add the pineapple and bell pepper, cut into small cubes. Fry for 5 minutes, then add the prawns and stir.

DSC_3110

DSC_3122

5. Separately, mix the lime juice with the soy sauce, previously diluted with a little bit of water. Pour into the pan and stir well.

DSC_3117

6. Stir fry over a medium heat for a few minutes, then turn off the heat. Add the crunchy radishes, season with black pepper and serve with a cup of steamed basmati rice. You can add some fresh chillies if you wish.

DSC_3120

DSC_3135-2

DSC_3160

DSC_3155

Gamberi in salsa agrodolce.

Ingredienti

Per 3 persone

Facile

Preparazione: 20 minuti

250 g di gamberi puliti

2 spicchi d’aglio, tagliati a pezzi

2 cipollotti, tagliati a fettine

1 peperone rosso (abbastanza grosso)

350 g di ananas (già pulito)

4 ravanelli (senza foglie)

3 cucchiai di salsa di soia (usate una salsa di soia fermentata naturalmente)

2 cucchiai di succo di lime

3 cucchiai di olio extra vergine d’oliva

pepe q. b.

peperoncino q. b. (facoltativo)

Preparazione.

1. Tagliate e pulite l’ananas, togliendo tutte le parti dure (compresa la parte dura al centro).

2. Lavate, tagliate a pezzi il peperone e affettate i ravanelli. Mettete i ravanelli da parte.

3. In una padella (o un wok), fate soffriggere i cipollotti e l’aglio per qualche minuto, in abbondante olio extra vergine d’oliva.

4. Aggiungete l’ananas e il peperone (tagliati a cubetti abbastanza piccoli). Fate soffriggere per 5 minuti, poi aggiungete i gamberi.

5. A parte, unite il succo di lime alla salsa di soia, precedentemente allungata con un po’ d’acqua. Amalgamate il tutto e versate il condimento in padella. Mescolate bene.

6. Fate friggere a fuoco medio per qualche minuto, poi spegnete il fuoco e aggiungete le fette di ravanelli. Servite con del riso basmati e aggiungete del pepe e/o peperoncino, se lo desiderate.

Mango Panna Cotta

Panna cotta is one of the most appreciated Italian desserts and is well known all over the world. This amazing dessert is probably widely appreciated, not only for its wonderful velvety texture and delicate flavour but also for the simplicity of the preparation method. The traditional recipe is usually prepared with cream, sugar and vanilla pods and served with fruit, chocolate or caramel sauce. In addition to the traditional recipe, there are many variations which include different ingredients, in order to get more creative and complex flavour combinations (we have already prepared a double chocolate panna cotta, in a previous post).

In this recipe, I added the mango pulp with a hint of lemon flavour, to celebrate the warm season. The result is an extremely velvety, exotic and charming dessert!

You’ll love it!!!

DSC_8005

 Tips.

1. To make a slightly lighter dessert you can replace 50 ml of whipping cream with 50 ml of whole milk.

2. It’s important to strain the mango puree well, because the mango pulp contains little hairy bits which can compromise the smoothness and texture of the dessert.

3. In this recipe, I added 1 tablespoon of honey, but half a tablespoon was actually enough for my taste. With half a tablespoon of honey you get a less sweet but more delicate panna cotta, which in my opinion, suits an adult taste best. You can taste the mixture with 1/2 tablespoon of honey and then decide whether you want to add more or not. For children, the preparation with a tablespoon of honey is perfect!

DSC_7961

Mango Panna Cotta.

Preparation: 20 minute + 3 hours in the fridge

Easy

Ingredients

for 2 servings

150g (5.2 oz) mango (+ a few pieces of fresh mango)

1 tablespoon of honey

the zest of half a lemon (or 1 drop of lemon essential oil)

2 gelatine leaves

200 ml ( 6.76 us fl oz) whipping or double cream

a few mint leaves

DSC_7943

Method

1. Leave the gelatine leaves to soak for about 10 minutes.

DSC_7932

2. Pour the cream into a small saucepan with the honey and the lemon zest (or lemon essential oil). Cook over a moderate heat for a few minutes, until the cream is quite hot (but do not boil). Then add the gelatine leaves, stir very well and turn off the heat.

DSC_7934

3. Peel the mango and cut it into pieces. Puree the fruit in a blender with the warm cream.

4. Using a strainer, pour the mixture into small one-portion pots and let cool. Then put the pots in the refrigerator to set for about 3 hours.

DSC_7947

5.  Serve the panna cotta with some fresh mango and a few mint leaves on top.

DSC_7984

DSC_7980

DSC_7988

DSC_7958

Panna Cotta al Mango.

Difficoltà: facile

Preparazione: 20 minuti + 3 ore nel frigorifero

Ingredienti

per 2 panne cotte

150 g di mango (+ qualche pezzo di mango da aggiungere alla fine, come guarnizione)

Scorza di mezzo limone (oppure 1 o 2 goccia di olio essenziale di limone)

1 cucchiaio di miele

2 fogli di colla di pesce

200 ml di panna

qualche foglia di menta

Metodo

1. Mettete a bagno, in acqua tiepida, i fogli di gelatina per 10 minuti.

2. Riscaldate la panna in un pentolino (a fuoco basso) con il miele e la scorza di limone (oppure l’olio essenziale di limone). Aggiungete la gelatina, mescolate per qualche minuto e spegnete il fuoco.

3. Togliete la buccia al mango, tagliatelo a pezzi e frullatelo bene insieme alla panna (ancora calda).

4. Usando un colino, filtrate la panna e versatela negli stampini. Lasciate raffreddare e poi mettete in frigorifero per 3 ore a rassodare.

5. Servite con dei pezzi di mango fresco e qualche foglia di menta.

DSC_8008

Spelt Bread With Home-made Hummus

Today’s brunch was a lovely spelt bread (made following this sourdough pizza base recipe) with home-made  hummus. Yummy!!!!

DSC_7565

DSC_7574

DSC_7593

DSC_7597

DSC_7602

DSC_7621