Category Archives: RESOURCES

Spaghetti with prawns and trumpet gourds

Today’s recipe is suitable for a special occasion like a romantic dinner (remember to halve the ingredients in this case) or an elegant meal. For this recipe I used italian trumpet gourds because, being very sweet, delicate and with a creamy, almost avocado-like texture, they work really well with the prawns in this dish.  If you can’t find any gourds you can use some zucchini / courgettes instead.

DSC_0141

Ingredients

Serves 4

3 medium-sized spring onions

1 sachet of saffron

1 large clove of garlic

a bunch of parsley

a bunch of tarragon

200 g (7 oz) trumpet gourds of Albenga , still green, with delicate skin (you can use zucchini / courgettes if you can’t find the gourds)

200 g (7 oz) prawns (washed and cleaned)

200 g (7 oz) spaghetti

2 tablespoons single cream

2 glasses of good white wine 

3 tablespoons extra virgin olive oil

salt and pepper to taste

DSC_0106

Finely chop the herbs with the spring onions and garlic.

DSC_0111

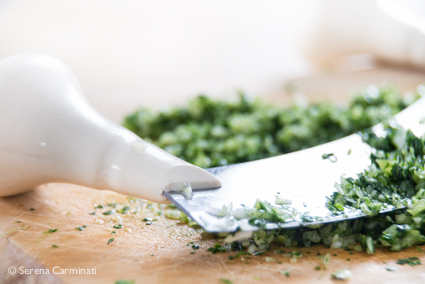
Fry the chopped ingredients in a large pan with plenty of olive oil.

DSC_0118

Add the gourds (cut into very thin slices). Cook, adding a little bit of water if necessary, until the grounds are tender.

DSC_0125

Season with salt and pepper. At this point, add the prawns with the white wine.

DSC_0131

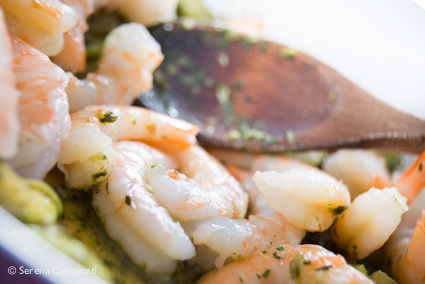
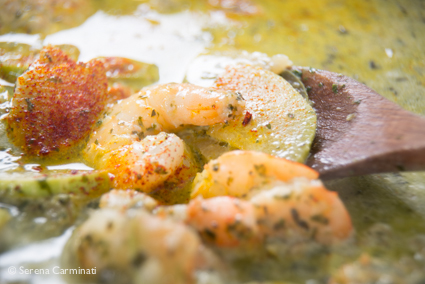
Meanwhile, in a large pan boil the pasta with a little bit of sea salt. Now, add the cream and saffron to the prawns and cook over medium heat until most of the excess liquid evaporates (bearing in mind that the sauce has to be very creamy, almost liquid).

DSC_0135

Once ready, drain the pasta and toss it directly in the frying pan with the sauce.

DSC_0170

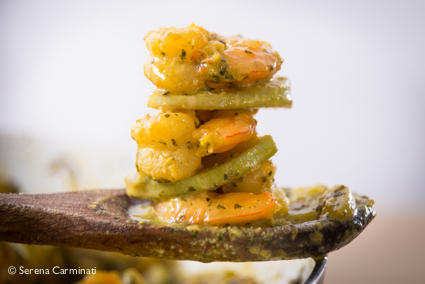
Spaghetti con gamberi e zucchine trombetta.

Ingredienti

per 4 persone

3 cipollotti di media grandezza

1 bustina di zafferano

1 spicchio d’aglio grande

un mazzetto di prezzemolo

un mazzetto di dragoncello

200 g di zucchine trombetta

200 g di code di gambero lavate e pulite

200 g di spaghetti

2 cucchiai di panna da cucina

2 bicchieri di vino bianco buono

3 cucchiai di olio extra vergine di oliva

sale e pepe q b

Tritate finemente i cipollotti con l’aglio e le erbe. Mettete a soffriggere gli ingredienti appena tritati in una padella grande con abbondante olio d’oliva. Nel frattempo, fate bollire l’acqua per la pasta con un po’ di sale grosso. Aggiungete al soffritto le zucchine trombetta tagliate a spicchi molto sottili. Fate rosolare bene, poi annaffiate con un po’ d’acqua. Aggiungete sale e pepe a piacere e continuate a cuocere finché le zucche saranno tenere. A questo punto,  aggiungete i gamberi e il vino bianco. A parte, buttate la pasta. Unite la panna e lo zafferano ai gamberi, facendo evaporare a fuoco medio il liquido in eccesso, tenendo presente che il condimento dovrà rimanere molto cremoso, quasi liquido.

Una volta pronto il condimento, scolate la pasta e conditela direttamente in padella.

Pinzimonio (vegetable crudites) with yogurt and mustard sauce.

This week we are going to prepare a lovely platter of Italian-style vegetable crudites (Pinzimonio) with a nice creamy sauce. Light and healthy, this colorful platter consists of a mixture of crunchy vegetables, usually cut into sticks and served with a dressing on the side. For this recipe I prepared a slightly chilled dipping sauce, made with yogurt and mustard.

 Ingredients

4-6 servings

1 large tomato

3 medium carrots

1 yellow pepper

1 red pepper

1/2 fennel

1 bunch of red radicchio leaves

1 bunch of radishes

3 stalks of celery

 for the sauce

1 low-fat greek yogurt ( 170 g, 5.99 oz, unsweetened)

1 tablespoon of apple cider vinegar

1 tablespoon of extra virgin olive oil

2 tablespoons strong mustard

a pinch of honey

salt and paprika to taste

Method.

1. Wash and prepare all the vegetable, then cut them into sticks ( except the radicchio leaves and radishes). Put all the vegetable to soak in cold water for a few minutes and drain.

DSC_9482

2. Separately, prepare a sauce combining the yogurt with mustard and the honey.

DSC_9412

3. Add vinegar, olive oil, salt and paprika to the mixture.

DSC_9420

DSC_9422

4. Put the sauce to cool in the refrigerator for about 30 minutes.

DSC_9467

5. Serve the vegetables on a large dish (or two) with the sauce in the centre.

DSC_9495

Pinzimonio di verdure con salsa di yogurt e senape.

1 pomodoro grande

3 carote medie

1 peperone giallo

1 peperone rosso

1/2 finocchio

1 mazzetto di radicchio rosso

1 mazzetto di ravanelli

3 coste di sedano

 per la salsa

1 yogurt greco magro (170 g, non zuccherato)

1 cucchiai di aceto di mele

1 cucchiaio di olio extravergine di oliva

2 cucchiai di senape

pochissimo miele

sale e paprica q b

Preparazione.

1. Lavate, mondate e tagliate le verdure a bastoncino, tranne il radicchio e i ravanelli. Immergete le verdure in acqua molto fredda per qualche minuto.

2. A parte, preparate una salsa unendo lo yogurt alla senape e al miele.

3. Aggiungete l’olio, l’aceto di mele, il sale e la paprica.

4. Mettete la salsa a raffreddare in frigorifero per 30 minuti. 

5. Servite le verdure in un piatto grande da portata (o due) , con la salsa al centro.

Neither a salad or a pizza: Insalapizza! (no cheese)

As refreshing as a summer salad and as tasty as a pizza! This is why I decided to call this dish insalapizza (salad-pizza). I often end up with no mozzarella cheese in my fridge, and this usually happens when I feel like having a pizza!…So one evening I came up with this nice and simple recipe. Since then I have had several occasions to try out and improve this dish. I hope you like it!

Pizza-salad recipe.

Ingredients

for 1 pizza

For the pizza dough

35 g (1.23 oz) wholemeal flour (whole wheat flour)

35 g (1.23 oz) whole spelt flour

20 g  (0.70 oz) Manitoba flour

45 g (1.58 oz) plain flour sourdough (or you can use 5 g of yeast. In this case, you have to add 45 g of plain flour and more water to make the dough. the rising time will also vary)

1 or 2 tablespoons mixed grains (hulled oats, hulled barley, hulled spelt, wheat, rye, brown rice)

1/2  tablespoon flax seeds (linseeds), optional

1/2  teaspoon salt

a little bit of barley malt syrup (to increase leavening strenght, optional)

Pizza toppings and seasoning

1 big onion

3 plum tomatos

water as needed

some rocket (arugula) leaves, washed and dried

salt and pepper

extra virgin olive oil (2 tablespoons to grease the oven tray and 2 more to pour on the pizza toppings)

Method
1. Wash the seeds and soak them in water for 6-8 hours.
2. Mix the sourdough with the flours, some water and malt (or honey). Add the seeds and half a teaspoon of salt to the dough. Mix well and increase the amount of flour if necessary (the dough shouldn’t stick to your hands).
DSC_9284
3. Let the dough rise until it has doubled in volume (3-6 hours, if you use sourdough).
If you use normal yeast (not sourdough) you have to increase the amount of flour and water ( in this case, add 45 g of plain flour) to the dough. Dissolve the yeast in a little bit of water with 1 tablespoon of flour. Then add the yeast to the mixture and let it rise for about an hour.
4. When the dough is ready, roll out the pizza base in a round baking tray (20-30 cm in diameter), greased with plenty of olive oil. Let the pizza base rise for another hour. Meanwhile, clean and cut the onion very finely and leave it to soak for an hour in water.
5. Wash, dry and cut the tomatoes into small cubes. Top your pizza base with the onion and the tomatoes. Season your pizza with plenty of extra virgin olive oil and bake at 200 ° C (392° F) for 30 minutes (until crispy).
DSC_9299
DSC_9314
Remove from the oven, season with salt and pepper, and garnish with a few rocket leaves.
DSC_9315
A few tips.
To shorten the preparation time, I usually make a lot of dough, I divide it into small quantities and store it in the freezer. In this way the dough is ready when I need it. Leave the seeds to soak at night, this also save some time.
Insalapizza.
Ingredienti per la base della pizza ai cereali.
Per 1 pizza

35 g di farina integrale

35 g di farina integrale di farro

20 g di manitoba

45 g di lievito madre (potete sostituire il lievito madre aggiungendo 45 g di farina 00 all’impasto con un po’ d’acqua e 5 g di lievito di birra da diluire con poca acqua e farina)

1 o 2 cucchiai di cereali misti (avena decorticata, orzo decorticato, farro decorticato, frumento, segale, riso integrale)

1/2 cucchiaio di semi di lino (facoltativo)

1/2 cucchiaino di sale

pochissimo malto d’orzo (per fare lievitare meglio l’impasto,  ma è facoltativo)

un po’ di farina in più da aggiungere a fine impasto

acqua q b

Ingredienti per il condimento

3 pomodori perini maturi

1 cipolla dolce grande

un mazzetto di rucola, lavata e pulita

sale e pepe q b

Olio d’oliva abbondante (2 cucchiai per ungere la teglia e 2 in più per condire la pizza in superficie )

Preparazione.

1. Lavate e lasciate i semi a bagno in acqua per 6-8 ore. Nel frattempo, unite le farine e il malto al lievito madre, aggiungendo un po’ d’acqua, se necessario. Lavorate bene l’impasto.  Aggiungete i semi, con mezzo cucchiaino di sale e aumentate la quantità di farina nel caso il composto risultasse troppo umido.

2. Fate lievitare fino a quando l’impasto sarà raddoppiato di volume (3-6 ore). Se usate il lievito di birra dovete aggiungere 45 g di farina 00 all’impasto, poi diluire il lievito di birra in un po’ d’acqua e impastare tutto. In questo caso, dovete lasciare lievitare per un’ ora circa.

3. Quando l’impasto sarà lievitato, stendetelo su una teglia rotonda (25-30 cm di diametro), ungendo la base con abbondante alio d’oliva. Lasciate lievitare per 1 oretta. Nel frattempo, tagliate la cipolla e lasciatela immersa in acqua per almeno 1 ora (per renderla più dolce). Lavate, asciugate e tagliate i pomodori a cubetti.

4. Disponete la cipolla e i pomodori sulla pizza e condite con abbondante olio d’oliva .Cuocete a 200 ° C per 30 minuti. Sfornate, condite con sale e pepe, aggiungendo qualche foglia di rucola per guarnire.

Consigli per la preparazione.
Per accorciare i tempi, generalmente preparo in anticipo una grossa quantità di pasta, la divido nelle giuste dosi e la scongelo in caso di bisogno. Questo procedimento facilità notevolmente le cose e funziona alla grande! Consiglio anche di lasciare i semi immersi nell’acqua tutta la notte, saranno più morbidi e i tempi di preparazione saranno più facili da gestire.

Delicious Plum Ice Cream With A Hint Of Cinnamon

In my parents’ garden there is a beautiful wild plum tree that every year gives us lots of fruit. These plums, however, are small, mushy and not very sweet. They not very good to eat but great for preparing jams, sauces and desserts. This week I’m going to prepare a really nice and delicate plum ice cream, enriched with a hint of cinnamon, a real treat!

DSC_9196

Yellow plum ice cream with a hint of cinnamon.

Ingredients

Serves 4

500 g yellow plums, halved, pitted

1 tablespoon of cornstarch

the juice of 1/2 a lemon

150 g brown sugar

200 ml water

1 greek yogurt (170 g)

1 tablespoon honey

cinnamon to taste (optional)

Method.

1. Peel the plums carefully (the plums I’m using have a very thin skin, therefore I’m not going to peel them for this recipe).

DSC_9176

2. Meanwhile, boil the water with sugar and let cool.

DSC_9179

3. Puree the fruit in a food processor until smooth, then add the lemon juice, honey, corn starch, and finally the yogurt with cinnamon to the mixture.

DSC_9181

4. Add the sugar syrup to the rest of the ingredients and mix well.

DSC_9192

5. Place the mixture in the ice cream maker and follow the manufacturer’s instructions.

DSC_9195

6. Store in freezer. Top with some fresh mint and serve.

DSC_9214
Gelato di prugne gialle alla cannella.
Ingredienti
Per 4 persone
500 g di prugne gialle
1 cucchiaio abbondante di amido di mais
il succo di 1/2 limone
150 g di zucchero di canna
200 ml di acqua
1 yogurt greco (175 g)
1 cucchiaio di miele
cannella q b (facoltativo)
Preparazione.

1. Lavate e asciugate le prugne, quindi togliete la buccia e il nocciolo (qui io uso delle prugne con la buccia sottilissima e non la tolgo).

2. A parte, fate bollire l’acqua con lo zucchero e lasciate raffreddare.

3. Frullate la frutta fino ad ottenere una crema, poi aggiungete il limone, il miele, l’amido di mais e lo yogurt con le cannella.

4. Aggiungete anche lo sciroppo e mescolate bene.

5. Mettete il composto nella gelatiera e seguite le istruzioni.

6. Una volta fatto, potete conservare il gelato nel congelatore o servirlo direttamente nelle coppette con due foglie di menta.

Cake Design Tutorial: Silk Clutch Bag (advanced).

Some time ago I helped a friend make a cake design tutorial. Although it’s definitely not a simple one, actually quite complicated, we decided to put it online anyway. Laura made a very sleek silk clutch bag cake design and it took several pictures and steps to be able to partially explain the process. We did our best, we hope you enjoy it. Feel free to comment on this post.

If you wish to see more of Laura Barcellonio’s cake design visit her facebook page : https://www.facebook.com/pages/Cake-Deluxe/265825503502411?fref=ts

Follow us on facebook : https://www.facebook.com/Foodfulife

Silk Clutch Bag Cake

Designed by Laura Barcellonio

dsc_5137

The material used:
A chopping board and a wide, pointed knife (small size)
A pizza or pastry cutting wheel (with a straight blade)
A metal working board to use as a cut mat and a cutting knife (a scalpel)
paper, pencil and scissors
Basic kitchen tools, a silicone spatula and a food brush
Few toothpick and straws
A base for cakes (a thick cardboard coated ) and a white ribbon

For the cake:

1 kg white sugar paste for the cake, plus 500 g for the base

ivory and black food colouring, (and edible pearl food dust optional)

vanilla buttercream

A sponge or a madeira cake ( quite thick)

A few raw pieces of spaghetti

Coloring the sugar paste:

Take 1 kg of white sugar paste. Using a toothpick, start mixing some ivory food colouring with a small amount of white sugar paste. Increase the amount of white sugar paste until you get the desired colour. Take a small piece of ivory paste and add the black color (just a little) , to create a uniform grey paste.

DSC_5145

Preparation of the pieces to dry:

With the ivory paste shape and cut the handle of the bag. Make 6 grey pearls (1 cm in diameter each) and insert them, three at a time, into two small pieces of spaghetti.

 Untitled-2.4

Then shape two grey drops, just a little bit bigger than the pearls. Let all the pieces dry for about an hour.

 DSC_5172

Cake shaping technique.

Using tracing paper, draw and cut the outlines of your clutch bag. Draw the base of the bag (22 x 12 cm, considering the widest points) , and the side ( 22 x 18 cm, considering the maximum width and height),then cut out your sketches. Take the sponge cake, mark the base and cut out two equal pieces in order to overlap them.

Untitled 1

You can use part of the buttercream to make the filling. Following the outline of your drawings, cut the cake until you obtain the desired shape.

Coat crumb with plenty of butter cream and put the cake to cool in the refrigerator for 15 minutes.

Roll out some ivory paste with a rolling pin, until you have a thin sheet, then cut out a rectangular shape and place it gently over the cake.

Untitled 2.1

Cut a trapeze out of the sugar paste sheet and use the straws to calculate 9 folds. Now shape the folds with your fingers and cut out any excess paste. Brush one side of the cake with water and cover it with the sugar paste layer. Repeat this procedure to cover both sides.

Untitled-2.2

DSC_5251

Cut another two smaller trapezoids and calculate 6 folds for each piece. Shape the folds, brush the surface, and apply the trapezoids to the small sides.

Untitled-3

For the handle:

Roll out the grey sugar paste, shape a small thick sheet and cut out two narrow strips, equal in size. Moisten the part on top of the cake with water, then place and mould the strips.

Take the two pieces of spaghetti with the pearls, pierce the grey stripes and place the handle on top of the cake. Using two pieces of spaghetti place the two drops in the center (see the final picture).

Untitled-4

For roses:

Roll out a thin sheet of ivory sugar paste ( 25 cm x 10 cm). Fold the sheet in half and roll it up to shape a rose. Remove any excess paste. Pierce the back of the rose with a small piece of spaghetti and place the rose on the cake.

Untitled-5

For the base:

Roll out a large chunk of ivory paste and cover the entire base of the cake. Roll out some thin stripes of white sugar paste, then fold them to create a fabric-like effect on the base of the cake.

Use a white ribbon to cover the edges. Place the cake on top of the base and brush the surface of the clutch bag with a pearl food colour powder,  diluted in a little bit of alcohol (this step is optional).

Untitled-2.3

Cake Design Tutorial: Pochette di seta

Qualche tempo fa ho aiutato un’ amica a fare un tutorial di cake design. Laura ha fatto una meravigliosa torta a forma di una pochette di seta, un elegantissimo esempio di cake design che richiede un po’ di impegno nella preparazione. Speriamo che vi piaccia.

Se volete vedere di più di cake design di Laura Barcellonio visitare la sua pagina facebook: https://www.facebook.com/pages/Cake-Deluxe/265825503502411?fref=ts

Seguiteci su Facebook:https://www.facebook.com/Foodfulife

Designed by Laura Barcellonio

dsc_5137

Il materiale:
Un tagliere grande e un piccolo coltello largo e stretto
Una rotella taglia pasta
Un piano di lavoro su cui tagliare e un cutter
delle cannucce e qualche stecchino
carta, matita e forbici
Attrezzi base da cucina, una spatola in silicone e un pennello per alimenti
una base per torte spessa di cartone rivestito e un nastro bianco
Per la torta:
1 kg di pasta di zucchero bianca per la torta, più altri 500 g per la base
2 coloranti alimentari concentrati tinta avorio e nero  (il perlato in polvere é facoltativo)
Crema al burro 
Torta di pan di spagna o plumcake allo yogurt
Zucchero a velo q b
alcuni spaghetti (pasta) per le applicazioni


Preparazione della pasta di zucchero:

Prendete 1 kg di pasta di zucchero bianca. Infilate la punta di uno stuzzicadenti nel colore alimentare avorio (ivory) e colorate una piccola quantità di pasta di zucchero. Aggiungete della pasta di zucchero bianca fino ad ottenere il colore desiderato. Fate lo stesso procedimento usando la pasta avorio e pochissimo colorante alimentare nero per creare una pasta grigia.

DSC_5145

Preparazione dei pezzi da far asciugare:

Con la pasta avorio modellate il manico (1 cm di diametro) e tagliate le estremità. Preparate 6 palline grigie uguali (1 cm circa di diametro) e infilzatele, tre a tre, con due pezzi di spaghetti.

Untitled-2.4

Preparate anche due gocce poco più grosse delle palline.

 DSC_5172

Fate asciugare per un’oretta.

Tagliamo la torta.

Disegnate e tagliate le sagome della pochette. La sagoma dell’ellisse della base ha come massime dimensioni 22 x 12 cm, mentre quella della proiezione del lato misura 22 x 18 cm. Segnate la base della torta con la sagoma di carta e tagliate con il coltello due pezzi uguali da sovrapporre.

Untitled 1

Tagliate e farcite la torta a piacere (con una crema bianca o crema al burro) .  Scolpite la torta seguendo la forma delle sagome. 

Procedete ricoprendo abbondantemente la superficie con crema al burro (crumb coating). Mettete la torta a raffreddare in frigorifero per 15 minuti. 

Stendete con il matterello un pezzo di pasta di zucchero (avorio) , tagliate un rettangolo sottile e stendetelo delicatamente sopra la torta.

Untitled 2.1

Tagliate un rettangolo di sfoglia e calcolate 9 pieghe usando le cannucce. Tagliate e modellate la pasta con le dita. Inumidite la parte su cui applicherete la sfoglia usando un pennello per alimenti. Stendete la pasta delicatamente sulla torta, infilando il materiale in eccesso sotto la base. Ripetete l’operazione fino a coprire entrambi i lati. 

Untitled-2.2

DSC_5251

Tagliate altri due trapezi piccoli dalla sfoglia e procedete misurando 6 pieghe a trapezio con le cannucce. Modellate, tagliate la pasta e infine applicate ai due lati scoperti della torta.

Untitled-3

Per il manico:

Stendete la pasta grigia fino ad ottenere una sfoglia spessa e tagliate due strisce strette, di uguali dimensioni. Inumidite la parte in cima alla torta e appoggiate le strisce sopra la parte inumidita, modellandole con le mani. 

Prendete le palline, infilzate le strisce grigie con gli spaghetti e posizionatevi sopra il manico. Aggiungete le due gocce nel centro usando due pezzi di spaghetti (vedi foto finale).

Untitled-4

Per le rose:

Stendete con il matterello una sfoglia di pasta di zucchero molto sottile. Formate una striscia (25 cm x 10 cm circa), piegatela in due e arrotolatela delicatamente, per formare una rosa.  Strozzate alla base il fiore con le dita e togliete la pasta in eccesso. Infilzate la rosa con uno spaghetto e applicate il fiore sulla torta.

Untitled-5

Per la base:

Stendete una grossa quantità di pasta di zucchero (color avorio), e usatela per coprire interamente la base di cartone della torta. Stendete qualche piccolo rettangolo di pasta di zucchero bianca e riponete le sfoglie sulla base, arricciandole per creare l’effetto della stoffa.

Applicate un nastrino intorno alla base e appoggiate la torta al centro della composizione. Per finire, spennellate la vostra pochette con un colorante alimentare perlato in polvere diluito in alcool (passaggio facoltativo).

Untitled-2.3

Mini Strawberry Pavlovas With Brown Sugar Meringues

Pavlovas are special desserts indeed! This recipe might seems quite complicated but, it’s actually very simple to make. You can prepare the meringues a few days earlier, or even buy ready-made ones​​, however, I recommend you use only fresh organic eggs and raw brown sugar to make them. Brown sugar meringues have a rich and fragrant flavour, which blends perfectly with the ingredients of  this delicious dessert.

DSC_8768

Mini strawberry pavlovas with brown sugar meringues.

ingredients

For 2 mini pavlovas (2 – 4 servings)

For the meringues

40 g (1.41 oz) egg white (1 egg white, large size)

80 g (2.82 oz) brown sugar

1 tablespoon of lemon juice

For the filling

1 small basket of strawberries (250 g, 8,81 oz)

250 ml (8.45 fl. oz) whipping cream

a pinch of cinnamon or cocoa powder, to taste

2 tablespoon ( not completely full) of honey, it must be liquid (1 spoon to add while whipping the cream and 1 spoon to use at the end of the recipe)

50 g (1.76 oz) toasted flaked almonds (optional)

a few mint leaves to garnish (optional)

Method.

1. Whip the egg white with lemon juice, adding sugar gradually towards the end of the whipping process.

DSC_8699

DSC_8702

DSC_8710

2. Spread the raw meringue on an oven tray, previously lined with baking paper. Shape 2 flat and wide meringues (about 10 cm) with a spoon (in the photographs I’m making 4). Bake at 120 ° C (240 ° F) for 2 hours and 20 minutes. Turn off the oven and let the meringues cool.

DSC_8714

DSC_8720

4. Separately, whip the cream, adding 1 tablespoon (not full) of honey, when it’s almost done.

DSC_8736

5. Wash, dry and cut the strawberries into slices. Pour the cream on the meringues and garnish with the fruit on top. Add a pinch of cinnamon (or cocoa powder) and finish garnishing with the almonds, some honey (1/2 spoon per meringues) and a few fresh mint leaves. Refrigerate until serving.

DSC_8763

Mini pavlova di fragole con meringhe di zucchero di canna.

Ingredienti

per le meringhe

Per 2-4 persone

40 g  di albumi

80 g di zucchero grezzo di canna

un cucchiaio di succo di limone

Per la farcitura

1 cestello piccolo di fragole (250 g)

250 ml di panna fresca da montare

un pizzico di cannella o di cacao ( a piacere)

2 cucchiai di miele, liquido (1 per addolcire la panna e 1 da aggiungere alla fine della preparazione)

50 g di mandorle a fette (facoltativo)

qualche foglia di menta per guarnire (facoltativo)

Preparazione.

1. Montate a neve l’albume con il succo di limone, aggiungendo lo zucchero gradualmente ( meglio unire la maggior parte dello zucchero quando l’albume sarà praticamente montato).

2. Usando un cucchiaio, stendete la meringa cruda su una teglia (ricoperta da un foglio di carta da forno) e formate 2 meringhe piatte e larghe (circa 10 cm). Infornate a 120° C per 2 ore e 20 minuti. Spegnete il forno e fate raffreddare.

3. A parte, montate a neve la panna, aggiungendo 1 cucchiaio di miele.

4. Lavate, asciugate e tagliate le fragole a spicchi.

5. Versate la panna sulle meringhe e guarnite con la frutta. Aggiungete un pizzico di cannella (o cacao) e poi guarnite con le mandorle, 1 cucchiaio di miele (1/2 per meringa) e qualche foglia di menta.

Chickpea hummus with multigrain pita bread (sourdough bread recipe).

Hummus is a delicious chickpea spread, easy to make and suitable for every occasion. Served with this special multigrain bread it becomes a real treat! This dish is rich in vegetable protein, fiber and omega 3, found in flaxseed. It is a great balanced meal when served with salad or fresh vegetables, while served with bread it is a wonderful starter.

Mutigrain pita bread.

For 4 flat breads.

ingredients

70 g (2.46 oz) wholemeal flour (whole wheat flour)

70 g (2.46 oz) wholemeal spelt flour

40 g (1.41) Manitoba flour

90 g (3.17 oz) sourdough

3 tablespoons 6 mixed grains (hulled oats, hulled barley, hulled spelt, wheat, rye, brown rice)

1 tablespoon flax seeds (linseeds)

1 tablespoon extra virgin olive oil

1 tea spoon of salt

1/2 teaspoon honey or barley malt (unsweetened) syrup (it helps the dough to rise and gives a nice crust to the bread, optional)

water as needed

For the hummus.

Ingredients

1 can chickpeas (240 g, 8.46 oz, drained chickpeas)

1 clove garlic

the juice 1/2 a lemon

1 teaspoon sesame seeds finely chopped

a few crystal of sea salt

4 tablespoons extra virgin olive oil

1/2 cup water

paprika to taste

Method (Multi Grain Pita Bread).

1. Wash the seeds in a bowl, changing the water several times, until it’s completely clear.

Step 1. Wash the seeds until the water is clear.

2. Leave the seeds to soak for 6-8 hours.

Step 2. Leave to soak for 6-8 hours.

3. Mix the flour with the sourdough, adding some water and a little bit of malt (or honey). Sprinkle the seeds on top of the mixture, add a teaspoon of salt and knead everything well (adding flour or water if necessary, as the dough should be neither too sticky nor too hard and dry).

Step 3. Mix the flour, the sourdough,the seeds,some malt and water.

4. Let it rise for 3 to 6 hours. When the dough has doubled in volume, divide it into 4 pieces and shape them into flat breads, using a rolling pin, if necessary.

5. Lay your breads on a baking sheet lightly oiled and bake at 200 ° C (392° F) for 15 minutes.

Step 4 and 5. Let rise, then shape the breads and bake them.

Chickpea hummus with multigrain pita bread (front shot pita bread)

Method (Chickpea Hummus).

1. Wash and drain the chickpeas (you can boil them for a few minutes to be safe).

Chickpea Hummus. Step 1. Wash and dry the chickpeas

2. Using a food processor, process the chickpeas until very finely chopped with the garlic, sesame seeds and salt (for better a result, I use mortar and pestle to break the sesame seeds with just a few sea salt crystals, before putting them in the food processor)

Chickpea Hummus. Step 2. Process the chickpeas with the garlic, the sesame seeds and salt.

3. Continue to process adding the lemon juice, water, and gradually the olive oil, until you have a nice creamy sauce.

Chickpea Hummus. Step 3. Add lemon juice, water and olive oil and process until creamy.

4. Put the hummus in a small bowl, top with some paprika and serve with the multigrain bread.

Step 4. Serve the hummus in a small bowl with the multigrain pita bread.

Hummus di ceci con pane arabo ai cereali e semi di lino.

Per 4 panini piatti (tipo pita) ai cereali.

Ingredienti

70 g di farina integrale

70 g di farina integrale di farro

40 g di manitoba

90 g di lievito madre

3 cucchiaio di 6 cereali misti ( avena decorticata, orzo decorticato, farro decorticato, frumento, segale,riso integrale)

1 cucchiaio di semi di lino

1 cucchiaio di olio extravergine di oliva

1 cucchiaino di sale

1/2 cucchiaino di miele o di malto (fa lievitare meglio l’impasto e aiuta il formarsi di una bella crosta, ma é facoltativo)

acqua q b

Per l’hummus di ceci

1 scatola di ceci (240 g di ceci scolati)

1 spicchio d’aglio

Il succo di 1/2 limone

! cucchiaino di semi di sesamo tritati

qualche cristallo di sale grosso

4 cucchiai di olio extravergine d’oliva

1/ 2 bicchiere d’acqua

una spolverata di paprika

Preparazione (pane pita ai cereali).

1. Mettete a bagno in una ciotola tutti i semi, cambiando l’acqua più volte, finché non sarà completamente limpida. Lasciate i semi immersi in acqua per 6 ore.

2. Unite le farine al lievito madre, aggiungendo un po’ d’acqua e un po’ di malto (o di miele). Unite i semi all’impasto, aggiungete un cucchiaino di sale e impastate bene.

3. Aggiungete farina o acqua se necessario,  l’impasto ottenuto non dovrebbe essere né troppo appiccicoso, né troppo duro e asciutto.

4. Fate lievitare dalle 3 alle 6 ore, fino a quando l’impasto sarà raddoppiato di volume.

5. Formate 4 pagnotte e stendetele su una teglia leggermente unta con olio d’oliva. Infornate a 200° C per 15 minuti.

Preparazione ( hummus di ceci).

1. Lavate e scolate i ceci (potete anche bollirli per qualche minuto, per sicurezza). Frullate i legumi molto finemente con l’aglio, i semi di sesamo e il sale (per un risultato migliore, uso prima un mortaio per sbriciolare i semi di sesamo con qualche cristallo di sale grosso e poi li metto con il resto degli ingredienti nel tritatutto).

2. Continuate a frullare e aggiungete il succo di mezzo limone,  l’acqua e in fine l’olio molto gradualmente, fino ad ottenere una crema.

3. Mettete l’hummus in una ciotola, aggiungete una spolverata di paprika e servite con il pane ancora cado.

Spelt Flour Apple Cake (no refined sugar, no butter)

A remaking of the classic! Today we are going to make a very special apple cake… This dessert is very easy to prepare, great for breakfast or as a snack, it contains no butter, milk or refined sugar and is absolutely delicious!!! For this recipe I used only organic ingredients.

Spelt flour apple cake (no refined sugar).

ingredients

400 g (14.1 oz) peeled golden apples

100g (3.5 oz) wholemeal spelt flour

1 egg

50 ml  (1.69 fl oz) almond milk

3 tablespoons barley malt

3 tablespoons honey

3 tablespoons sunflower oil

1 pinch of salt

1/2 teaspoon of baking powder

1 pinch of cinnamon (optional)

the zest of 1 organic lemon and the juice of 1/2

Method.

1. Cut the apples into thin slices, then add the juice and the zest of the lemon and mix well.

Step 1. Cut the apples, add the lemon juice and mix.

2. Separately, mix the egg with malt and honey, to obtain a creamy mixture. Add the flour with the baking powder and stir.

Step 2. Mix the egg with malt and honey, then add the flour and baking powder.

Step 2. Mix the egg with malt and honey, then add the flour and baking powder.

Step 2. Mix the egg with malt and honey, then add the flour and baking powder.

3. Add also the apples, 3 tablespoons of sunflower oil, a pinch of salt, 50 ml of almond milk and some grated cinnamon.

Step 3. Add the apple, the oil, a pinch of salt, cinnamon and the almond milk to the flour.

4. Mix well. Pour the mixture into a loaf tin (I use a 25 cm long x10 cm wide tin, lined with baking paper) and bake at 180 ° C (356°F) for 25-35 minutes.

Step 4. Mix and bake at 180° C (356 °F ) for 25-35 minutes.

Step 4. Mix and bake at 180° C (356 °F ) for 25-35 minutes.

If you like this recipe give us a like on our facebook page:  https://www.facebook.com/Foodfulife

Torta di mele con farina di farro, malto e miele.
Una rivisitazione della classica torta rustica alle mele. Un dolce facilissimo da preparare, ottimo a colazione o a merenda. Questa ricetta non contiene burro, latte o zucchero raffinato, ma è buonissima!!! Per la preparazione ho usato solo ingredienti biologici.
Ingredienti

400 g di mele golden

100 g di farina integrale di farro

1 uova

scorza di un limone biologico e il succo di 1/2 limone

50 ml di latte di mandorla

3 cucchiai di malto d’orzo

3 cucchiai di miele

3 cucchiai di olio di girasole

1 pizzico di sale

1/2 bustina di lievito chimico per dolci

1 pizzico di cannella (facoltativo)

Preparazione.

1. Tagliate le mele a fettine sottili, aggiungete il succo e la scorza di limone e mescolate bene.

2. A parte, amalgamate l’uovo con il malto e il miele, fino ad ottenere una crema. Aggiungete la farina e il lievito, continuando a mescolare.

3. Unite al composto le mele con il limone, l’olio, le cannella, un pizzico di sale e il latte di mandorla.

4. Versate il composto in una teglia, foderata con carta da forno (uso una teglia rettangolare di 25 cm di lunghezza x10 cm di larghezza) e infornate a 180° C per 25-35 minuti.

Buona torta a tutti!!

Some tips to keep your sourdough in good shape!

My sourdough is one year old! I keep it strong and healthy in a nice big jar in the fridge. I usually feed it once a week (or refresh it, as we say) , but the refreshment time varies depending on my needs. I’ve never had any problems with my natural yeast, however, at times, it’s possible that the yeast becomes sourer, or less responsive to leavening, therefore less active. These elements depend on many factors. There are some steps you can take to keep your sourdough in the best shape and correct any of problems. Of course, if you want a sour product, in order to let the bacteria produce acidity you have to do the opposite of what is indicated below.

To increase the leavening strength:

⁃ increase the temperature during leavening

⁃ decrease the ratio refreshments / flour

⁃ increase the ratio water / flour

⁃ increase humidity

In case of over-acidity:

⁃ change the type of flour (change microflora)

⁃ decrease the rising time

⁃ decrease ratio refreshments / flour

⁃ decrease the amount of water with the flour (to make a harder dough)

⁃ lower the temperature of the dough

DSC_7787

Some of this information belongs to the teaching material of the Cereal Technology Course at Parma University (Italy), courtesy of Prof. Franco Antoniazzi.

Come mantenere il lievito madre al meglio.

Il mio lievito madre ha un anno di vita! Lo tengo in un vasetto di vetro nel frigorifero e lo rinfresco generalmente una volta a settimana, ma a volte anche più spesso se ne uso in grandi quantità. Non ho mai avuto grossi problemi, ma è possibile che il lievito naturale a volte diventi più acido, oppure sia meno reattivo alla lievitazione, questo dipende da molti fattori. Ci sono comunque degli accorgimenti che si possono adottare per mantenere il lievito madre al meglio e correggere eventuali anomalie.

Interventi sui rinfreschi del lievito naturale.

Per aumentare la forza lievitante:

  • aumentare la temperatura di lievitazione
  • diminuire il rapporto rinfreschi/farina
  • aumentare il rapporto acqua/farina
  • aumentare l’umidità

Interventi in caso di acidità eccessiva:

  • cambiare tipo di farina (microflora diversa)
  • diminuire i tempi di lievitazione
  • diminuire i rapporti rinfreschi/farina
  • diminuire la quantità di acqua rispetto alla farina (impasto più duro)
  • abbassare le temperature degli impasti

Alcune delle informazioni riportate in questo articolo, fanno parte del materiale didattico del corso di Tecnologia dei Cereali dell’Univeristà di Parma, per gentile concessione del Prof. Franco Antoniazzi.